AMS Net ID and IP address
How to change AMS Net Id
Introduction
Difference between ADS and AMS:
ADS (Automation Device Specification) is the TwinCAT communication protocol that specifies the interaction between two ADS devices. For example, it defines what operations can be executed on another ADS device, what parameters are necessary for that and what return value is sent after execution.
AMS (Automation Message Specification) specifies the exchange of the ADS data. A major component of the communication protocol is the AmsNetId. This is specified in the AMS/ADS package for the source and target device. An ADS device can be explicitly addressed using the AmsNetId.
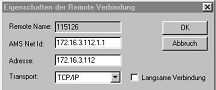
A route between two devices must be setup in TwinCAT so that they can communicate. This route is configured on both sides and typically contains the route name, the AmsNetId and the address of the communication partner as well as the type of connection. The configuration of new routes and an overview of existing routes in a TwinCAT system are shown in the following figure.
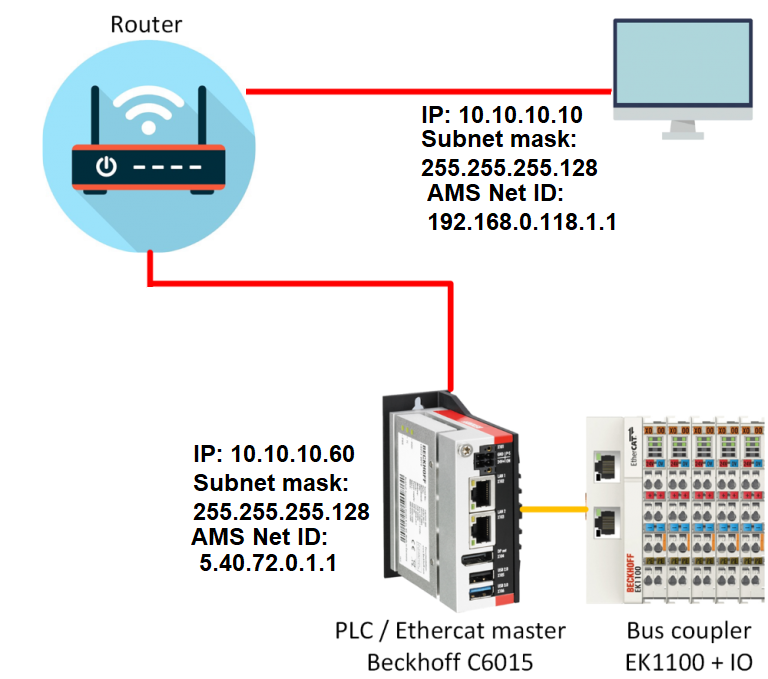
Figure 1: Typical connection between PLC and the engineering PC

Figure 2: A PC can have many ADS routes to many devices
How to change IP address of PLC
If the PLC is near you and you are directly connected to the PLC then easy. If you are connected to the network and if you have made mistake then somebody should fix it locally. So be extremely careful, what are you doing.
=>Control panel | Network and Sharing Center | Change adapter setting | Select a network port (which one you want to make the remote connection)
=>Right click | properties | Internet Protocol Version 4 | properties and you get the following page and you fill it.
Note: we have set the IP address 10.1.50.50 and if you are in the same network then you can ping the PLC from a command prompt of your computer. If the PING does not work you can check the firewall. Disable the firewall or expose the port for ping.
You should be able to connect the PLC over a remote desktop.
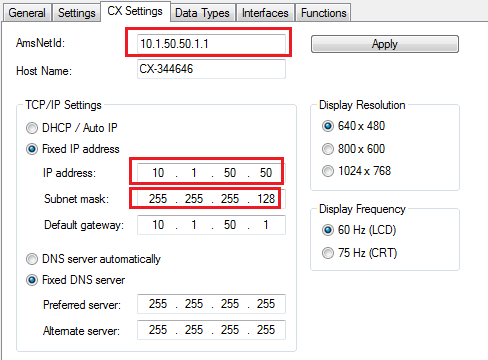
Figure 4: PLC’s static IP address setting
How to set the AMS net ID CX device:
The best option would be to use the IP address +”.1.1″, for example if we have an IP address 10.1.50.50 then we can make the IP address as “10.1.50.50.1.1”, if we remember the IP address then easily we can remember the AMS net id.
=>First we set the IP address of the device
Control Panel | Network and Sharing Center | Change Adapter settings
=>Follow the picture below
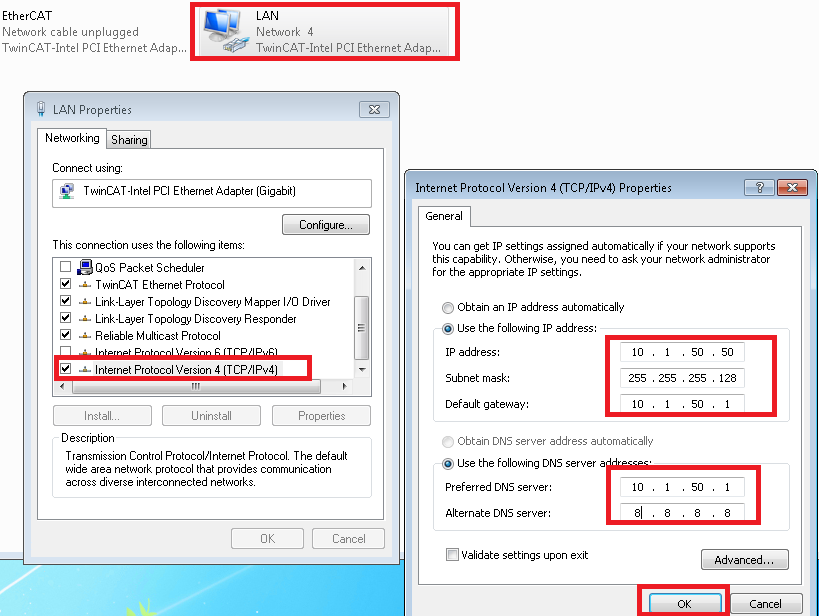
Figure 6: Static IP address setting of a PLC in control panel
=>Now we have the IP address set to the CX device and we set AMS net id to the device.
=>Right click on the TwinCAT icon at the right bottom corner of the CX PLC desktop
=> If you don’t set the AMS Net id, plc will have a default calculated one which is hard to remember, so one way I prefer to set it with IP address. My AMS net id will be IP address + “.1.1”, in our case the AMS net id: 10.1.50.50.1.1
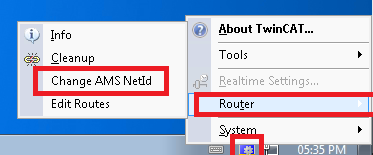
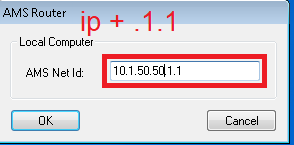
Figure 8: We can change AMS Net id to IP + .1.1
Now we should be able to communicate from a client over ADS by using the AMS Net id.
=>Sometimes the ADS from the client may not work and we might need to check if the route has been added to PLC, to check that check the Edit Routes and see if the client AMS id has been added in the table, if not you can add it by pressing on the Add button
The name and AdsNetID of the CE device are derived by default from the device’s unique MAC ID. You can find the MAC ID on the label on the CE device.
Name of the CE device:
By default, the name of the device is a combination of a prefix (e.g. CX for CX devices or CP for Control Panels) and the last three bytes of the device’s unique MAC ID.
Example:
The MAC ID 00-01-05-00-27-84 produces:
the device name CX-002784 (for CE devices such as CX1000 / CX1020 / CX9000 and so on)
the device name CP-002784 (for CE devices such as Ethernet Panel and so on)
AdsNetId of the CE device:
This AmsNetId consists by default of the last four digits of the CE device’s unique Mac ID with the extension 1.1., the Mac ID being converted from the hexadecimal system to the decimal system.
Example:
The MAC ID 00-01-05-00-27-84 produces the AmsNetID 5.0.39.132.1.1
You can select and assign your own settings differently.
The AMS Net ID is the address of the local computer in the TwinCAT network. The AMS Net ID consists of 6 bytes and is represented in a dot notation. The “Net IDs” must be assigned by the project planner and must not be repeated in the TwinCAT network. By default, the installation generates an AMS NetID from the IP address of the system (if available) + “1.1”. If no IP address can be determined during the installation, the AMS NetID “1.1.1.1.1.1” is created.
TwinCAT system generates AMS NetID which is difficult to remember. So we can build it by adding “.1.1” to the IP address.
For example, if the IP address is 10.1.50.50 then AMS net ID would be 10.1.50.50.1.1
We need to change the AMS net ID in the PLC side as well.
Click on the bottom right corner TwinCAT Icon | Router | Change AMS Net ID
A dialog will be visible, add the AMS net ID (IP address + .1.1)
How to find the PLC from visual studio
Scenario: ADS connection through a firewall
This example is used to describe how an ADS device (e.g. TwinCAT Engineering PC, third-party Scada systems etc…) can communicate with a TwinCAT Runtime through a firewall.
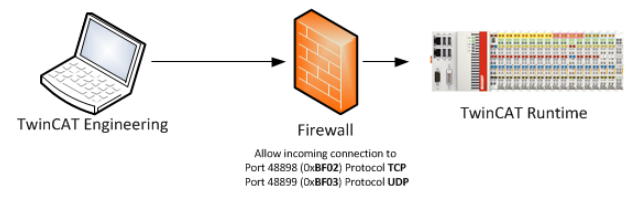
Figure 3: A PC and PLC are different network protected by firewall
You can shutdown the firewall or open the following ports.
Firewallrules/Portfilter settings
You have to configure following rules for incoming connections to your TwinCAT Runtime to establish the ADS communication:
Direction | Local Port | Remote Port | Protocol | Action | Usage |
Incoming | 48898 | * | TCP | Allow | Communication |
Incoming | 48899 | * | UDP | Allow | Broadcast search |
Incoming | 8016 | * | TCP | Allow | Secure ADS |
Scenario: ADS connection through a firewall
This example is used to describe how an ADS device (e.g. TwinCAT Engineering PC, third-party Scada systems etc…) can communicate with a TwinCAT Runtime through a firewall.
=> Fire your visual studio PLC project | System | Choose Target
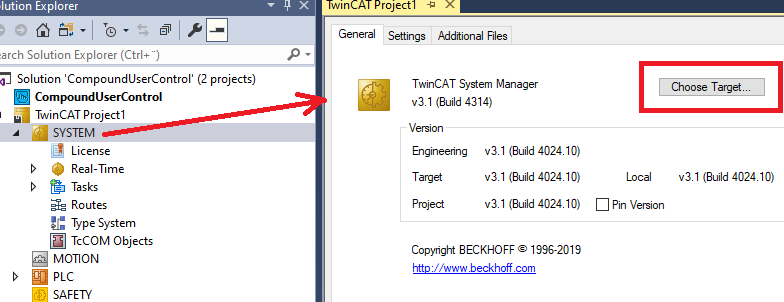
Figure 5: Target PLC selection from engineering PC
=> Follow the following screenshot
=> Mark the device found and click on Add Route.
=> If you do not wish to search for any further devices, click on Close to close the Add Route Dialog. The new device is displayed in the Choose Target System window.
=> Mark the device that you wish to set as the target system and click on OK.

Figure 7: Searching PLC by using IP address
=> Now the setup is complete, you can download your PLC program and run in the PLC.
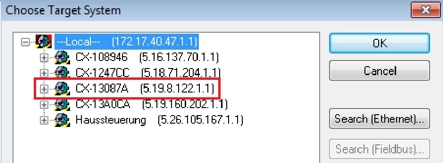
Figure 7: List of PLCs AMS net Ids
Download the sample from the link given above.
Next, let’s try to understand persistent data https://www.hemelix.com/plc/structured-text-how-to-add-route-for-plc/
Ask questions related to Hemelix sample code and design at Google group https://groups.google.com/g/hemelix