JavaScript, function and Code Behind
JavaScript is a scripting or programming language that allows us to implement complex features on web pages such as animated graphics, and scrolling videos. JavaScript is the Programming Language for the Web. It can update and change both HTML and CSS and can calculate, manipulate and validate data just like a conventional programming language but in the case of JavaScript code is executing in the browser environment. TwinCAT HMI has been developed using this technology.
If you want to know more about JS you could browse these pages (https://www.w3schools.com/whatis/whatis_js.asp).
We can manipulate any properties of control by JavaScript in the TwinCAT environment. JavaScript functionalities have arisen in TwinCAT HMI in two forms.
Code Behind
Code-behind consists of TypeScript/JavaScript code and is added to a project as a separate file. A Code-Behind file can be created based on TypeScript or JavaScript. Both have the same technical options and are very similar in terms of programming. Due to the better Visual Studio programming support offered by Visual Studio, TypeScript should be selected for new functions. A code-behind file can be used for JavaScript functionalities that are to apply globally to the entire project. Control events can be registered independently of the HMI side, based on the control ID. Therefore, a code-behind file is particularly suitable for mapping complex functionalities with JavaScript that cannot be performed using graphical engineering.
An introductory example of usages of code-behind file.
We have a very simple HMI only with two buttons. The first button has display text ‘First button’ and the second button has display text as ‘Second button, the second button has an identifier as ‘TcHmiButton_1’. These are shown in the following image. In this simple application, we shall change the text of the second button by using code-behind JavaScript code. As we can see, during the design phase, the text is the ‘Second button’.

Figure 01: Desktop view and configuring Button_1
=>Fire up visual studio and design a page as shown in the above image, mainly button one and button two.
=>Create a folder called CodeBehind as shown in the following image and add three CodeBehind files in the folder.
=> Select CodeBehind folder | right click | Add | New Item | CodeBehind (JavaScript), default name is CodeBehind1.js
Though we shall use only one file in this example, but we have added 3 just to show the ordering of files.
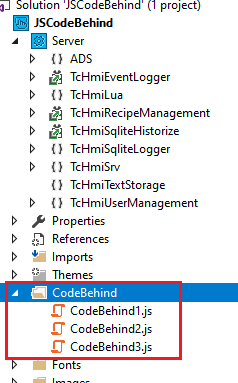
Figure 02: Application have many code behind files and those can be rearranged based on dependency
The framework will create the following code snippet, then we just need to add our expected functionalities there.
(function (TcHmi) {
    // If you want to unregister an event outside the event code you need to use the return value of the method register()
    var destroyOnInitialized = TcHmi.EventProvider.register('onInitialized', function (e, data) {
        // This event will be raised only once, so we can free resources.
        // It's best practice to use destroy function of the event object within the callback function to avoid conflicts.
        e.destroy();
        // ----------------------
        // Place your code here!
        // ----------------------
    });
})(TcHmi);
Now we shall add some code in the place where we have ‘Place your code here!’. The final one will be like this.
(function (TcHmi) {
    // If you want to unregister an event outside the event code you need to use the return value of the method register()
    var destroyOnInitialized = TcHmi.EventProvider.register('onInitialized', function (e, data) {
        // This event will be raised only once, so we can free resources.
        // It's best practice to use destroy function of the event object within the callback function to avoid conflicts.
        e.destroy();
        // ----------------------
        // Place your code here!
        // ----------------------
        var someControl = TcHmi.Controls.get('TcHmiButton_1');
        if(someControl !== undefined) {
            someControl.setText('Changed Code Behind');
        }
    });
    var destroyEvent = TcHmi.EventProvider.register(
        'TcHmiButton.onPressed',
        function (evt, data) {
            // Do stuff
            console.log(evt);
            if (data) {
                // some events have custom data
                console.log(data);
            }
            var someControl = TcHmi.Controls.get('TcHmiButton_1');
            if (someControl !== undefined) {
                someControl.setText('Again Changed');
            }
            // Destroy to free event resources if event is no longer needed.
            destroyEvent();
        }
    );
})(TcHmi);
When we have run the HMI and press on the First button, the second button text has been changed ‘Second Button’ to ‘Change in Code Behind’ to ‘Again Changed’, as shown in the following image.
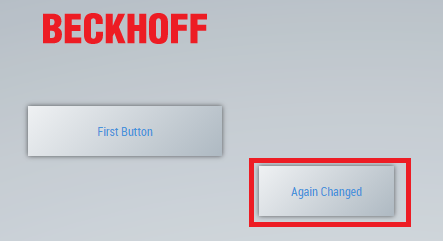
Figure 03: Part of final UI to show button text changes
Now we probably know what can be done by code-behind file in the TwinCAT environment.
Now we explain why we added three files. We can add functionalities in the code behind the file in any order but if we have a dependency of functionality that must be reordered.
We do the re-order by selecting Project | right-click | CodeBehind sort order and theme assignment | JavaScript Files Tab, we can use the up/down arrow to tell the framework which file to be executed first.
Java Script Functions
JavaScript plays a vital role in TwinCAT HMI development. You can make the HMI elegant and beautiful by using JavaScript by using properly.
A JavaScript function is a block of code designed to perform a particular task that is executed when “something” invokes it (calls it). The purpose of the JavaScript function is to define the code once and use it many times. A JavaScript function can call another function, see the example below. See the references and TIPs section at the bottom of this page.
function function_one() {
    function_two(); // considering the next alert, I figured you wanted to call function_two first
    alert("The function called 'function_one' has been called.");
}
function function_two() {
    alert("The function called 'function_two' has been called.");
}
function_one();
See more at this page https://www.hemelix.com/scada-hmi/twincat-hmi/twincat-hmi-async-function/
Create control by using JavaScript:
Normally we drag and drop the control from the toolbox in the engineering environment, we can do the same by using JavaScript code. The following function monitor the onAttached event for Desktop. When the event occurs then it creates a button based on the information supplied. It checks if the Desktop control is available and then adds the created control to the Desktop.
 TcHmi.EventProvider.register('Desktop.onAttached', function (e, data) {
    var myButton = TcHmi.ControlFactory.createEx(
        'tchmi-button',
        'MyButton',
        {
            'data-tchmi-top': 25,
            'data-tchmi-left': 250,
            'data-tchmi-width': 200,
            'data-tchmi-height': 50,
            'data-tchmi-text': 'MyButton',
            'data-tchmi-background-color': {
                'color': 'rgba(55, 55, 55, 1)'
            }
        }
    );
    var desktop = TcHmi.Controls.get('Desktop');
    if (desktop && myButton) {
        desktop.addChild(myButton);
    }
});
How to access the button created by the JS code:
console.log('some log');
var buttonID = TcHmi.Controls.get('MyButton') ;
buttonID.setText('Hello Success'); //Change the button text
Example using JavaScript code:
In this simple exercise, we shall change the image source by using JavaScript. if we insert a number in the text box then a source name is returned by JavaScript as shown in the code snippet. As you can see, we are returning an image file path to the caller based on the value of par1.
    var FunctionJS1 = function (par1) {
        switch (par1) {
            case 1:
                return 'Images/valve.svg';
                break;
            case 2:
                return 'Images/valve_hor_closed.svg';
                break;
            case 3:
                return 'Images/Beckhoff_Logo.svg';
                break;
            case 4:
                return 'Images/lock.svg';
                break;
            case 5:
                return 'Images/thermometer.svg';
                break;
            case 6:
                return 'Images/valve_ver_open.svg';
                break;
            default:
                return 'Images/MainDoor.svg';
        }
    };
How to start the example:
=>Either you can start a new TwinCAT HMI project or open the sample which we are providing as a sample code.
=>Insert a JavaScript function to the solution (normally we create a folder for functions)
=>Insert the above code in the function template provided by the environment (take care of matching parenthesis and brackets).
=> Note that we are passing par1 as a parameter that has a type INT (different than String)
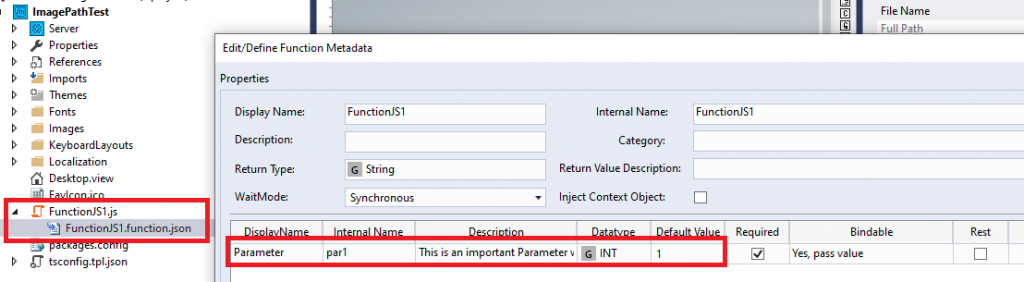
Figure 04: Adding/Editing parameters of JavaScript function
=>Insert two images boxes on the Desktop from toolboxes
=>Insert two text boxes on the Desktop from toolboxes.
=>Now we configure the image sources (we are showing only one image configuration other one is similar)
=>Select one of the images from the desktop then F4 (or the properties icon, range tool)
=>At the beginning, the Src field of the properties should be empty.
=>Click on the little square and select ‘Create function binding’, there will be fx to indicate the field for function.
=>Type the function name (FunctionJS1), there will be a suggestion to select the function, select it, you may have the different option based on the HMI Engineering version
=>We need to put the typed number as a parameter there (we can press on parameter if shown and select the Text field of the textbox) or we can directly copy-paste the following text FunctionJS1(%ctrl%TextID::Text%/ctrl%)
=>Infact, we should pass integer type to the function but JS has magic and it can converts that for us.
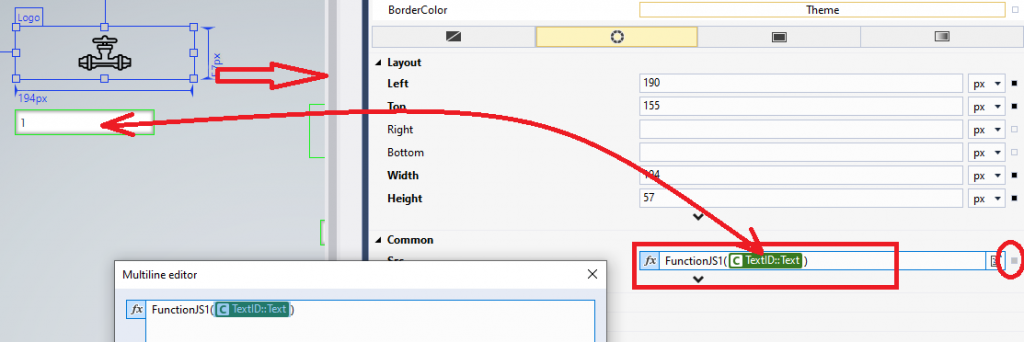
Figure 05: Passing Textbox content to JavaScript function
Now the configuration is complete and the app can be tested by the live view or running in Google chrome.
Type 1, 2, etc and see the image is being changed as shown in the JavaScript code. In the first pair, the image source has been retrieved by the following statement. FunctionJS1(%ctrl%TextID::Text%/ctrl%)
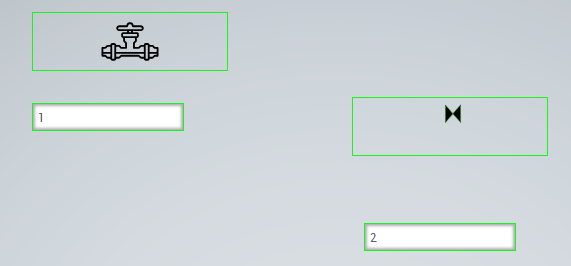
Figure 06: Number is passed to JavaScript function to select the a images for HMI
Download the sample (ImagePathTest_Hemelix.Zip), Example includes necessary images.
If we are confident with this example then we can continue with rest of the example and adapt to our project in hand either in school or in real project. If you think this is useful please share it in your network.
Image rotation, rotation angle generated by PLC
We shall describe the example with a video tutorial very soon. You can download the example and see how to use the rotation function in HMI. Click on the page to download it https://www.hemelix.com/rotationtest/
The green dot is the center of rotation. Beckhoff icon is rotating around the center of the image itself and on the other hand, the rectangle is rotating around a corner of the image. The angle is generated by PLC code (as current value 354 degrees). The Start button will start the rotation and the Stop button will stop.
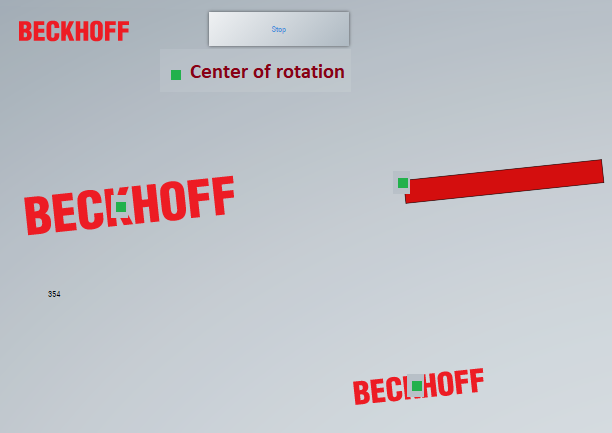
Figure 07: Center of rotation selection of objects
The Beckhoff image is rotated by the following DIV element directly added to the HTML editor
    <div id="TcHmiImage" data-tchmi-type="tchmi-image" data-tchmi-height="272" data-tchmi-height-unit="px" data-tchmi-left="10" data-tchmi-left-unit="px" data-tchmi-top="36" data-tchmi-top-unit="px" data-tchmi-width="364" data-tchmi-width-unit="px" data-tchmi-src="%pp%Icon%/pp%" data-tchmi-transform="%f%DegreesToRotationWithValveEnable(%pp%Value%/pp%)%/f%">
    </div>
The corresponding JavaScript function is as follows:
DegreesToRotationWithValveEnable JS function is called with a parameter (rotation angle, Degrees). The angle in this example is generated by the PLC code (by some INT type)
(function (TcHmi) {
    var DegreesToRotationWithValveEnable = function (Degrees) {
        return [{
            "transformType": "Rotate",
            "angle": Degrees,
            "angleUnit": "deg"
        }]
    };
    TcHmi.Functions.registerFunction('DegreesToRotationWithValveEnable', DegreesToRotationWithValveEnable);
})(TcHmi);
Now we explain how do we rotate the rectangle. A different transformation is used for this rectangle rotation. When the angle is changed we call a transformation as shown in the following image. This angle is generated by PLC code as well.
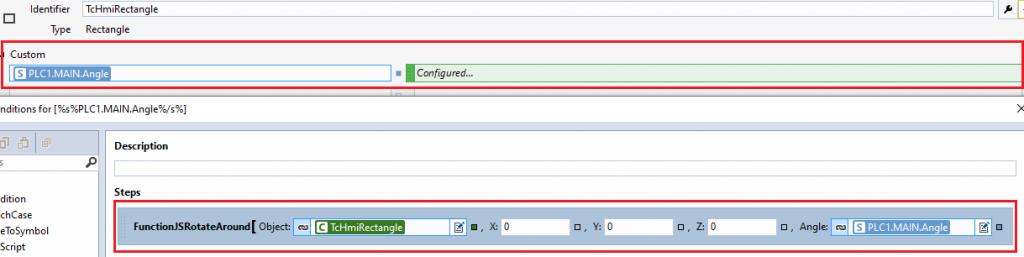
Figure 08: Custom event can be used to monitor PLC variable and a function can be called
The corresponding JavaScript function is shown in the following code.
(function (TcHmi) {
    var FunctionJSRotateAround = function (Object, X, Y, Z, Angle) {
        var t = [{
            "transformType": "Origin",
            "x": X,
            "xUnit": "px",
            "y": Y,
            "yUnit": "px",
            "z": Z,
            "zUnit": "px",
        }, {
            "transformType": "Rotate",
            "angle": Angle,
            "angleUnit": "deg"
        }
        ];
        Object.setTransform(t);
    };
    TcHmi.Functions.registerFunction('FunctionJSRotateAround', FunctionJSRotateAround);
})(TcHmi);
For second Beckhoff image we are using center of image (though hard coded) as shown in the following image.
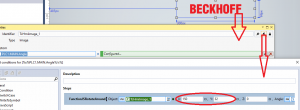
Figure 09: Function parameters can come from caller or can be put value as hard coded one
Feel free to download and try the example, if there is any issue please report to our google groups
Image rotation, rotation angle generated by JavaScript
We described the image in the previous section where the rotation angle was generated by the PLC code. The situation could be for example a device is rotating and we know it’s RPM and we can map it for the HMI.
But in other cases where we don’t know the RPM how do we animate the rotation? In this sample, we are going to solve it. In this sample, we know that the device is rotating by some Boolean variable. We can map the variable and create a custom notifier for that. When the variable is true then some images start to rotate and when it is false then it will stop to rotate. The following snippet shows the variable startRotation. If startRotation is true in the PLC then Beckhoff icon will rotate and if it is false then the rotation stops.
PROGRAM MAIN
VAR
startRotation :  BOOL:= FALSE; //ON image will rotate, OFF image will stop
myTimer : TON; // Timer for simulating the alarm as it is coming from devices
counter : DINT :=0;
END_VAR
You can download the example and see how to use the rotation function in HMI. Click on the page to download it https://www.hemelix.com/rotationtest2/
Select the startRotation in the custom event.

Figure 10: Function can be inserted from Functions folder in Actions and Conditions
The corresponding JavaScript function (FunctionJS_ControlManipulation) is as follows:
(function (TcHmi) {
    var FunctionJS_ControlManipulation = function () {
        var Angle = 0;
        var timer = 0;
        var timer_is_on = 0;
        var h;
        var someControl = TcHmi.Controls.get('ViewDesktopBeckhoffLogo');
        startCount();

        function timedCount() {
            Angle = Angle + 2;
            timer = setTimeout(timedCount, 10);
            if (Angle > 360) {
                Angle = 0;
            }

            TcHmi.Symbol.readEx2('%s%PLC1.MAIN.startRotation%/s%', function (data) {
                if (data.error === TcHmi.Errors.NONE) {
                    var value = data.value;
                    if (value == false) {
                        Angle = 0;
                        h = [{
                            "transformType": "Origin",
                            "x": 100,
                            "xUnit": "px",
                            "y": 25,
                            "yUnit": "px",
                            "z": 0,
                            "zUnit": "px",
                        }, {
                            "transformType": "Rotate",
                            "angle": Angle,
                            "angleUnit": "deg"
                        }
                        ];
                        someControl.setTransform(h);
                        stopCount();
                    }
                } else {
                    console.log("Error reading variable startTimer");
                    stopCount();
                }
            });
            h = [{
                "transformType": "Origin",
                "x": 100,
                "xUnit": "px",
                "y": 25,
                "yUnit": "px",
                "z": 0,
                "zUnit": "px",
            }, {
                "transformType": "Rotate",
                "angle": Angle,
                "angleUnit": "deg"
            }
            ];
            someControl.setTransform(h);
        }
        function startCount() {
            if (!timer_is_on) {
                timer_is_on = 1;
                timedCount();
            }
        }
        function stopCount() {
            clearTimeout(timer);
            timer_is_on = 0;
        }
    };
    TcHmi.Functions.registerFunction('FunctionJS_ControlManipulation', FunctionJS_ControlManipulation);
})(TcHmi);
Translate an Image based on sensor status
In our yard gate, we have two sensors. One is a closed limit switch and another is an open limit switch. When we are starting out HMI, we should position our gate by reading the sensors. Here are the snippets that we can be used for these types of situations.
console.log('Reposition gate control during attached');
var gateControl = TcHmi.Controls.get('TcHmiImage_Gate');
var openPosition = [
{
    "transformType": "Translate",
    "x": -515,
    "xUnit": "px",
    "y": 0,
    "yUnit": "px",
    "z": 0,
    "zUnit": "px"
}
];
var closePosition = [
{
    "transformType": "Translate",
    "x": 0,
    "xUnit": "px",
    "y": 0,
    "yUnit": "px",
    "z": 0,
    "zUnit": "px"
}
];
async function ManageDoorStartupStatus()
{
try {
    var doorClosedLimitSwitch = await ReadSymbol('%s%PLC1.MAIN.fnYardDoor.doorCloseProximitySensor%/s%');
    var doorOpenedLimitSwitch = await ReadSymbol('%s%PLC1.MAIN.fnYardDoor.doorOpenProximitySensor%/s%');
    if(doorClosedLimitSwitch == true && doorOpenedLimitSwitch == false) {
       gateControl.setTransform(closePosition);
    }
    if(doorClosedLimitSwitch == false && doorOpenedLimitSwitch == true) {
        gateControl.setTransform(openPosition);
    }
}
catch(error) {
    console.log(`Error whle ManageDoorStartupStatus ErrorCode = ${error}`);
  }
}
ManageDoorStartupStatus();
Filling a tank with liquid
This is an off-topic example (that does not belong to our fictitious home automation project). We are including this here as we get some requests from the readers. The requirement of the tutorial is like these.
A tank will be filled with liquid. There will be a valve and a proximity sensor (upper side). The proximity sensor will indicate that the tank is full so the valve will be closed. There will be a proximity sensor at the bottom of the tank that will indicate the tank is empty via an out valve. There will be a Fill/Empty button. If the tank is full then it can be emptied by pressing on Empty button and vice versa.
The settings of the valve can be done by opening a popup (not shown here, if you are interested take a look at https://www.hemelix.com/scada-hmi/twincat-hmi/more-on-javascript-and-usercontrol/).
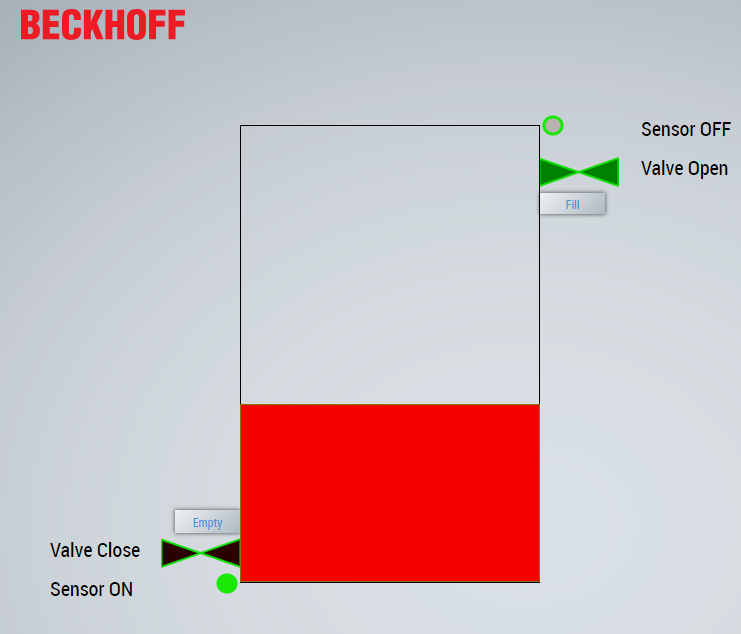
Figure 11: Filling liquid tank by timer interval and JavaScript
Actions and condition for tank filling application
This is a general setting that we can use whenever we need to configure HMI for mapped variables. We can monitor any variable in the Custom option. Whenever the variable is changed then we can do an action based on our needs. It means we monitor a variable and when it changes then we can add any actions from the general section or we can add our own functions from the Functions folder (left hand side).
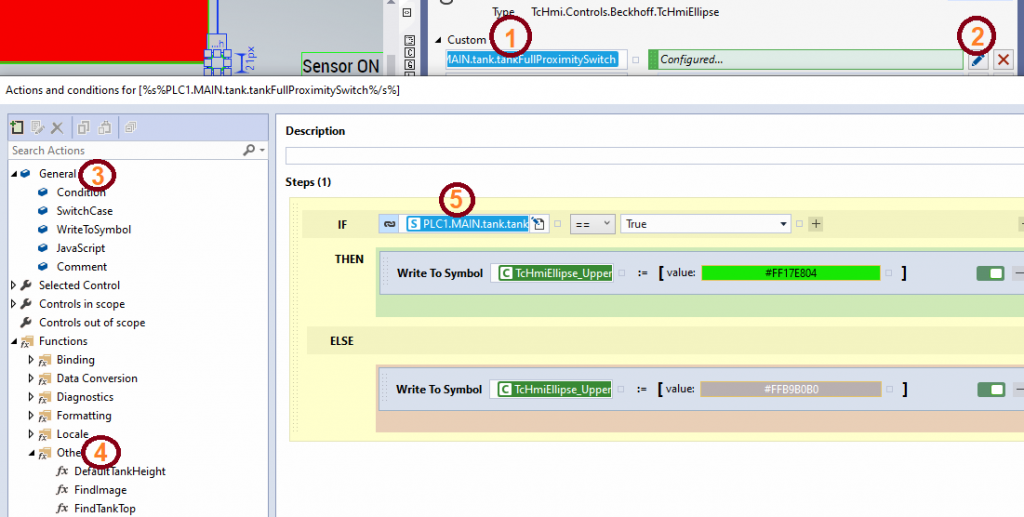
Figure 12: Actions and conditions, Custom event for monitoring tankFullProxiimitySwitch
Let’s see the explanation in figure 12 as explained below.
1 => We monitor tankFullProximitySwitch by using a Custom event monitor, we can monitor as many variables as necessary by adding the variables to the next line. We can do a similar by using a subscription (see more at https://www.hemelix.com/scada-hmi/twincat-hmi/mapping-and-subscription-using-js/)
2 => Press on the pencil icon for bringing the Actions and conditions editor
3 => We can use the following coding steps
A. Condition, a general if-else block where we can write statements in each branch.
B. SwitchCase, each case can execute a separate statement.
C. WriteToSymbol, a value can be written to a server variable (in PLC) or a UI control.
D. JavaScript, a JavaScript editor where we can edit and insert JavaScript to manipulate UI elements or PLC variables
4 => If we add a JavaScript function those are available in the Other folder, from where we can drag and drop our functions for writing
5 => We monitor proximitySwitch and if the value is True then we make the symbol green else gray color. Here we can use any item from the general section.
The tank is filled by the following two JavaScript files.
Implementation of FindTankTop JavaScript function
(function (TcHmi) {
    var FindTankTop = function FindTankTop(liquidHeight, fill, top) {
        var intfill = Math.floor(fill);
        var data = parseInt(top + liquidHeight - ((liquidHeight / 100) * intfill));
        return data;
    };
    TcHmi.Functions.registerFunction('FindTankTop', FindTankTop);
})(TcHmi);
Implementation of TankHeight JavaScript function
(function (TcHmi) {
    var TankHeight = function TankHeight(tankHeight, liquidFiil) {
        var intfill = Math.floor(liquidFiil);
        var updatedHeight = parseInt(tankHeight / 100 * intfill);
        return updatedHeight;
    };
    TcHmi.Functions.registerFunction('TankHeight', TankHeight);
})(TcHmi);
Read Write Symbol by JavaScript
A symbol can be read or can be written with a value by using JavaScript. This example shows how to read value from PLC and how to write value to PLC. The sample application is shown in the following image.
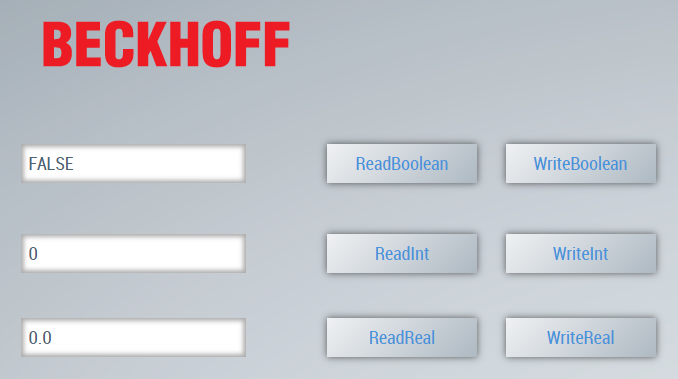
Figure 13: Read and Write different type of data to PLC
Read button read the value from a symbol and write button write the value to the symbol. Read button read a value by JavaScript, following code shows the JavaScript function for reading real data.
(function (TcHmi) {
    var FunctionJS_ReadWriteReal = function (RealData, IsReading) {
        var retValue = 0;
        var formattedSymbol = '%s%PLC1.MAIN.realData%/s%';
        //IsReading == false is not used in actual call.
        //The write function is used by directly with the write button
        if (IsReading == false) {
            TcHmi.Symbol.writeEx(formattedSymbol, IntegerData, function (data) {
                if (data.error === TcHmi.Errors.NONE) {
                    console.log("Writting real OK");
                } else {
                    console.log("Writting real NOT OK");
                }
            });
        } else {
            TcHmi.Symbol.readEx2(formattedSymbol, function (data) {
                if (data.error === TcHmi.Errors.NONE) {
                    retValue = data.value;
                    console.log("Reading real OK");
                    console.log(retValue);
                    var targetControl = TcHmi.Controls.get("TcHmiTextbox_Real");
                    if (targetControl != undefined) {
                        targetControl.setText(retValue.toString());
                    }
                } else {
                    console.log("Reading real NOT OK");
                }
            });
        }
        return retValue;
    };
    TcHmi.Functions.registerFunction('FunctionJS_ReadWriteReal', FunctionJS_ReadWriteReal);
})(TcHmi); 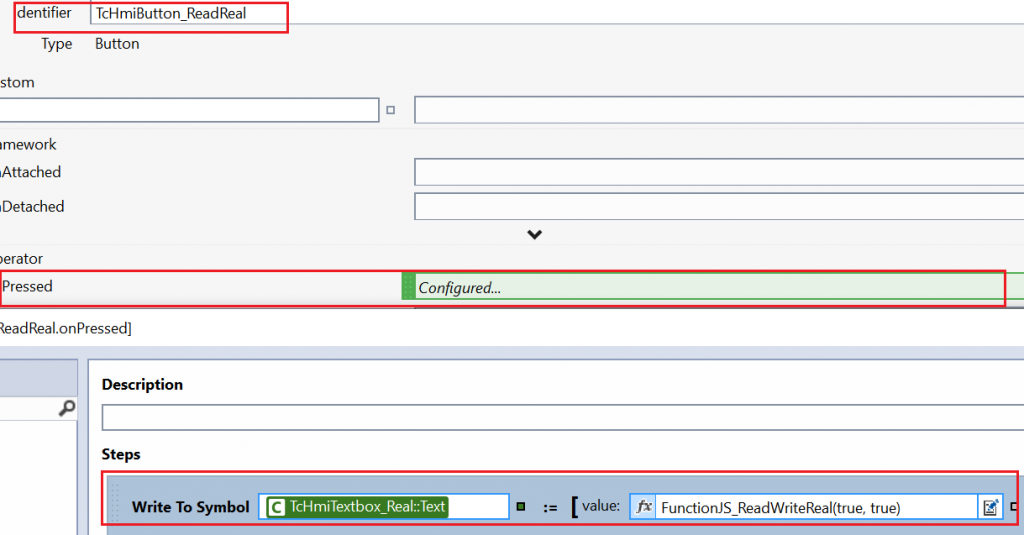
Figure 14: Return value of JavaScript function is set to Textbox
When we press the write button for writing real data then the following code will be executed.
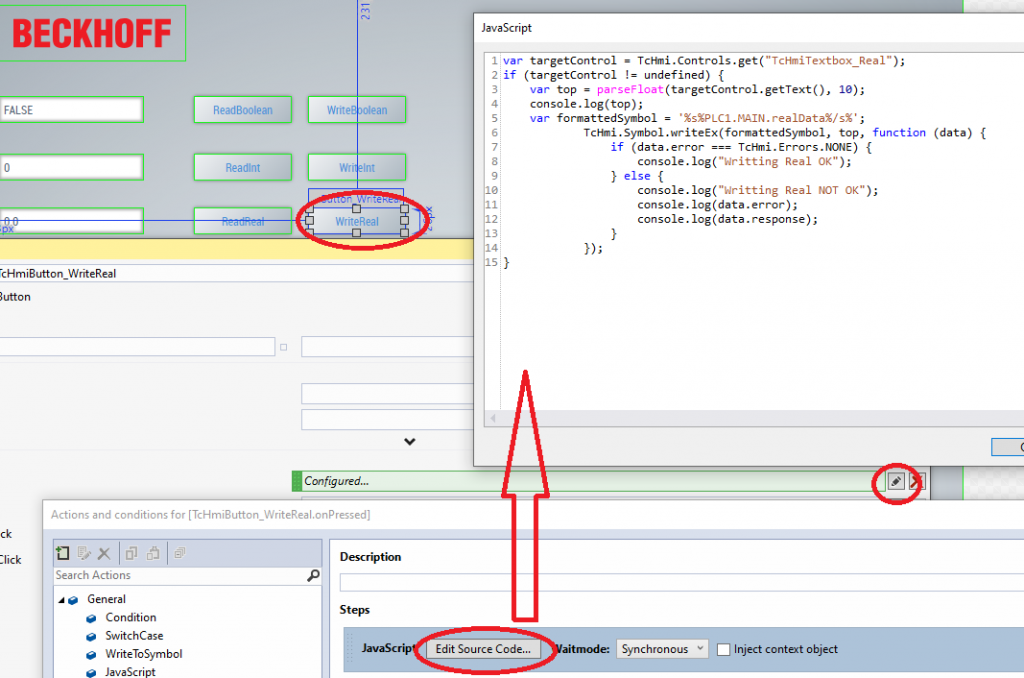
Figure 15: JavaScript is used to read data from UI then to PLC variable
The JavaScript code in text format:
var targetControl = TcHmi.Controls.get("TcHmiTextbox_Real");
if (targetControl != undefined) {
    var top = parseFloat(targetControl.getText(), 10);
    console.log(top);
    var formattedSymbol = '%s%PLC1.MAIN.realData%/s%';
            TcHmi.Symbol.writeEx(formattedSymbol, top, function (data) {
                if (data.error === TcHmi.Errors.NONE) {
                    console.log("Writting Real OK");
                } else {
                    console.log("Writting Real NOT OK");
                    console.log(data.error);
                    console.log(data.response);
                }
            });
}
Additional example:
Say we have a Grid view and we want to extract data when user click on a cell. First we need to tell the framework about the column information as shown in the following image. There are 2 column in the following grid example. Each column has name, level and control (edit box, text block etc). We access the property based on name (productid, storeid in this example). SrcData is pure JSON string and there should be productid, storeid as keys in the JSON string.
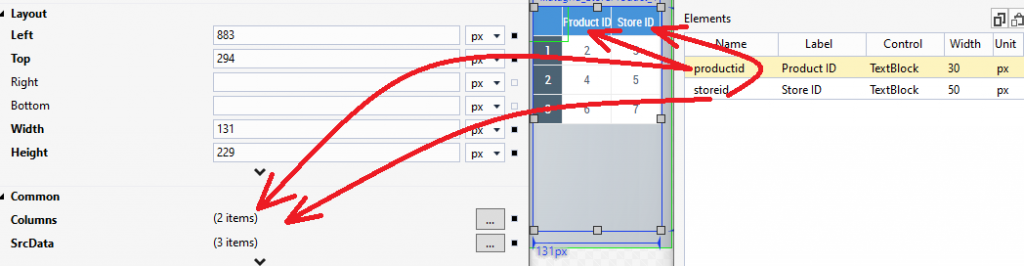
Figure 16: Relations between Columns and SrcData for Grid view
[
  {
    "productid": "2",  //This is matching with the Name field identifier (productid)
    "storeid": "3" //This is matching with the Name field identifier (storeid)
  },
  {
    "productid": "4",
    "storeid": "5"
  },
  {
    "productid": "6",
    "storeid": "7"
  }
]
By using following code we can extract data when user has clicked on any cell (there are some additional test for fun). When selected item event has emitted then we can call a JavaScript method with the row and column number as parameters.
        var myControl = TcHmi.Controls.get('TcHmiDatagrid_StoreProduct_1');
        if (myControl) {
            console.log(SelectedRow);
            console.log(SelectedColumn);
            var dataa = myControl.getSrcData();
            var myJSONString = JSON.stringify(dataa);
            console.log(myJSONString);
            var JSONObject = JSON.parse(myJSONString);
            var c = dataa["productid"];
            console.log(dataa[SelectedRow].productid);
            console.log(dataa[SelectedRow].storeid);
            var employees = [
                { "firstName": "John", "lastName": "Doe" },
                { "firstName": "Anna", "lastName": "Smith" },
                { "firstName": "Peter", "lastName": "Jones" }
            ];
            console.log(employees[0]); //print first object in the array
            console.log(employees[0].firstName);  //print first name John
            //var obj = JSON.parse(dataa);  //dataa is already a JS object, it will throw an exception
            console.log('new test');
            var myJSON = '{"name":"John", "age":31, "city":"New York"}';
            var myObj = JSON.parse(myJSON);
            console.log(myObj); //print the JS object
            console.log(myObj.age); //Print age, 31
        }
TIPs
TIP 01:
If we insert a JavaScript function in the project and later we rename the function, it is not enough to change the name in solution explorer. Intellisense gets the name from some JSON file, we need to change the name of the JSON file.
TIP 02:
When we have our JavaScript function that will be available in Actions and conditions (Functions | Other). This function can be drag and drop for execution. This is shown in the following figure. This can be done also by copy-paste from note pad (for example you want to copy from another project)
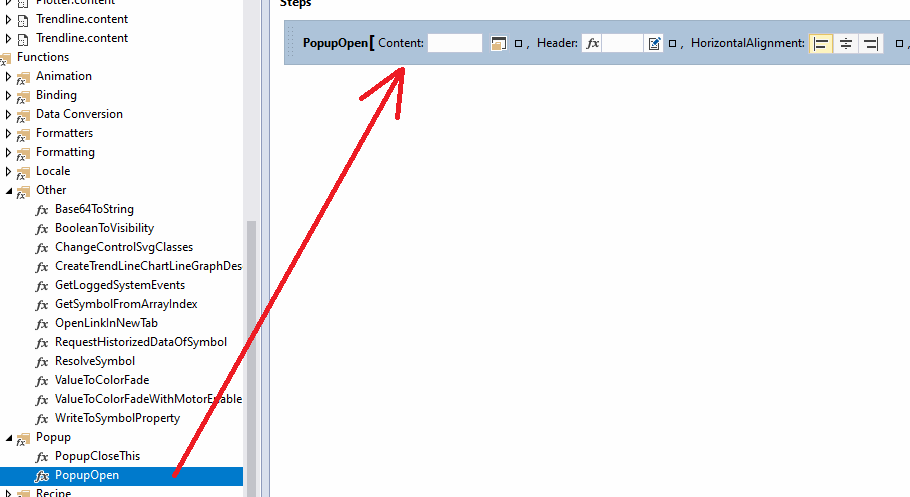
Figure 17: Popup function has been drag and drop to right hand side
TIP 03:
When passing string to JavaScript function pass with a quotation, for example, MyJSFn(‘hello parameter’). If we pass multiple parameters don’t keep space between parameters, for example, MyJSFunction (‘param1’, ‘param2’); I have noticed sometimes the method’s name is modified with 20 (space) although not sure 100%. If you know let me know.
TIP 04:
Sometimes, we might need to reorganize function parameters or add new parameters to the existing function. In this case, the parameters sequence for the old function and the new function do not match. The easiest way to handle this is to remove the old one and call it again based on the new function prototype.
TIP 05: single vs. double in JavaScript
Using the other type of quote as a literal both are same but single quoting a string is in fact not according to JSON standards.
alert('Say "Hello"');
alert("Say 'Hello'");
const months = ['Jan', 'March', 'April', 'June'];
var length = months.length;
var length = months.length;
months.splice(length-1, 1);
console.log(months); //output ["Jan", "March", "April"]
months.splice(0, 1); //delete the first one
Download the sample from the link given above.
See next how to create TwinCAT HMI Popup at https://www.hemelix.com/scada-hmi/twincat-hmi/twincat-hmi-popup/
Ask questions related to Hemelix sample code and design at Google group https://groups.google.com/g/hemelix