TwinCAT HMI View
View
An application can have many views. A user can jump from one view to another view and come back to the previous view. All contents of the view are logically combined. By default, HMI engineering offers a default view, the name of the default view is “Desktop.view”. It is the landing page of any HMI system. We can load as many views as possible depending on our needs.
A view is simply the web page we see. A page that displays the text, images of a website. If we build websites with HTML, then every page we create is the view like the homepage, about page, and the contact page. The view can be considered as a rectangle on the screen that shows some type of content. The rectangle here is actually invisible, but every view occupies a rectangle shape. TwinCAT HMI framework format the view for us that fits the browser.
Download by pressing here HMIViewChange_Hemelix.zip
The view can be used for HMI navigation purposes that we shall describe in the next section.
We shall have 4 other views on our fictitious home automation system.
Desktop.view, default view, general info about the home automation system
Lockview.view, main house door lock status, shows lock status with a text and with an image.
Thermometerview.view, will display the current temperature of the house and allow to change the temperature by opening and closing valves for warm and cold water
WaterValveview.view, shows a page for manipulating valves directly
MainDoorview.view, allows the yard door to open and close
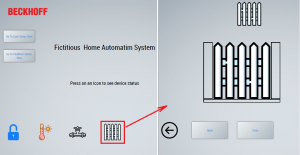
Main view of the application: If we press on the door icon, it will create a new view and that is displayed on the screen. We can come back to main view by pressing on the back arrow image.

Figure 1: Main view of the sample application
The other 3 views are shown in the following images.
Main door lock status view. We can lock and unlock the main door through the PLC. If we press on the lock then it will update the lock variable in the PLC code.
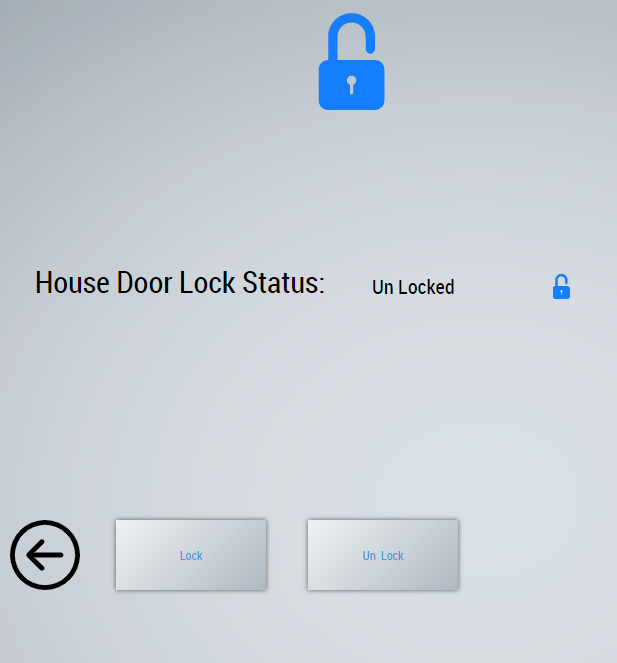
Figure 2: Lock status view of the application, where we can lock and unlock the door
Temperature control view of the house. We can set a target value and command the PLC which will open the valve to achieve the desired room temperature.

Figure 3: Temperature view, where we can set the room temperature warm or cold
Valve control view of the house. Valve can be opened by directly or when we are changing temperature in temperature control view.
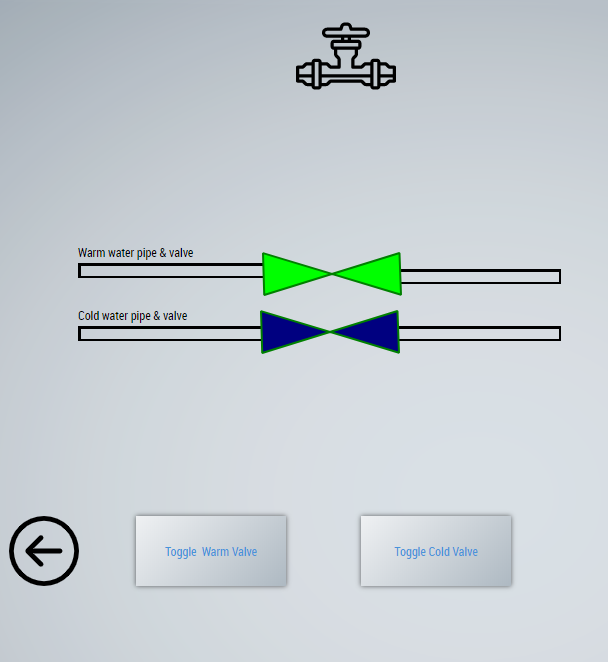
Figure 4: Valve control view, valve’s open state and close state display different images
Design of the application
STEP 01:
=>Create an HMI project as usual (File | New | Project | Select HMI ) or see the earlier HMI project
=>This will create the default page (or view Desktop.view)
=>Create two buttons (Change the text to “Go To Lock Status View” and “Go To YardDoor Status View”)
=>Change the IDs of these button to TcHmi_Controls_Beckhoff_TcHmiButton_LockStatusView and TcHmi_Controls_Beckhoff_TcHmiButton_YardGateView , it is good to have the same ID, because we can refer to any control by the ID.
=>Add four images at the bottom (you have to add the images to the images folder and configure it) by drag and dropping four times the image control.
=>Press F4 or properties for each image and configure the Src field.
=>Now add the following code as embedded JavaScript code under the 2 desktop buttons and change the view which one is going to load, the following load the LockStatus.view for example.
var v1 = TcHmi.View.get();
console.log('Button pressed ' + v1.getId());
TcHmi.View.load('LockStatus.view', function (data) {
var v2 = TcHmi.View.get();
console.log(v2.getId());
});
Note: The above code is an asynchronous function, how to call JavaScript asynchronous function s take a look at https://www.hemelix.com/scada-hmi/twincat-hmi/twincat-hmi-async-function/
STEP 02:
=> Now add 4 views (Project | Add new item | View) and rename it to LockStatus.View, ThermometerStatus.view, Watervalve.view and YardDoor.view
=> Now if we press on the 2 buttons then it will load 2 views according to STEP 01 (but of course, we don’t have any way to come back to Desktop. view)
STEP 03:
We are using the following embedded JavaScript for loading LockStatus.view and YardDoorStatus.view (under two buttons in the Desktop. view) just to show how to use behind a button.
=>Select those two buttons |Properties (F4) | Event | Add JavaScript | Edit Source Code and enter the following code
=>Test the work so far done using the live view (press the 2 buttons and see that we are able to switch views)
var v1 = TcHmi.View.get();
console.log('Button pressed ' + v1.getId());
TcHmi.View.load('LockStatus.view', function (data) {
var v2 = TcHmi.View.get();
console.log(v2.getId());
});
STEP 04:
=>Insert all the necessary control to each view and pay attention to the ID of the control.
=>Insert an image control as a back arrow, each back arrow should be named in such a way that matches the code behind the file. For example, see the event TcHmi_Controls_Beckhoff_TcHmiImage_LockToDesktop.onPressed in the code behind the file. The back image control ID is TcHmi_Controls_Beckhoff_TcHmiImage_LockToDesktop
=>When all IDs are OK and desired control are in place we can insert the following code behind the file in the Script folder.
=>We are using some minor JavaScript function such as FloatToText and TextToFloat
Code behind file for loading the views:
The view are loaded by a code behind file. We shall define a function for each icon in the code behind file as shown in the following code: When we press on the icon (images at the bottom) then we load the view by the following code.
// Keep these lines for a best effort IntelliSense of Visual Studio 2017.
/// <reference path="../../Packages/Beckhoff.TwinCAT.HMI.Framework.12.742.5/runtimes/native1.12-tchmi/TcHmi.d.ts" />

(function (/** @type {globalThis.TcHmi} */ TcHmi) {
    // If you want to unregister an event outside the event code you need to use the return value of the method register()
    var destroyOnInitialized = TcHmi.EventProvider.register('onInitialized', function (e, data) {
        // This event will be raised only once, so we can free resources.
        // It's best practice to use destroy function of the event object within the callback function to avoid conflicts.
        e.destroy();


        //1 Manage LockStatus view  to Desktop view
        // put this function block before the previous one otherwise it not work.
        var destroyEvent = TcHmi.EventProvider.register(
            'TcHmi_Controls_Beckhoff_TcHmiImage_LockToDesktop.onPressed',
            function (evt, data) {
                var v1 = TcHmi.View.get();
                console.log(v1.getId());
                TcHmi.View.load('Desktop.view', function (data) {
                    var v2 = TcHmi.View.get();
                    console.log(v2.getId());
                });
                // Destroy to free event resources if event is no longer needed.
                //But comment out if you need it
                //destroyEvent();
            }
        );


        var destroyEvent = TcHmi.EventProvider.register(
            'TcHmi_Controls_Beckhoff_TcHmiImage_DesktopLock.onPressed',
            function (evt, data) {

                var v1 = TcHmi.View.get();
                console.log(v1.getId());
                TcHmi.View.load('LockStatus.view', function (data) {
                    var v2 = TcHmi.View.get();
                    console.log(v2.getId());
                });

                // Destroy to free event resources if event is no longer needed.
                //But comment out if you need it
                //destroyEvent();
            }
        );


        //2 Manage Thermometer view  to Desktop view
        // put this function block before the previous one otherwise it not work.
        var destroyEvent = TcHmi.EventProvider.register(
            'TcHmi_Controls_Beckhoff_TcHmiImage_ThermoToDesktop.onPressed',
            function (evt, data) {
                var v1 = TcHmi.View.get();
                console.log(v1.getId());
                TcHmi.View.load('Desktop.view', function (data) {
                    var v2 = TcHmi.View.get();
                    console.log(v2.getId());
                });
                // Destroy to free event resources if event is no longer needed.
                //But comment out if you need it
                //destroyEvent();
            }
        );


        var destroyEvent = TcHmi.EventProvider.register(
            'TcHmi_Controls_Beckhoff_TcHmiImage_DesktopThermometer.onPressed',
            function (evt, data) {

                var v1 = TcHmi.View.get();
                console.log(v1.getId());
                TcHmi.View.load('ThermometerStatus.view', function (data) {
                    var v2 = TcHmi.View.get();
                    console.log(v2.getId());
                });

                // Destroy to free event resources if event is no longer needed.
                //But comment out if you need it
                //destroyEvent();
            }
        );

        //3 Manage Water Valve view  to Desktop view
        // put this function block before the previous one otherwise it not work.
        var destroyEvent = TcHmi.EventProvider.register(
            'TcHmi_Controls_Beckhoff_TcHmiImage_WaterValveToDesktop.onPressed',
            function (evt, data) {
                var v1 = TcHmi.View.get();
                console.log(v1.getId());
                TcHmi.View.load('Desktop.view', function (data) {
                    var v2 = TcHmi.View.get();
                    console.log(v2.getId());
                });
                // Destroy to free event resources if event is no longer needed.
                //But comment out if you need it
                //destroyEvent();
            }
        );


        var destroyEvent = TcHmi.EventProvider.register(
            'TcHmi_Controls_Beckhoff_TcHmiImage_DesktopValve.onPressed',
            function (evt, data) {

                var v1 = TcHmi.View.get();
                console.log(v1.getId());
                TcHmi.View.load('WaterValve.view', function (data) {
                    var v2 = TcHmi.View.get();
                    console.log(v2.getId());
                });

                // Destroy to free event resources if event is no longer needed.
                //But comment out if you need it
                //destroyEvent();
            }
        );

        //4 Manage Yard Door view  to Desktop view
        // put this function block before the previous one otherwise it not work.
        var destroyEvent = TcHmi.EventProvider.register(
            'TcHmi_Controls_Beckhoff_TcHmiImage_YardDoorToDesktop.onPressed',
            function (evt, data) {
                var v1 = TcHmi.View.get();
                console.log(v1.getId());
                TcHmi.View.load('Desktop.view', function (data) {
                    var v2 = TcHmi.View.get();
                    console.log(v2.getId());
                });
                // Destroy to free event resources if event is no longer needed.
                //But comment out if you need it
                //destroyEvent();
            }
        );


        var destroyEvent = TcHmi.EventProvider.register(
            'TcHmi_Controls_Beckhoff_TcHmiImage_DesktopYardDoor.onPressed',
            function (evt, data) {

                var v1 = TcHmi.View.get();
                console.log(v1.getId());
                TcHmi.View.load('YardDoor.view', function (data) {
                    var v2 = TcHmi.View.get();
                    console.log(v2.getId());
                });

                // Destroy to free event resources if event is no longer needed.
                //But comment out if you need it
                //destroyEvent();
            }
        );
    });
})(TcHmi);
=> Test with live view or review and compare the code if something goes wrong.
Passing data back and forth between view
If we have multiple views in our application then we might need to pass them back and forth. How can we do this? In this section, we shall describe the with a sample application.
In the sample application, we can see if you edit the device name it is added to the left-side grid view. If an item is there then that item will be deleted and if the item is not there then that item will be added.
Another View button will load another view and we can see the same data there as in text form. So how we can achieve this:
=> Global variable, declare a variable in a code-behind file that can be manipulated from anywhere. Add/remove from the list as needed. The data can be used from another view also
var globalDeviceList = [];
=>LocalStorage Set and retrieve localStorage name/value pair.
console.log('Button pressed ');
var jsonstring = JSON.stringify(globalDeviceList);
localStorage.setItem('myLocalStorage', jsonstring);
Retrieve and add the data from another view:
console.log('Setting local storage data');
var myLocalStorageData = localStorage.getItem('myLocalStorage'); function AddOrDeleteItem(DeviceName) {
var itemFound = false;
var indexArray = -1;
for (var i = 0; i < globalDeviceList.length; i++) {
if (globalDeviceList[i].DeviceName.localeCompare(DeviceName) == 0) {
itemFound = true;
indexArray = i;
break;
}
}
var anItem = {
"DeviceName": " ",
"ChangedTime": "time1"
};
if (itemFound) {
globalDeviceList.splice(indexArray, 1);
} else if (!itemFound) {
anItem.DeviceName = DeviceName;
var d = new Date();
anItem.ChangedTime = d.toLocaleString();
globalDeviceList.splice(0, 0, anItem);
}
}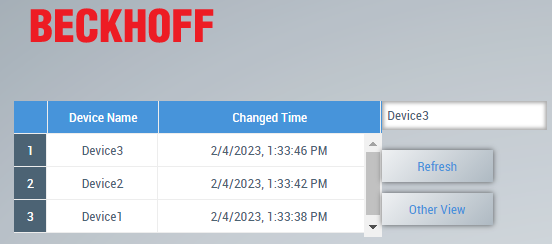
Figure 05: Passing data between different view
TIP 01: Button, Image Id in different view should have a unique name
TIP 02: If we want to have back and forth in the navigation then we should keep stuff in the memory by not destroying the event (comment out destroyEvent())
TIP 03: We might need to reorganize the JavaScript function location inside the file for reference
TIP 04: These are done by JavaScript, so no event is configured in the image properties see more at https://www.w3schools.com/js/default.asp
Download the sample from the link given above.
Next, let’s try to understand what is a view at https://www.hemelix.com/scada-hmi/twincat-hmi/twincat-hmi-region-and-content/
Ask questions related to Hemelix sample code and design at Google group https://groups.google.com/g/hemelix