TwinCAT HMI Symbol Data Binding and Mapping
(Video tutorial at the end)
In TwinCAT HMI a variable is called a symbol, in another system, it may be called a tag as well. This symbol can be mapped or linked to the PLC variable. Some symbols can be local to the HMI server. That means it is not read from PLC. The HMI server’s responsibility is to keep up to date on all the symbols that have been mapped.
The following definition is valid for symbols:
Symbol Name/Content: PLC1.MAIN.varIntPlcVariable
We have a variable in our PLC program, and the name is varIntPlcVariable. We can create a symbol in JavaScript (see our JavaScript section for more).
var symbolString = '%s%PLC1.MAIN.varIntPlcVariable%/s%';
var symbol = new TcHmi.Symbol(symbolString);
var symbolJSON = JSON.stringify(symbol);
If you observe, symbolJSON with https://jsonlint.com/ then you see the following content.
The following properties of symbols are clear: type, expression, name, content, etc. When we ask from a symbol, what is symbol expression then the framework returns __expression as a symbol expression.
{
	"__symbol": {
		"__diagGUID": "",
		"__expression": {
			"__path": null,
			"__type": 10,
			"__options": {},
			"__expression": "%s%PLC1.MAIN.varIntPlcVariable%/s%",
			"__tag": "s",
			"__content": "PLC1.MAIN.varIntPlcVariable",
			"__name": "PLC1.MAIN.varIntPlcVariable"
		},
		"__state": 10,
		"__schema": null,
		"__destroyTypeDefinitionChanged": null
	}
}
Symbol Expression: %s%PLC1.MAIN.varIntPlcVariable%/s%
var symbolString = '%s%PLC1.MAIN.varIntPlcVariable%/s%';
var symbolExpression = new TcHmi.SymbolExpression(symbolString);
var json = JSON.stringify(symbolExpression);
Again if you see the JSON in https://jsonlint.com/ then you see the following content:
{
	"__path": null,
	"__type": 10,
	"__options": {},
	"__expression": "%s%PLC1.MAIN.varIntPlcVariable%/s%",
	"__tag": "s",
	"__content": "PLC1.MAIN.varIntPlcVariable",
	"__name": "PLC1.MAIN.varIntPlcVariable"
}
Mapping is the event of telling the HMI Server where the needed symbols are located in the PLC.
If we map a variable then actually we are updating a file in the TwinCAT environment:
The file is:
${project_folder}\Server\TcHmiSrv\TcHmiSrv.Config.default.jsonFor example, when we map a variable, we shall have the following contents:
Variable in PLC program (for example)
PLC1::MAIN::ArrayGate[0]::ArrayMotorControl[0]::ArrayROTATIONSENSOR[0]::alarm That variable will map to the HMI as
PLC1.MAIN.ArrayGate.0.ArrayMotorControl.0.ArrayROTATIONSENSOR.0.alarm That information will be recorded by the TwinCAT framework in the TcHmiSrv.Config.default.json file as the following (there will be much other information as well):
        "PLC1.MAIN.ArrayGate.0.ArrayMotorControl.0.ArrayROTATIONSENSOR.0.alarm": {
            "ACCESS": 3,
            "CUSTOMERDATA": "",
            "DOMAIN": "ADS",
            "HIDDEN": false,
            "MAPPING": "PLC1::MAIN::ArrayGate[0]::ArrayMotorControl[0]::ArrayROTATIONSENSOR[0]::alarm",
            "OPTIONS": {},
            "SCHEMA": {
                "$ref": "tchmi:general#/definitions/BOOL"
            },
            "USEMAPPING": true
        },
Sometimes, we may have seen a warning symbol besides a mapped variable (see Tips 3 at the bottom), the reason is mismatching in the file.
Download the complete working source code Symbol_Data_Hemelix.zip
A binding links any symbol to a property of a control. A binding automatically updates the property of the control when the value of the symbol changes. There are two types of binding:
=>Data binding, also called variable binding, a variable is linked to any property of control then we say the variable is bound to the property (see the image below). If we don’t use any variable then we can’t bind it. See the images below. If we are mapping a variable from the PLC program to the control properties of a UI control, then the framework updates the control UI automatically. See more at https://infosys.beckhoff.com/english.php?content=../content/1033/te2000_tc3_hmi_engineering/5725715851.html&id=
=>Function binding, basically means we can use a function for the control property. Note that when we use function binding then fx is highlighted. A function binding can be created for all control properties if the JavaScript functions return a suitable value for the property of the control. More info at
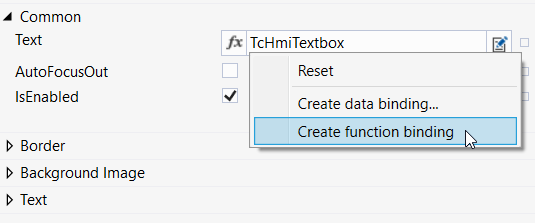
Figure 01: Data binding and function binding
See the following screenshot to understand the difference between data binding and function binding. We are passing MotorName as function binding (note the highlighted fx). The field returns a javascript object ‘Motor One’ (note the Apostrophe), without the Apostrophe data will not be passed, and the control will not display it.
MotorStartTime will be displayed as it is written as ‘3’
MotorRotationMinute will not be displayed as it is not variable binding nor function binding
MotorStopTime will not be displayed as it expects variable for real but we are passing a text.
If fx is highlighted then we have selected function binding, then it expect a value which has been defined somehow!
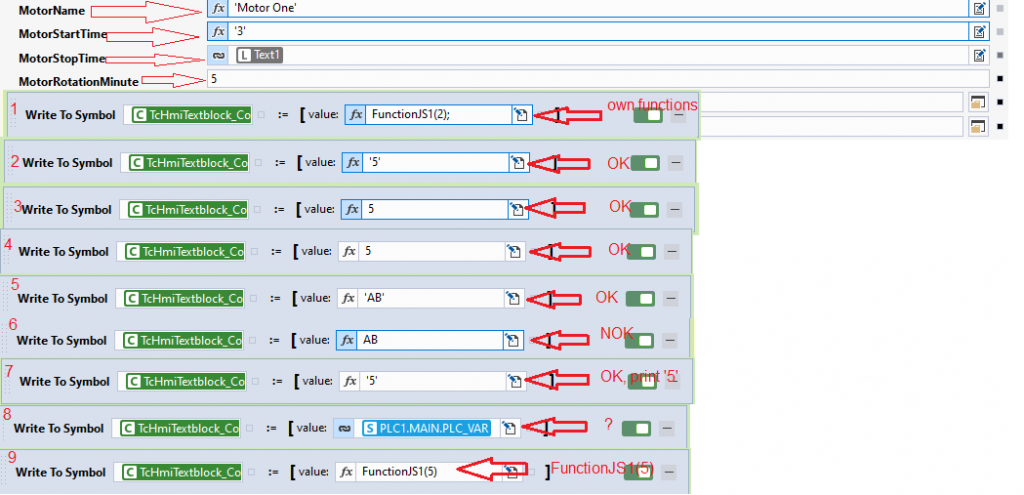
Figure 02: passing parameters for function binding and data binding
Some descriptions of the above in Figure 2
Case 1:
We have a custom JavaScript function that just takes a parameter and returns another number. This works because it returns a number object (primitive wrapper object). Note fx is highlighted! 4 is printed to the Textblock.
            function FunctionJS1(par1) {
                return par1 * 2;
            }
Case 2: We are directly passing a string 5 as a string. It works and the result is 5, not ‘5’
Case 3: If fx is highlighted then we need to pass an object, 5 is a number, and which is the wrapper object, so it works and the result is 5.
Case 4: fx is not high lighted, still it print 5, the reason 5 is an object, works like data binding.
Case 5: fx is not high lighted and the parameter is ‘AB’ which is a literal object and it works (like data binding), output ‘AB’ not AB
Case 6: fx is high lighted and the parameter is AB which is NOT a string type (also not defined anywhere) object and it does not work, output is error as shown in the following image.
Figure 03: passing parameters which are not defined
Case 7:
We are doing data binding and the result is ‘5’
Case 8: We have data binding to a PLC variable which is ULINT type. The TextBlock expects text and garbage data is printed! such as +RsAAAAAAAA=
VAR
PLC_VAR : ULINT := 23;
END_VAR
If we had right data type, the variable would have bound properly (by configuration).
See https://developer.mozilla.org/en-US/docs/Web/JavaScript/Reference/Global_Objects/BigInt
Case 9: We are using our custom function but the fx is not highlighted. This works just like data binding and the output is FunctionJS1(5) as a string object, it does not evaluate the function at all!
Tip:
When we add a function by copy-paste then sometimes it shows 404. One solution is expanding the field and it will be OK,
Also, a good idea to check with the console.log method. This causes unwanted text to be inserted (newline or CR or similar) and it does not work.
Anatomy of binding:
TcHmi.Binding.createEx =>Creates a binding between a symbol and a control attribute using the attribute setter function, takes 3 parameters
Symbol expression (for example, HMI internal variable, ‘%i%MyInternalSymbol_1%/i%’, Server variable ‘%s%PLC1.MAIN.varIntPlcVariable%/s%’, parameter variable %pp%someRealParameter%/pp%)
Name of the control setter function (for example, setText, setLeft etc setter function for control properties)
Reference to the control instance ( for example, var myControl = TcHmi.Controls.get(‘TcHmiTextbox_1’);)
var myControl = TcHmi.Controls.get('TcHmiTextbox_1');
if(myControl){
TcHmi.Binding.createEx('%i%MyInternalSymbol_1%/i%', 'setText', myControl); }
CreateEx does not return anything if we want to be sure may be a good idea to check in the following way:
var result = TcHmi.Binding.exists('Text',TcHmiTextbox_1);
if(result){
    console.log('Binding does exists');
} else {
    console.log('Binding does not exists');
}
TcHmi.Binding.exists => Test if there is existing binding between control property and control. The binding can be established by the createEx function of the program or by using the graphical tools. exists takes 2 parameters. If either has not been done then it will return false.
propertyName: Name of the property, for example, Text, Left, Top, etc. These properties can be set.
Control: (reference to a control, for example, var myControl = TcHmi.Controls.get(‘TcHmiTextbox_1’);)
TcHmi.Binding.resolveEx => Returns a symbol expression (for example ‘%i%MyInternalSymbol_1%/i%’, ‘%s%PLC1.MAIN.varIntPlcVariable%/s%’ etc) if a binding exists between a symbol and the control attribute or null if no binding exists. This function takes 2 parameters:
propertyName: Name of the property, for example, Text, Left, Top, etc. These properties can be set.
Control: (reference to a control, for example, var myControl = TcHmi.Controls.get(‘TcHmiTextbox_1’);)
var myControl = TcHmi.Controls.get('TcHmiTextbox_1');
if(myControl){
    var result = TcHmi.Binding.exists('Text',myControl);
    if(result){
         console.log("Binding exists");
    } else {
         console.log("Binding does not exist");
    }
    var symbolExpression = TcHmi.Binding.resolveEx('Text',myControl);
    if(symbolExpression){
         console.log(myControl.getId() + '::Text is bound to symbol expression: ' + symbolExpression.toString());
    } else {
		console.log(myControl.getId() + '::Text is bound to symbol expression: ' + symbolExpression.toString());
    }
}
Mapping of Array type in PLC and display in HMI
We have an array declared in PLC like the following,
ArrayInt : ARRAY [1..5] OF INT := [10,20,30,40,50];
We display it in textBlock and it will be shown as the following.
[10,20,30,40,50]If we execute the following code in any event (for example during attach of textbox)
async function ReadData()
{
try {
        var resturnArray ;
        resturnArray = await ReadSymbol('%s%PLC1.MAIN.ArrayInt%/s%');
        console.log('typeof resturnArray ='+ typeof resturnArray);
for (var key in resturnArray){
    console.log(`key=${key}, resturnArray[key]=${resturnArray[key]}`);
}
    }
catch(error) {
    console.log(`Error in ReadData = ${error}`);
  }
}
ReadData();
The output will be, this will be an object and we can treat the object
typeof resturnArray =object
key=0, resturnArray[key]=10
key=1, resturnArray[key]=20
key=2, resturnArray[key]=30
key=3, resturnArray[key]=40
key=4, resturnArray[key]=50
How to make PLC data available to HMI Server
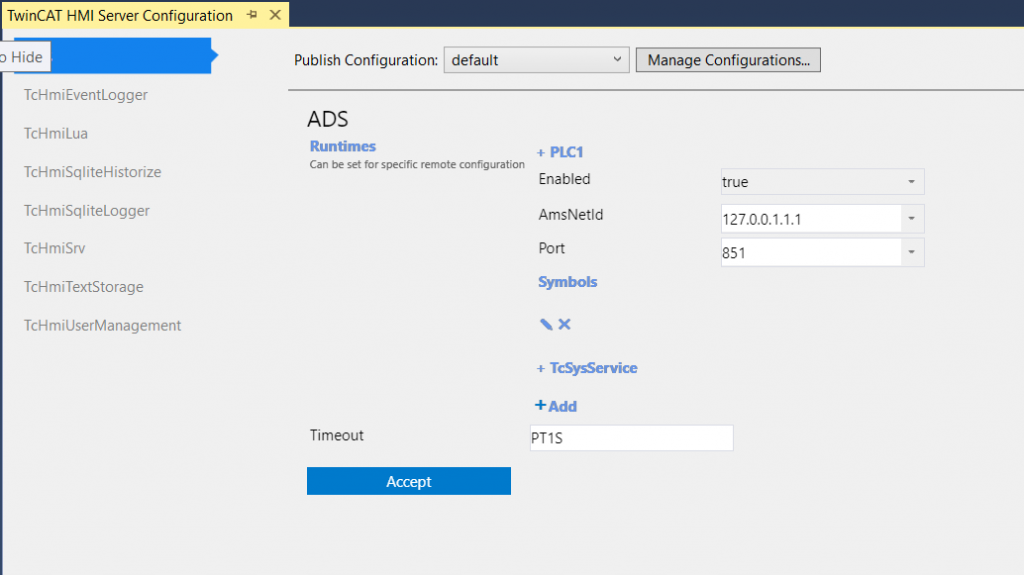
Figure 04: How to tell HMI from where we can fetch the PLC data
=> First we need to give access to the PLC. The PLC can be in the local network, remote network, or even the local machine (PLC program is running in the same machine). The PLC is identified by the Ams NetId.
=> If the PLC is in the network then the HMI Server computer (where the HMI Server is running) should have the route, for details see how to add a route for searching Beckhoff PLC.
=> If the PLC is running on the local PC, we add the localhost address “127.0.0.1.” + “1.1”
=> For remote machine, it is wise to set the AmsNetId to IP address + .1.1, this help to remember the AmsNet Id, see how to change Ams Net Id
=> You can bring the left-hand side setting dialog by selecting HMI Project | Server and then from the menu TWINCATHMI | TwinCAT HMI Server Configuration.
=> Set Enabled to true, AmsNetId and the port number and press accept.
Mapping Level in the PLC code
Function blocks and other modules are hierarchically arranged in Visual Studio when we are coding in structured text language.
We have an array in PLC like the following:
fnValveArray: ARRAY[0..TOTAL] OF FN_VALVE;
VAR CONSTANT
    TOTAL : INT := 120;
END_VAR
Suppose we map from the fnValveController level rather than the individual variable level (mapping isClosed for individual valve items), the size of the TcHmiSrv.Config.default can be significantly different.
An individual variable symbol will be like the following.
%s%PLC1.MAIN.fnValveController.fnValveArray.0.isClosed%/s%
If the size of the error is bigger than 99, then the mapping process is different. We can change the index while mapping. The domain ADS is added. In the following, we can edit 111 to what ever index is needed to map.
If the mapping variable index is 111 for example, the symbol expression will be like the following.
%s%ADS.PLC1.MAIN.fnValveController.fnValveArray.111.openTimeMs%/s%

Figure 05: Mapping big array when the size is bigger than 99, configuring for index 111
Another easier way to map the array is that, could be mapped from the function block which one contains the array, as shown in the following image. We have mapped from the fnValveController level, which will map all objects below the controller.

Figure 05a: Mapping big array from the function block which contains the array
console.log('LoadDataFromDataBase called');
async function LoadDataFromDataBase() {
try {
    var symbol = '%s%PLC1.MAIN.fnValveController::fnValveArray%/s%'
    var w = await ReadFromServer(symbol);
    for (var i = 0; i < w.length; i++) {
        var data = w[i].openTimeMs;
        console.log('data = ' + data);
        }
} catch (error) {
    console.log('v =  error' );
}
    }

LoadDataFromDataBase();
The output will be
data = 1
data = 2  etc
Whitelisting and blacklisting
With version 1.12, it is possible to use black or whitelisting for PLC symbols. With black or whitelisting, PLC symbols can be explicitly hidden or shown for use in the HMI. For this, we can tag the corresponding variables in the PLC with an attribute pragma. In the default case, blacklisting is active, which means that we have access to all variables of the PLC that are not explicitly hidden for the HMI. On the configuration page of the ADS extension, we can switch between black and whitelisting (Use whitelisting false is the default case).
=> Use whitelisting, false (default case) => All variables are visible in HMI ( All Symbols in TwinCAT HMI Configuration)
=> Use whitelisting, true (when we change in ADS setting) => No variables are visible in HMI ( All Symbols in TwinCAT HMI Configuration), even the previously mapped symbols show an alarm, then all data is hidden including MAIN.
=> Use whitelisting, true (when we change in ADS setting) => Data will be available in HMI again
{ attribute 'TcHmiSymbol.Show' }
MyInt :INT := 100;
Multiple Variable Declaration:
{ attribute 'TcHmiSymbol.Show' }
myVar1,
{ attribute 'TcHmiSymbol.Show' }
myVar2,
{ attribute 'TcHmiSymbol.Show' }
myVar3 : INT;
We can declare the above code in the following way:
{ attribute 'TcHmiSymbol.Show' }
myVar1 : INT;
{ attribute 'TcHmiSymbol.Show' }
myVar2 : INT;
{ attribute 'TcHmiSymbol.Show' }
myVar3 : INT;
The following attribute pragmas are available for black or whitelisting in the TwinCAT HMI:
{ attribute 'TcHmiSymbol.Show' }
{ attribute 'TcHmiSymbol.ShowRecursively' }
{ attribute 'TcHmiSymbol.Hide' }
{ attribute 'TcHmiSymbol.ReadOnly' }
{ attribute 'TcHmiSymbol.BLOB' }
Now change the program to the following with white listing true
PROGRAM MAIN
VAR
{ attribute 'TcHmiSymbol.ShowRecursively' } //Data can be seen explicitly
bigData : ARRAY[0..dataSize] OF deviceProperty;
initDone : BOOL := FALSE;
index : INT := 0;
innerIndex : INT := 0;
myTimer : TON;
startTimer : BOOL := FALSE;
delayPassed : BOOL := FALSE;
END_VAR
VAR CONSTANT
	{ attribute 'TcHmiSymbol.Hide' }  //If we try to read this variable it will throw exception.
    dataSize : INT:= 100;
END_VAR
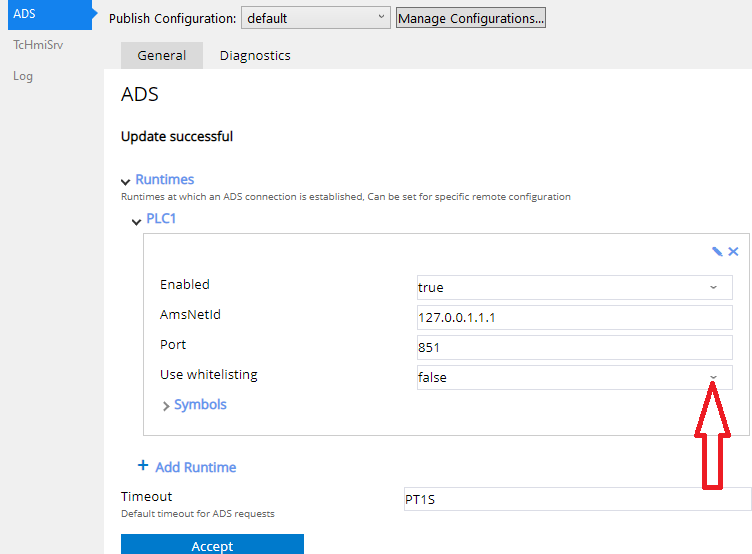
Figure 06 : Setting whitelisting true (none visible) or false (all visible, default case)
In general, PLC includes variables in a hierarchy, MAIN can contain a variable (which is an instance of a function block). If we want to use a variable from that function block, we need to insert the attribute into the function block instances.
In the following sample, we see we are interested only in the fnMode variable, but we need to use the show attribute for fnInstances also.
PROGRAM MAIN
VAR
{ attribute 'TcHmiSymbol.Show' }
 fnInstances  : FN_MYFUNCTIONBLOCK;
END_VAR
//Function Block
FN_MYFUNCTIONBLOCK
VAR
{ attribute 'TcHmiSymbol.Show' }
 fnMode : BOOL;
END_VAR
Auto Mapping Symbols
Variables from the PLC can be automatically mapped in the human-machine interface using the automap function. To do this, attributes must be set on the relevant variables in the PLC. The human-machine interface searches the existing ADS symbols and creates them automatically if the relevant attribute is present.
Available attributes (from Beckhoff Infosys):
|
Attributes |
Description |
Version |
|---|---|---|
|
‘TcHmiSymbol.AddSymbol’ |
Maps the variable in the human-machine interface using the automap function |
>= 1.12.756.1 |
|
‘TcHmiSymbol.AddSymbol.Ignore’ |
Ignores the variable, but underlying variables with AddSymbol attribute are still mapped. |
>= 1.14.x.x |
|
‘TcHmiSymbol.AddSymbol.IgnoreRecursively’ |
Ignores the variable and the underlying variables |
>= 1.14.x.x |
|
‘TcHmiSymbol.AddSymbol.Hidden’ |
Hides the mapping (only visible when extended symbols are displayed) |
>= 1.12.756.1 |
|
‘TcHmiSymbol.AddSymbol.UserGroups’ |
Creates a read/write authorization for user groups |
>= 1.12.756.1 |
|
‘TcHmiSymbol.AddSymbol.UserGroups.Read’ |
Creates a read authorization for user groups |
>= 1.14.x.x |
Auto mapping helps and save time, when we are mapping thousands of variables, so this must be used. I used 1.12.756.1 HMI Engineering version for test purposes. It has a few new features as shown in the following image.

Figure 07 : ADS settings in 1.12.756.1
If we have an array of 50 devices where we need to map 50 X 10 = 500 variables, the auto map helps greatly. See in the following image, we are expecting to map only maxRotationValue variable. We can do it in the following way
FUNCTION_BLOCK MotorAC
VAR_INPUT
 machineName : WSTRING :="Type A";
END_VAR
VAR_OUTPUT
 machineAlarm : BOOL := FALSE;
END_VAR
VAR
{ attribute 'TcHmiSymbol.AddSymbol' }
maxRotationValue : REAL := 0.0;
rotationPerSeconds : INT := 0;
myTimer : TON ;
startMachine : BOOL := FALSE;
END_VAR

Figure 08 : Auto mapping in ADS settings in 1.12.756.1
1.Open the TwinCAT HMI Configuration window.
2.Go to the Server Symbols / All Symbols tab.
3.Right-click on ADS.
4.Start the automatic mapping via Map Automap Symbols.
After adding, a message about the number of symbols added or an error message appears.
Mapping variables to TwinCAT HMI
Adding Ams Net Id establishes a link between the HMI Server and the PLC. HMI Server does not know what kinds of variables are available in the PLC yet. The mapping process establishes a connection between HMI Server and the PLC so that HMI Server can read those data over the ADS protocol.
Note: In some smaller controller Symbol name is not supported, in this case the data can be accessed directly by using indexGroup and indexOffset (in that case, we press on Symbols and then Add)
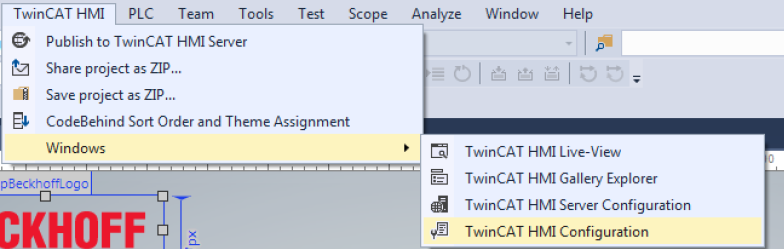
Figure 09: HMI configuration for making the data available from PLC
=> Select the HMI project and then Server in the solution explorer
=>Now select the HMI Configuration as shown in the left image
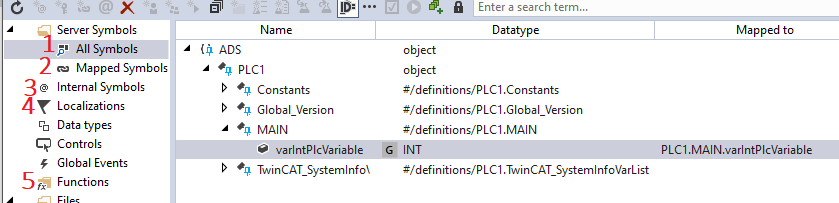
Figure 10: Mapping variables
1 => Shows all the variables in the PLC Main
2 =>Mapped Symbol (the variables which have been mapped)
3 => Internal symbol to the HMI server
4 => Localization of this application (see more).
5 => Built-in function provided by TwinCAT framework.
=> Select the HMI project and then Server in the solution explorer while HMI project is selected
=>Now select the HMI Configuration as shown in the left image
=> If we press on the All Symbols then it will show all PLC variables under the MAIN PLC, if this does not show any variables then refresh the configuration
=> To map a variable, we right click on the PLC variable and select and select Map Symbol and press OK. Now this variable will be available in the HMI
=>We can map all the necessary variable one by one or selecting all by in single mapping.
=>Mapped Symbols will show all the mapped variables in the system
HMI Server Symbols
Server symbols can be created centrally in the server under Mapped Symbols. They can also be used offline without a PLC. Clicking on the button Create Server Symbol opens a dialog for adding server symbols. Server symbols can be used to hold some internal variables for processing business logic. This can be mapped to the PLC variable as well. This variable can be persistent meaning if the server is restarted the value is saved.
=> Right click on the Mapped Symbols
=> Select create new server symbol
=> Fill in the necessary information as shown in the following image
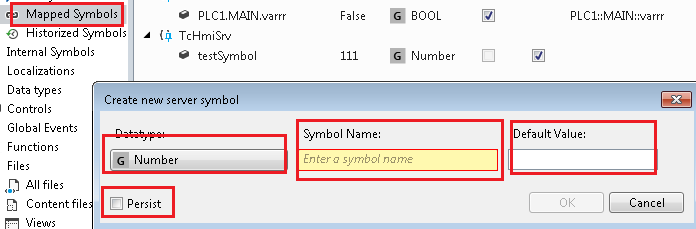
Figure 11: New server symbol creation
Internal Symbols
Internal symbols are independent of the server and are valid within a browser instance. The internal symbols thus enable variables to be saved individually for each client.
=> Internal Symbol can be created in same way as server symbols
=> Right-click on the internal symbol and fill in the necessary information as shown in the following image
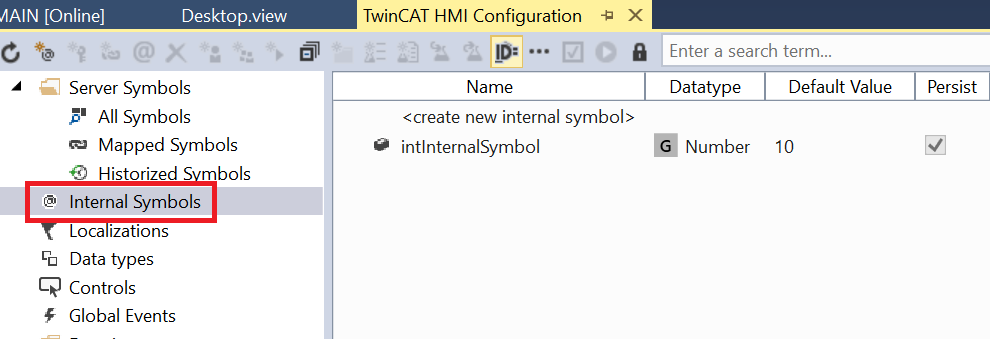
Figure 12: Internal server symbol creation
Test Application
The test application can be downloaded from hemelix.com and test.
Here is a short description of what the test application does.
1=> An internal symbol is displayed here (the internal symbol has been bounded manually),
2=>If we press this button the internal symbol will increase by one,
3=>Internal symbol will decrease by one,
4=>If we press this button it will read the value of edit box 5 and set it to PLC, this button’s left property is bound with the internal symbol, so if we increase or decrease the internal symbol, this button will move left or right.
5=>Display the current value of the PLC variable if there is binding. If there is no binding then it will be empty
6=>If we press this button the PLC variable (we have a single variable) will be bound to the edit box at 5
7=>If we press this button the PLC variable (we have a single variable) will be unbounded to the edit box at 5 and it will display nothing (because it is not bound anywhere)
8=>Display the binding status if we press on 6 or 7 or even during the initialization of the program.
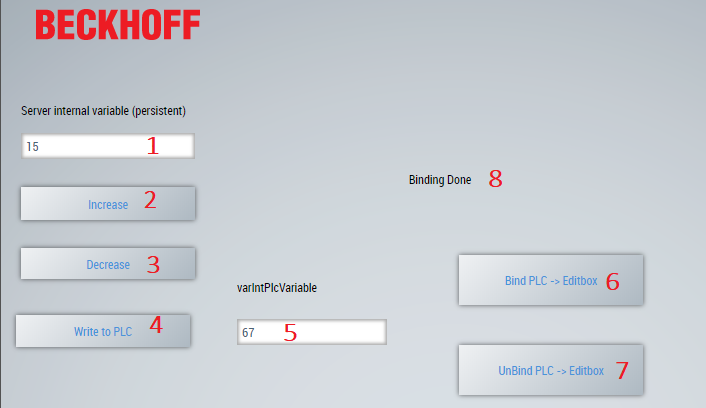
Figure 13: UI of the test applications
We embedded JavaScript code for binding and unbinding. For test purpose we have embedded JavaScript for editbox (5). The code can be found in the downloaded zip file.
var myControlInt = TcHmi.Controls.get('TcHmi_Controls_Beckhoff_TcHmiTextbox_IntPLCVariable');
if(myControlInt){
    var result = TcHmi.Binding.exists('Text',myControlInt);
    if(result){
         console.log("Binding exists with IntPLCVariable");
    } else {
         console.log("Binding does not exist with IntPLCVariable");
    }
}
if(myControlInt){
    var symbolExpression = TcHmi.Binding.resolveEx('Text',myControlInt);
    if(symbolExpression){
         console.log(myControlInt.getId() + '::Text is bound to symbol expression: ' + symbolExpression.toString());
    } else {
         console.log("Binding does not exist with IntPLCVariable, symbol expression is null");
    }
}
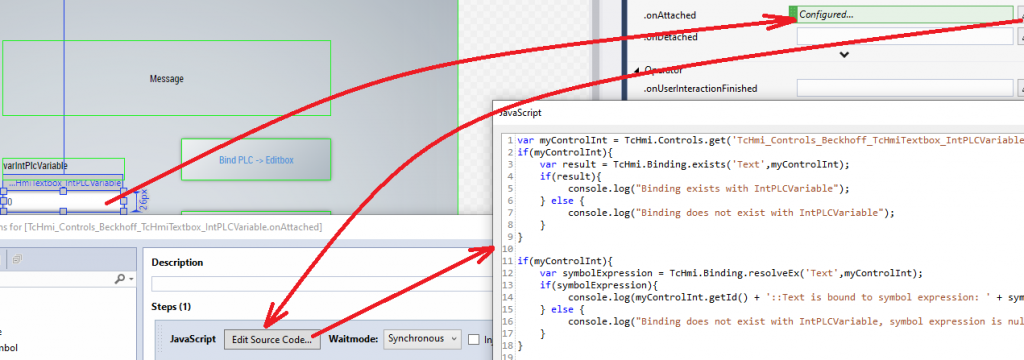
Figure 14: Configure the text box onAttached event
We have embedded the following code for button number 6 (to make the binding), for unbinding, we have a little bit of different code that can be check by copying the code.
var myEditBoxControl = TcHmi.Controls.get('TcHmi_Controls_Beckhoff_TcHmiTextbox_IntPLCVariable');
var myMsgBoxControl = TcHmi.Controls.get('TcHmi_Controls_Beckhoff_TcHmiTextblock_Message');
if (myEditBoxControl && myMsgBoxControl) {
    TcHmi.Binding.createEx('%s%PLC1.MAIN.varIntPlcVariable%/s%', 'SetText', myEditBoxControl);
    var result = TcHmi.Binding.exists('Text',myEditBoxControl);
    if(result){
        myMsgBoxControl.setText('Binding Done');
    } else {
        myMsgBoxControl.setText('Binding not Done');
    }
}
How do we bind control property and variable
We can do it in 2 ways:
=> We can bind a variable by selecting a small square and selecting the mapped variable. If we don’t use these configuration options then we can create by JavaScript code. Whenever the varIntPlcVariable is changed in the PLC, then the Text field will be changed as well.
=> If we don’t have the binding then the field will be empty but we can bind it by the following code.
TcHmi.Binding.createEx('%s%PLC1.MAIN.varIntPlcVariable%/s%', 'SetText', myEditBoxControl);
If we have executed the above code (in any way) then when the variable in PLC is changed then the edit box will
be updated though we have not configured it by pressing the small rectangle.
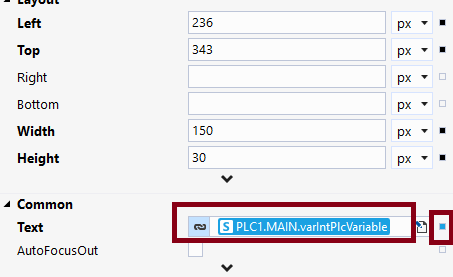
Figure 15: Configure the text box with Symbol
Advanced topics about Symbol, Symbol expression and Binding
We have described symbols, compound user control, and how to reduce the number of parameters passing for user control has been described. You need some knowledge about user controls, JavaScript, and subscription mechanisms in TwinCAT.
Here is the link to how you should go through the tutorial.
=> Symbol, Symbol Expression, and bindins this page https://www.hemelix.com/scada-hmi/twincat-hmi/twincat-hmi-symbol/
=> Compound user control, https://www.hemelix.com/scada-hmi/twincat-hmi/twincat-hmi-compound-user-control/
=> How to reduce the number of parameters when using compound user control, https://www.hemelix.com/scada-hmi/twincat-hmi/mapping-and-subscription-using-js/
You can watch the video, and go through the source code. If you have an issue then you can comment on the YouTube video or in our Google group
Tips 01: Why my HMI does not updated with initial value set in the server or in server extension?
Data need to changed if we want to display data on the UI. One way to configure the UI with custom events as shown in the following image.
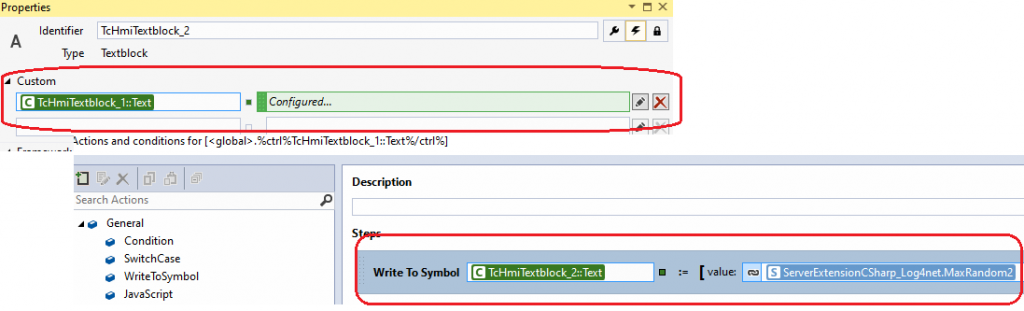
Figure 16: Custom event configuration (we tell whenever the UI text is changed then it is written to the server variable)
Tip 02: I see warning symbols besides my mapped variables, which it is shown in the following image.
The reason for this you have a running runtime with previous variables mapped (from other PLC programs).
Sol: just unmap these variables (if those variables are not needed in the current program) or check if the PLC is in run mode.
Tip 03: If all variables are marked with the symbol, then your route has been lost or the data in the PLC has been changed. If you add the target PLC in TwinCAT route, then it will be fine again, or if you refresh the mapping, it may disappear. If you had an array of 120 and now you change the item numbers to 130, this will create this type of warning. Refresh as shown in Figure 17.
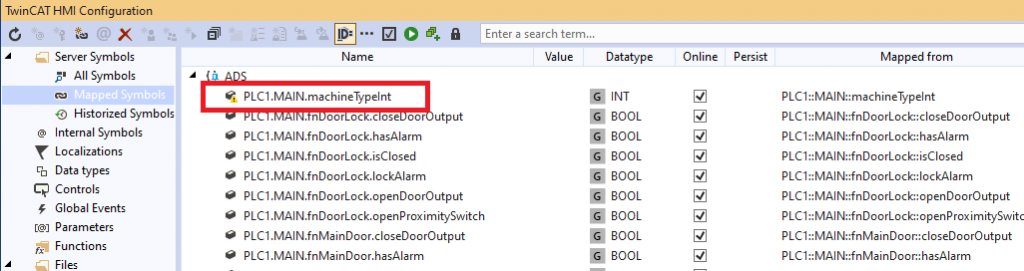
Figure 17: Effect of route changes on PLC variables
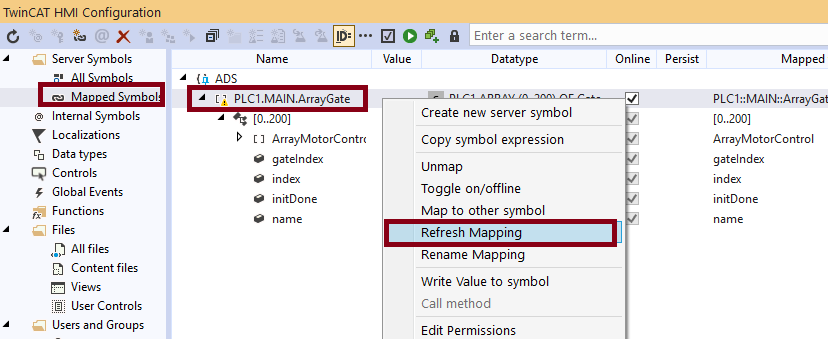
Figure 18: Refresh variables when those are out of sync.
Tips 04: We can see this type of error sometimes in the console.
TcHmiFramework.js:744 [2021-11-08T07:50:48.925Z][Error] [Source=Framework, Module=TcHmi.System.TriggerManager, Event=%i%System_Mode%/i%, ObjectType=WriteToSymbol] Code: 3005/0xbbd, Message: E_SERVER_COMMAND_ERROR
Reason: %s%PLC1.SystemMode%/s%: Error in command for symbol: ‘PLC1.SystemMode’ in response from server with id: ‘9’.
Domain: TcHmi.System.Symbol
as result of: Code: 7/0x7, Message: ADS_API_RETURN_CODE
Reason: Sum ADS write request of size 13 containing 1 requests failed.
Domain: ADS
Solution: At least, if our route has been deleted for some reason then we can see this type of message.
Tips 05:
When we add a function by copy-paste then sometimes it shows 404. One solution is expanding the field and it will be OK,
Also, a good idea to check with the console.log method. This causes unwanted text to be inserted (newline or CR or similar, not exactly known to me, if you know you can post to our Google group) and it does not work.
Tips 06:
We can set the color and text of an edit box in the following way. It does not work if we create a hexacode and use it directly.
var deviceColorNormal = {
"color": "rgba(0, 153, 0, 1)"
};

var NameUpperText = TcHmi.Controls.get('Gate_UpperOne.MyTextBlock');
if (NameUpperText != undefined) {
	var myColorRed = {
	color: "red"
};
let aa = parseFloat(readData).toFixed(2);
NameUpperText.setText(aa);
NameUpperText.setTextColor(myColorRed);
}
Tips 07: Type mismatch (3005), Invalid type at ´DataField´: ´Expected string, got int.
There are many reasons why we get 3005, quite annoying! Here we list what I see so far.
3005 is defined in the following page: https://infosys.beckhoff.com/english.php?content=../content/1033/te2000_tc3_hmi_engineering/3758305291.html&id=
If we have mapped a data struct and after mapping, we have changed a field then we need to refresh or remap the data from the HMI mapping process (See more in the JavaScript part one for more).
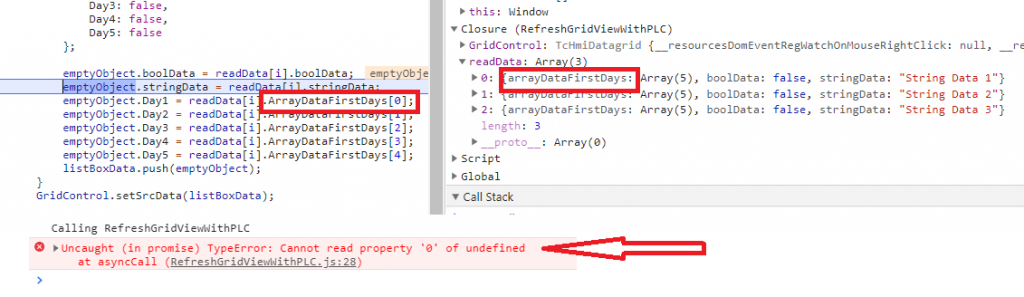
Tips 08: Uncaught (in promise) TypeError: Cannot read property of ‘0’ of undefined
TYPE deviceProperty :
STRUCT
 boolData : BOOL;
 stringData : STRING;
 ArrayDataFirstDays : ARRAY [0..4] OF BOOL;
END_STRUCT
END_TYPE
We changed by mistake ArrayDataFirstDays to arrayDataFirstDays (Note: A to a). Adding new field in the PLC struct has no effect on the mapping side.
Tip 08: Auto-mapping does not work in the case of subscription
When we subscribe to an array and try to get data by subscribing, then we get error code 3005 if we don’t auto-map each variable.
If we have an array of function blocks or a struct, then we have to map each variable; it is not enough if we map from the upper level. In case of manual mapping, it looks like if we map from the upper level, then it is enough. But for an auto map, we need to map each variable.
Tip 09: Invalid range at: Expected 6, got 0
When we try to write data to an array and then we get error code 3005. It also shows the inner error in promise level expect something and got something.
The reason of this is underlying array size has been changed but in the mapped file we have previous number of item. Solution to this problem is unmapp the variable and map it again.
Tip 10: We get 3005 also when we don’t have permission to read or write
If we have defined that a log in user can read some symbol, and if a viewer tries to read it, then we get a 3005 error as well.
Tip 11: Error Code 2002 Schema Unknown Definition (Could not resolve Schema)
If we have not mapped a variable but we are trying to read/write it, we get 2002, as shown in the following image.

Tip 12: Mapping in the case Array size is bigger than 99
When the array size is bigger than 99, then the mapping process does not show all the items; it shows single items. We can map the variables as shown in Figure 05.
References
Next
Download the sample from the link given above.
Next, let’s continue with details of HMI configuration at https://www.hemelix.com/scada-hmi/twincat-hmi/twincat-hmi-user-control/
Ask questions related to Hemelix sample code and design at Google group https://groups.google.com/g/hemelix