
TwinCAT HMI Server Extension
Java script is used heavily in TwinCAT HMI development. What will happen if something can’t be implemented by javascript or if we want to isolate our business logic in remote servers and there it is not possible to implement by JavaScript? TwinCAT HMI provides a way to implement the functionalities and use it as it has been a built-in type. Properties and methods can be configured when a button has been clicked for example. The framework provides the mechanism so that when the button in UI is pressed then a method from the extension is called.
List of extensions provided by Beckhoff:
The development of server extensions is done in C#. The development takes place in a separate project type within the Visual Studio. A corresponding project template is available for this purpose. Download Sample 1 (full step by step)
Download Sample 2 (no step by step decription)
This extension is a DLL that implements an interface provided by the HMI framework. HMI can call methods implemented by the custom extension module so if we try to call the method from a random DLL that will not be possible since the framework has no idea about the DLL.
Custom extension and TwinCAT architecture
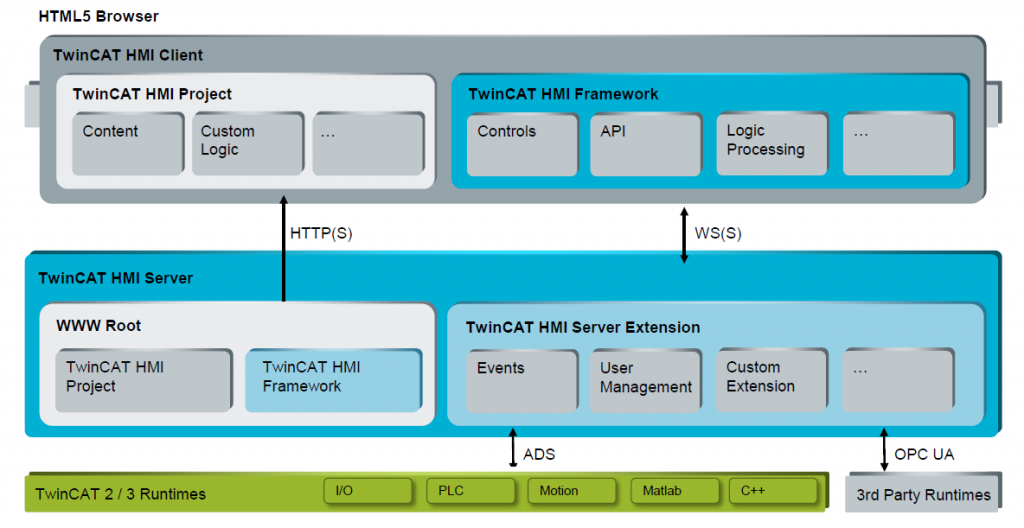
Figure 1: TwinCAT extension architecture
Relation between TwinCAT HMI client and custom module
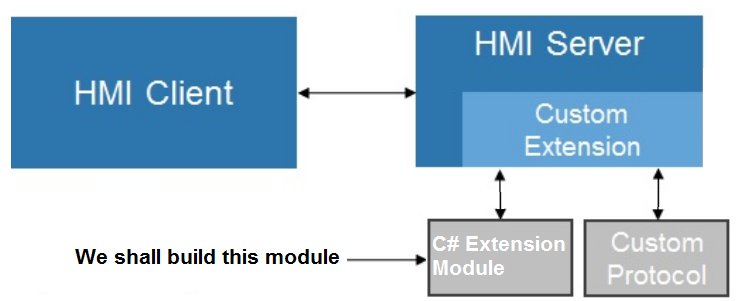
Figure 2: TwinCAT client and HMI server communication
We shall show how to build the C# extension module (a C# DLL that will fit into the HMI framework.) The DLL can call methods and sets data to and from the HMI Server. The framework is provided by the TwinCAT. In most cases, we need to focus on our actual problems.
Sample Example 1
The module we are developing will show how to display the time string from the extension module to HMI. It will show how to set data from the HMI to the extension module. We read back the data from the extension and display the data to HMI. So what we set to the extension should be the same as what we read from the extension.
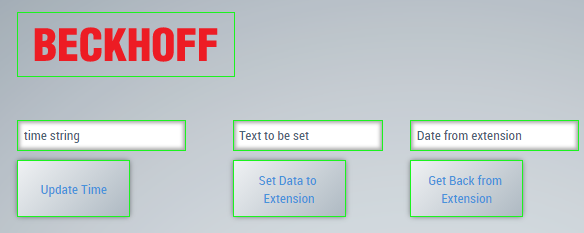
Figure 3: TwinCAT C# extension, first sample HMI
The above image shows the control used in the sample, the extension module works as a plugin to the TwinCAT HMI framework. The table below explains shortly the types, functionalities, and ID of each control. If we follow this tutorial then it is a good idea to have the same ID of those control.
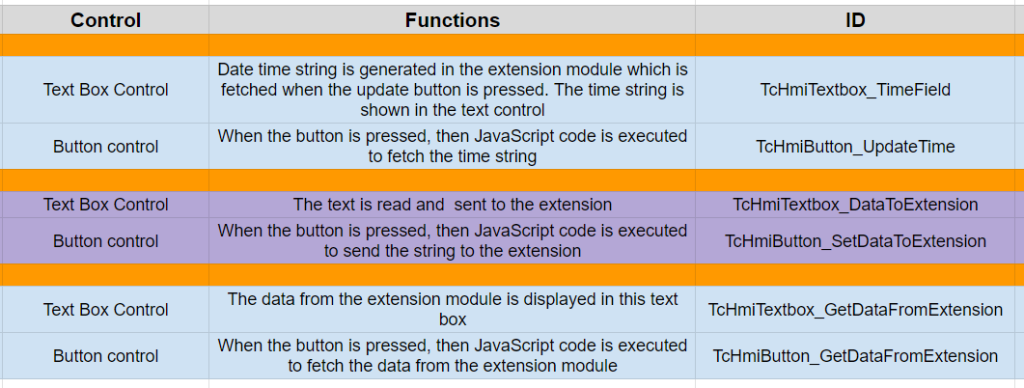
Figure 4: Control used and it’s function in the sample 1
STEP 01: In Visual Studio, create an HMI project, drag and drop all the necessary controls (as shown in the previous figure) in the HMI. Change the ID and default text of those text box controls as shown in figure 1 and 2
STEP 02: In Visual Studio, select, Add a new project, select the CSharp extension then Next and Create
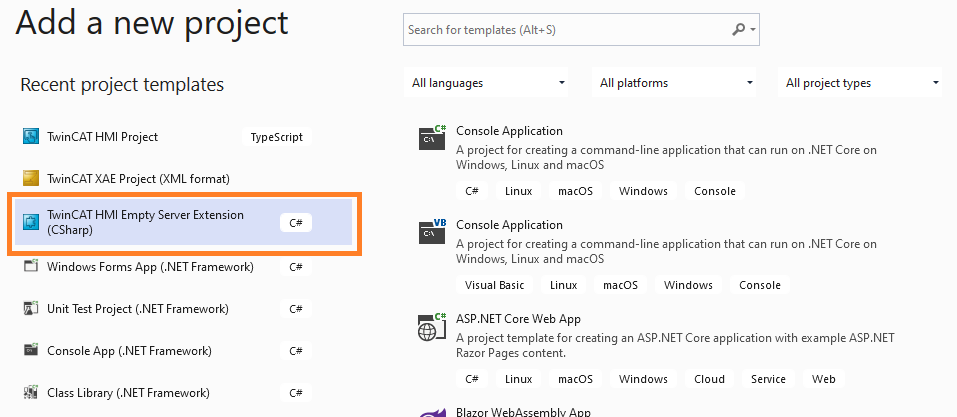
Figure 5: TwinCAT C# extension creation by the wizards provided in HMI Engineering
STEP 03: Select the HMI version if you have multiple versions installed and then press Create
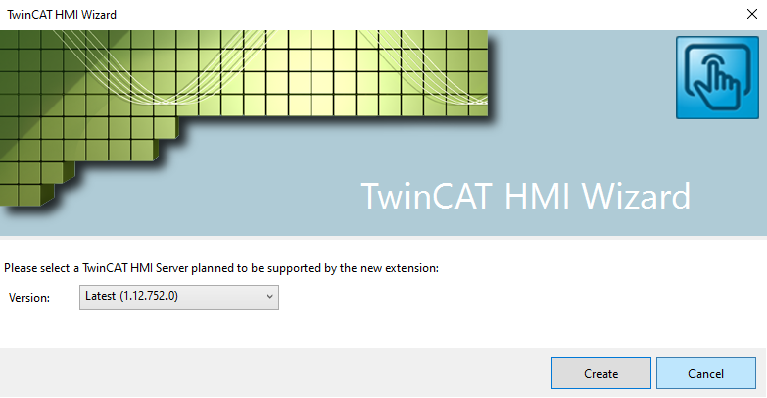
Figure 6: TwinCAT C# extension creation, select the right version if you multiple HMI engineering installed in your system
Note: Many times if we use different engineering version, the process can be a bit different or similar, we use 1.12.752.0
At this point, we have created the project and in Visual Studio it will show something similar. We should have a CSharp source code (xx.cs where xx is the extension project name). The framework provides template code for the interface methods which we need to fill.
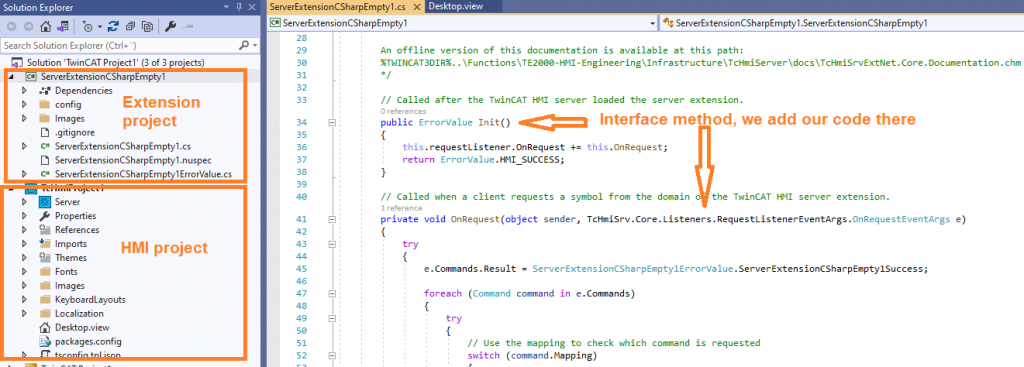
Figure 7: TwinCAT C# extension creation, both projects (HMI and Extension in the same solutions)
Now we should be able to build the project successfully. Browse the generated code and you can find the OnRequest method, we have a switch case for mapping different commands from HMI. We replace ” YOUR_MAPPING” with a suitable command string in the following snippet in xx.cs (where xx is our extension project).
switch (command.Mapping)
{
    // case "YOUR_MAPPING":
    //     Handle command
    //     break;
    default:
    command.ExtensionResult = ServerExtensionCSharpEmpty1ErrorValue.ServerExtensionCSharpEmpty1Fail;
    command.ResultString = "Unknown command '" + command.Mapping + "' not handled.";
    break;
}
A different version of the wizards creates a different type of code. The version we are using here is 1.12.752.0. In the previous version, it was generating a bit different code but the idea is the same, so be aware of that.
We shall think a bit our requirements and functionalities. We get time as string from extension so we can have a command name ‘GetTimeDataValue‘. We shall set the string data from HMI to the extension, so we can have a command name ‘SetDataToExtension‘. The final one, we get the string what we set from the HMI to extension, we read it back to verify that it really work, so we introduce another command ‘GetDataFromExtension‘
We shall update the xx.cs (where xx is our extension project name) with the follwoing code. When we read or write from JavaScript code then the framework call the method OnRequest() which we need fill based on our commands. We are showing only switch case part, those comands are highlighted! We can check complete code by downloading it.
switch (command.Mapping)
{
	 case "GetTimeDataValue":
		command.ReadValue = DateTime.Now.ToString("HH: mm:ss");
		command.ExtensionResult = ServerExtensionCSharpEmpty1ErrorValue.ServerExtensionCSharpEmpty1Success;
		command.ResultString = "GetTimeDataValue '" + command.Mapping + "' OK ";
		break;
	case "SetDataToExtension":
		if (command.IsSet == true && command.WriteValue != null)
		{
			dataBackAndFourth = command.WriteValue;
			command.ExtensionResult = ServerExtensionCSharpEmpty1ErrorValue.ServerExtensionCSharpEmpty1Success;
		}
		else
		{
			command.ExtensionResult = ServerExtensionCSharpEmpty1ErrorValue.ServerExtensionCSharpEmpty1Fail;
		}
		command.ResultString = "SetDataToExtension '" + command.Mapping + "' not handled.";
		break;
	case "GetDataFromExtension":
		command.ReadValue = dataBackAndFourth;
		command.ExtensionResult = ServerExtensionCSharpEmpty1ErrorValue.ServerExtensionCSharpEmpty1Success;
		command.ResultString = "GetDataFromExtension '" + command.Mapping + "' has been handled";
		break;
Note:
We have declared a variable like this, it will be set from HMI and read back for HMI from the extension.
private string dataBackAndFourth = "";
We are using or setting command.ReadValue to current time as string, by which we receive the data from extension to HMI.
When we write data SetDataToExtension then we check if the data is set by command.IsSet and command.WriteValue is not null then we can set the variable in our extension class.
dataBackAndFourth = command.WriteValue;
STEP 04: Now we need to put the code (which are in italic below) in the file xx.Config.json (where xx is the extension project name) inside “symbols” : { PUT the italic code here }. If we don’t add these variables would not be available to HMI
“symbols”: {
    "GetTimeDataValue": {
      "readValue": {
        "$ref": "tchmi:general#/definitions/String"
      },
      "hidden": false
    },
    "SetDataToExtension": {
      "readValue": {
        "$ref": "tchmi:general#/definitions/String"
      },
      "hidden": false
    },
    "GetDataFromExtension": {
      "readValue": {
        "$ref": "tchmi:general#/definitions/String"
      },
      "hidden": false
    }
}
STEP 05: If the project was compiled successfully, the extension can be loaded from the server. So we need a reference for the extension from the HMI project.
=> Do the following
HMI Project References | Add References | Select the extension.
Our extension must be checked. In this way, we can have references of extension to the HMI project, so the command of extension is available to the HMI.
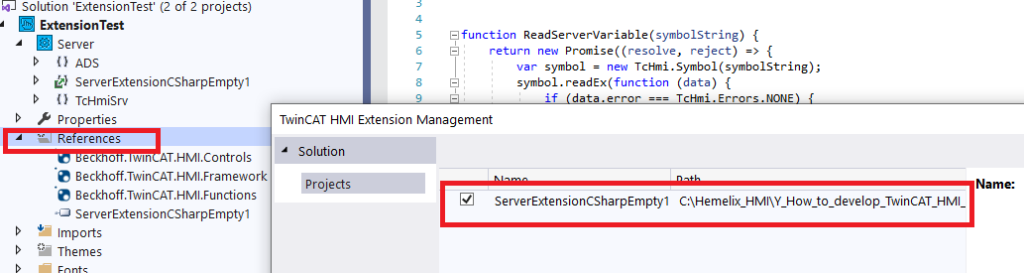
Figure 8: Adding references to extension to HMI project
If the project compiles successfully, we can activate the extension. If the arrow beside extension is green otherwise it is red.
Note: If the extension is red (not activated), if we publish the project then it will not work as expected.
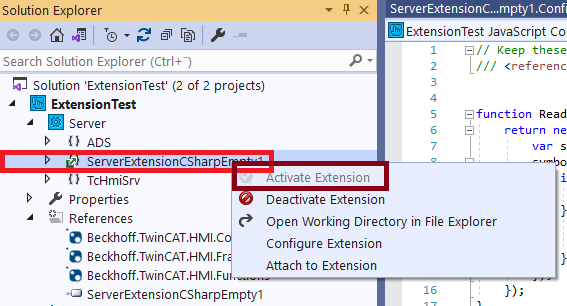
Figure 9: Activating extension, green arrow means activated, red means not activated
STEP 06:
Bring the HMI Configuration menu as shown in the following figure for mapping those variables. Most cases, if we build the project those variables are mapped by itself. If those are not mapped we can map just like how we do with ADS variable mapping.
We can see the mapped variable as shown in the following figure. If those are not shown in the mapped symbol then those should be visible in all symbols and we can map those from there as we do for ADS. If those are missing in the All Symbols group, we can clean the project and rebuild it.
Note: if we build and configure then we change the string command then we can have an invalid command as shown in the following figure, for example, GetDataValue was defined previously and we don’t have it anymore it shows as a warning, if it happens like this we can delete it.
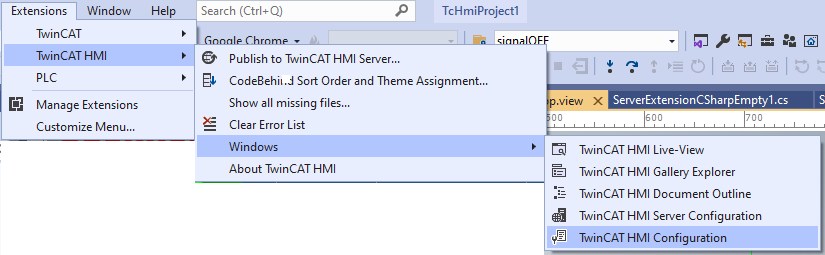
Figure 10: The symbols for extension can be mapped as an ADS variable.
We can see the mapped variable as shown in the following figure. If those are not shown in the mapped symbol then those should be visible in all symbols and we can map those from there as we do for ADS. If those are missing in the All Symbols group, we can clean the project and rebuild it.
Note: if we build and configure then we change the string command then we can have an invalid command as shown in the following figure, for example, GetDataValue was defined previously and we don’t have it anymore it shows as a warning, if it happens like this we can delete it.
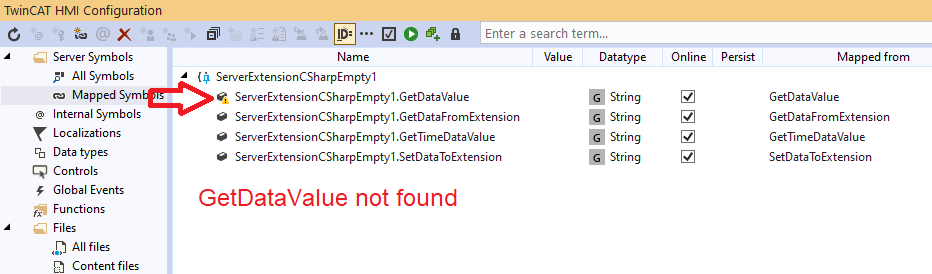
Figure 11: Our mapped symbols,GaetData value as extra
The symbol can be used from the Action and condition editor or can be used by JavaScript. This extension can do any work as the C# application in windows can do. There are two ways by using the symbol binding mechanism that we have used already in the different projects already.
The following is a symbol expression which can be read the data from extension by using ReadEx TwinCAT JavaScript function.
%s%ServerExtensionCSharpEmpty1.GetTimeDataValue%/s%
We can add a data item to the extension by the following symbol expression.
'%s%ServerExtensionCSharpEmpty1.SetDataToExtension%/s%'
STEP 07:
We can use ReadEx or WriteEx directly to read/write variable from/to the extension module, but we want to use these in a better way. We can convert the asynchronous call to a synchronous call as described on page https://www.hemelix.com/scada-hmi/twincat-hmi/twincat-hmi-async-function/ see section Asynchronous call as synchronous.
=> We insert a code behind file in the HMI project (not in the extension project),
=> Do the following
HMI Project | right Click | New Item | Select CodeBehind (JavaScript) and the default name is fine (CodeBehindJs1.js)
=> Insert the following code in the code behind file.
function ReadServerVariable(symbolString) {
    return new Promise((resolve, reject) => {
        var symbol = new TcHmi.Symbol(symbolString);
        symbol.readEx(function (data) {
            if (data.error === TcHmi.Errors.NONE) {
                resolve(data.value);
            } else {
                var errorData = `Error in ReadServerVariable symbolString = ${symbolString} data.error = ${data.error}`;
                reject(errorData);
            }
        });
    });
}
function WriteServerVariable(symbolParameter, dataParameter) {
    return new Promise((resolve, reject) => {
        TcHmi.Symbol.writeEx(symbolParameter, dataParameter, function (data) {
            if (data.error === TcHmi.Errors.NONE) {
                resolve(data.error);
            } else {
                var errorData = `Error in WriteServerVariable symbolString = ${symbolString} data.error = ${data.error}`;
                reject(errorData);
            }
        });
    });
}
These two functions will be called from the HMI in JavaScript code, we get references of control (for example the TextBox control), read data from controls send that to extension, and read back and set to the HMI controls.
STEP 08:
Now we focus on the HMI, how to read/write data.
=> Reading time value as a string from the extension
Go to the TcHmiButton_UpdateTime button’s event onPressed event and insert the following code, see JavaScript editor 5.
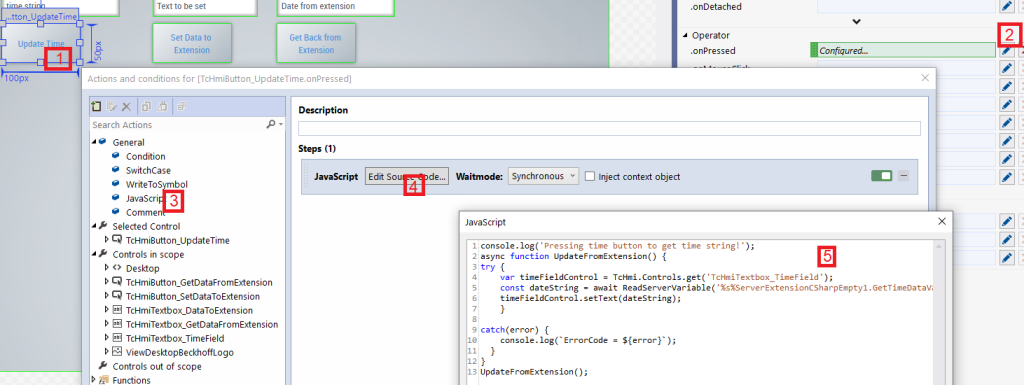
Figure 12: Process for adding and configuring JavaScript code
Setting data from HMI to extension, we fetch the data from the text box control and send that to the extension
Go to TcHmiButton_SetDataToExtension button’s event onPressed event and insert the following code.
console.log('Setting data to extension module');
async function SettingDataToExtensionModule() {
try {
	var textControl = TcHmi.Controls.get('TcHmiTextbox_DataToExtension');
    const writeStatus = await WriteServerVariable('%s%ServerExtensionCSharpEmpty1.SetDataToExtension%/s%', textControl.getText());
	console.log(`writeStatus = ${writeStatus}`);
    }
catch(error) {
    console.log(`ErrorCode  in SettingDataToExtensionModule = ${error}`);
  }
}
SettingDataToExtensionModule();
Getting data from the extension to HMI, We can verify what was written in the previous steps by getting back it from extension. We can make sure that correct data was written and got back the right one.
Go to TcHmiButton_GetDataFromExtensionbutton’s event onPressed event and insert the following code.
console.log('Pressing Get Back Data from extension');
async function PressingGetBackDataFromExtension() {
try {
    var textControl = TcHmi.Controls.get('TcHmiTextbox_GetDataFromExtension');
    const dateString = await ReadServerVariable('%s%ServerExtensionCSharpEmpty1.GetDataFromExtension%/s%');
    textControl.setText(dateString);
    }
catch(error) {
    console.log(`ErrorCode  in calling PressingGetBackDataFromExtension = ${error}`);
  }
}
PressingGetBackDataFromExtension();
Example 2
In the following example, we interact with the SQLite database by using an extension. The extension reads data from the database and displays it on the HMI. The complete source code is ready for download so we shall not describe all the steps here. The following figure shows a diagram of what the application does.
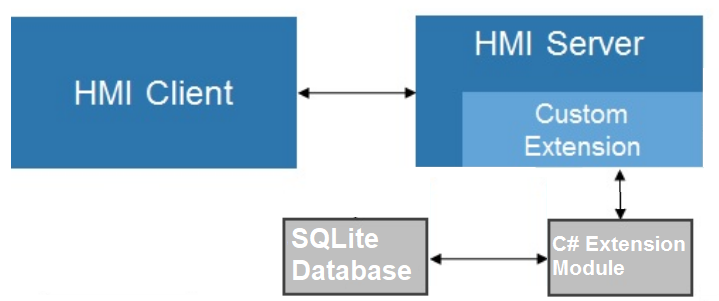
Figure 13: C# Extension Module is our target in this tutorial
The module we are developing will read data from the SQLite database and will be displayed on HMI. If we see figure 13 then we can see a clear picture of what are we going to do in this tutorial. We develop the C# Extension Module. Our focus is the extension, not HMI, not SQLite database. We have separate tutorials for those.

Figure 14: Extension variable can be mapped just like ADS variables.
The data is formatted as needed by the Grid View in extension, so we don’t need to do anything in HMI.
%s%ServerExtensionCSharpEmpty1.GetDataValue%/s%
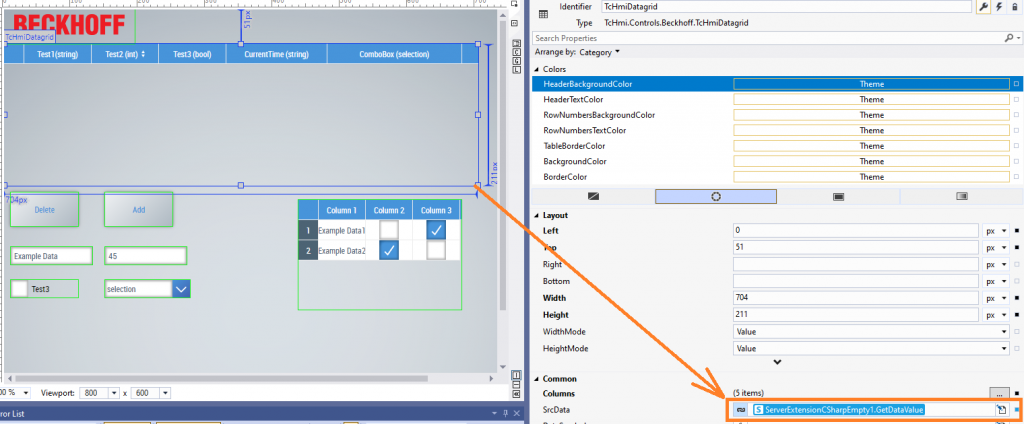
Figure 15: Data source for the Grid view is the extension in second sample
We can add a data item to the extension by the following code, we are using the command WriteValueAdd: In this case, the symbol expression is
'%s%ServerExtensionCSharpEmpty1.WriteValueAdd%/s%'
The data from the HMI is collected as a JavaScript object (uiData). The object is converted to a JSON string and then pass to the writeEx function. This is an asynchronous function that will be called back with data as a parameter that will tell the status of the call.
var myJSONString = JSON.stringify(uiData);
TcHmi.Symbol.writeEx('%s%ServerExtensionCSharpEmpty1.WriteValueAdd%/s%', myJSONString, function (data) {
if (data.error === TcHmi.Errors.NONE) {
     console.log('One item writing to extension OK');
} else {
     console.log('Write was not OK data.details.code = ${data.details.code}');
}
Debugging Extenstion
The extension module can be debugged by Visual Studio debugger. We shall describe step by step in this section. In general, if describe the C# extension. If we want to debug JS code we can use a browser debugger in Chrome for example.
=> Build the extension in Debug mode (of Visual Studio), if we build in Release mode, we can’t set breakpoint
=> Put the breakpoint in the suspected place where we think might have problems
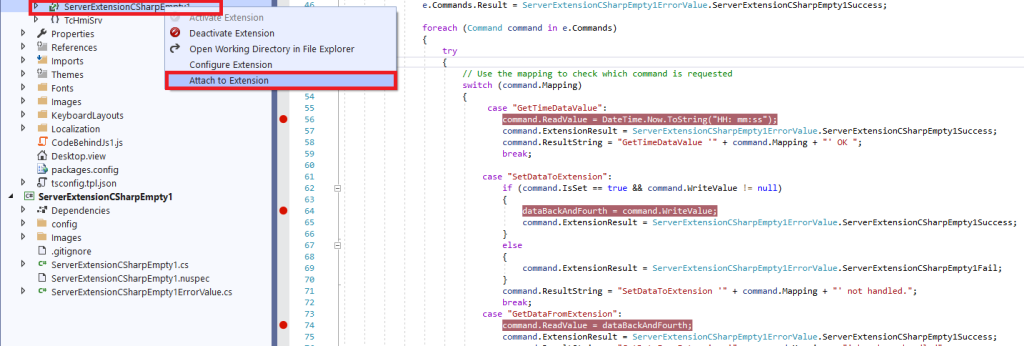
Figure 16: Attaching extension for debug purposes
=> Now if we run the HMI and set on a button then it will hit a break point and we can go step by step and check the variables. If the debugging process does not work, we can clean the solution and rebuild the project. It should work again.
We have noticed that sometimes it may not work then as an alternative, this can work also, if you know the work around you could coment in our Google group.
=> Select the extension project | Debug | Attach to Process… |
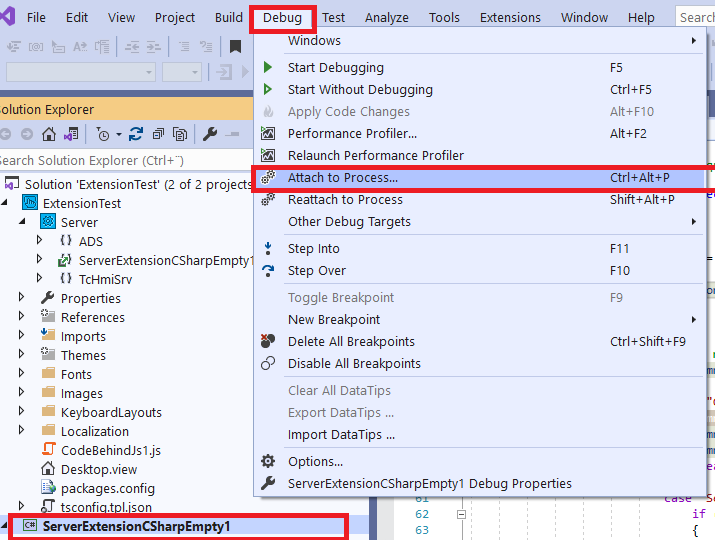
Figure 17: Attaching extension for debug purposes
=> Attach to TCHmiExtensionContainer.exe and use the desktop, debug point will hit and we can continue debugging
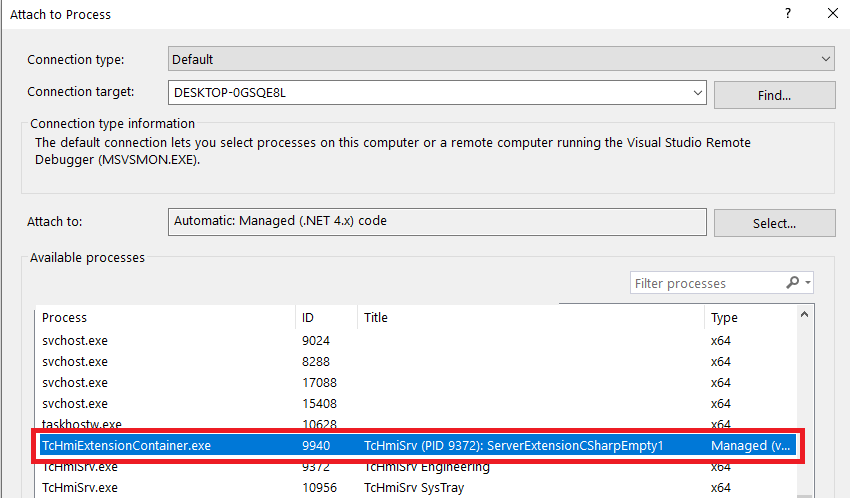
Figure 18: Attaching extension for debugging purposes to TCHmiExtensionContainer.exe
Tips:
T01: Symbol access right from the server extension is as follows:
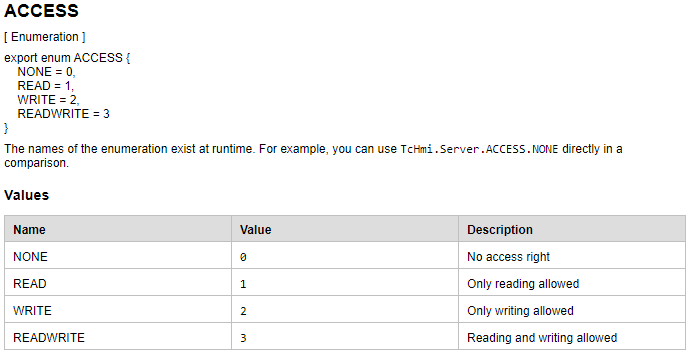
Figure 19: Access right definitions
T02: If you are creating an extension in version Product Version: 1.12.742.5, Version: 1.12.742.5 (not sure about minor version) or later, you need to include the extension version project as reference to the HMI project. you can create a package by the extension and add it to the project as references, then we shall get a chance to activate the extension and you can used the mapped variables as described before.
T03: When we are creating the module (DLL by the wizards provided by Beckhoff) we have seen it creates RandomValue and MaxRandom. If we search by visual studio then replace all found items but in next time if you build the whole project then it will appear again. The JSON file is auto created by taking the data from HMI configuration (mapped symbol). If you un mapped the symbol the it will be removed from the JSON file.
T04: When changing variable info or updating extension DLL for the framework then we may see there is config error for the extension. This will disappear if we just just restart the server (from bottom right corner).
T05: Sometimes, the extension module is not updated. The reason for some reason the Visual Studio does not clean old files properly. As a result, you may need to clean it manually.
T06: Symbols from extension module is shown or listed in the mapped list according to TcHmiSrv.Config.default.json file (found in $ProjectPath\Server\Extensions\TcHmiSrv)
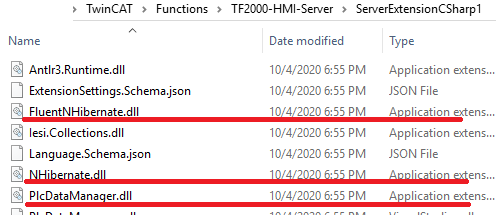
Figure 20: Locations of module in the HMI Server
Imported libraries are located in the folder C:\TwinCAT\Functions\TF2000-HMI-Server\ServerExtensionCSharp1 when is our extension project. In the above image, we have used those DLL in our project and those are visible in the exported project folder.
T07: We need to make sure the following function should not throw exception.
public ErrorValue Init(ITcHmiSrvExtHost host, Context context)
If you are using log4net.config in the Init finction, make sure the following path is correct.
“C:\\TwinCAT\\Functions\\TE2000-HMI-Engineering\\Bin\\x86\\TcHmiEngineeringExtensions.Server\\log4net.config”
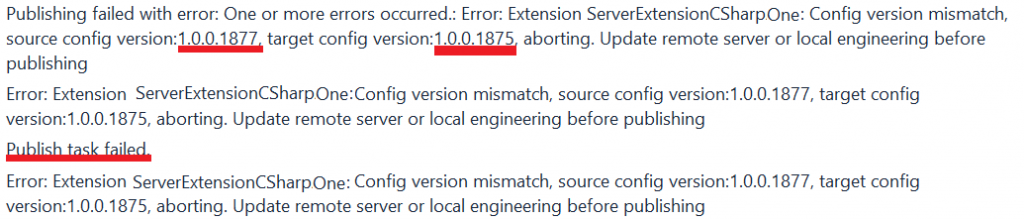
T08: We can have error sometimes that indicate that config file version mismatches, in this case we can’t publish the extension. See the following screenshot, where our module name is ServerExtensionCSharpOne and the config file is ServerExtensionCSharp:Config. The solution is we can change the version number in the config file and try again.
There is another way to solve this problem as well.
=> Go to HMI Server’s config page
=> Press on TcHmiSrv tab in the configuration page
=> Press on Extensions, then the extension in questions and delete (upper right corner cross)
=> Publish it again, boom!
T09: Beckhoff publishes some of the modules via Nuget package management as compared to the previous releases ( for example SqliteHistorize and Event-related), we can end up with a situation that may be we don’t find the right version. One solution to this problem is to try the previous version of the package. The case below can be solved by installing the previous version (12.742.5) but 12.744.4 does not work.
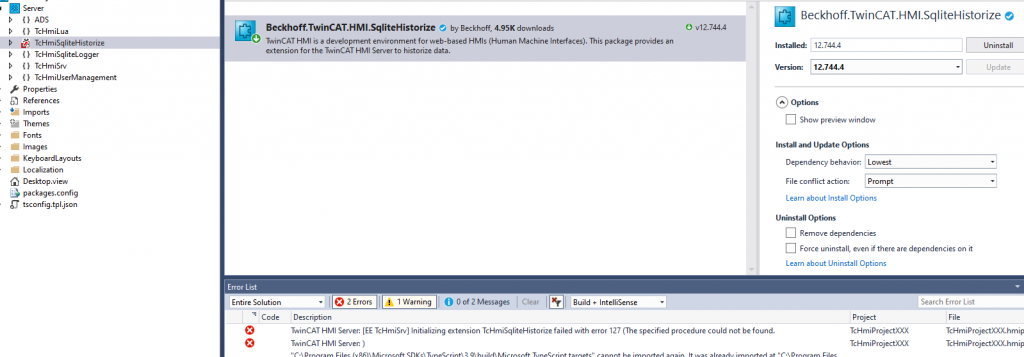
Figure 21: Mismatches of extension provided by Beckhoff. This must be compatible with our Server version.
T10: License is needed when we activate the extension. We need to purchase a license for HMI Server.
=> Add a reference of the extension DLL or project to the HMI project
=> Add TC3 HMI Extension SDK license plus other licenses if needed
=> Activate the 7 days trial license
=> We can create a small PLC project and we select the HMI Server as target and activate the license
=> Following figure shows that ExtensionTest has been added to reference (Reference | Add Reference)
=> It should be visible as green (if activated) and as red (if not activated)
=> You can click also on the HMI server config page to activate the extension
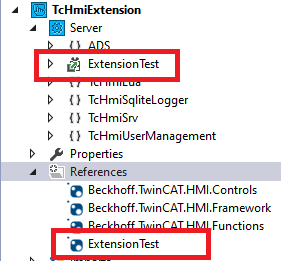
Figure 22: Extension in activated state
T11: Symbols and the commands must match
{
  "$schema": "ExtensionSettings.Schema.json",
  "guid": "f0c3bd99-c625-428e-b831-fcf76a666c3b",
  "version": "1.0.0.0",
  "configVersion": "1.0.0.6",
  "policies": [
    "StrictPropertyValidation"
  ],
  "symbols": {
    "ReadValueString": {
      "readValue": {
        "allOf": [
          {
            "$ref": "tchmi:general#/definitions/String"
          },
          {
            "readOnly": true
          }
        ]
      },
      "hidden": false
    },
    "WriteValueInt": {
      "readValue": {
        "$ref": "tchmi:general#/definitions/Integer"
      },
      "hidden": false
    }
  }
}
switch (command.Mapping)
{
	case "ReadValueString":
	//At this point IsSet is false
	command.ReadValue = 7777;
	//At this point IsSet is true
	if (command.IsSet == true)
	{
	command.ReadValue = 7777;  //This will be executed
	}
	command.ExtensionResult = ServerExtensionReadWriteErrorValue.ServerExtensionReadWriteSuccess;
	command.ResultString = "ReadValue1 '" + command.Mapping + "' not handled.";
	break;
	case "WriteValueInt":
	command.ReadValue = aString;
	if (command.IsSet == true && command.WriteValue != null)
	{
	command.ReadValue = 7777; // If UI has written something to WriteValueInt will have value for current cycle
	}
	else
	{
	}
	command.ExtensionResult = ServerExtensionReadWriteErrorValue.ServerExtensionReadWriteSuccess;
	command.ResultString = "WriteValue1 '" + command.Mapping + "' not handled.";
	break;
T12: We see the following message when the extension is not activated, we activate the extension and try again
TcHmiFramework.js:687 [2022-04-17T07:39:48.523Z][Error] [Source=Framework, Module=TcHmi.System.TriggerManager, Event=Desktop.onAttached, ObjectType=WriteToSymbol] Code: 3005/0xbbd, Message: E_SERVER_COMMAND_ERROR
  Reason: %s%ServerExtensionCSharpEmpty1.WriteValueInit%/s%: Error in command for symbol: 'ServerExtensionCSharpEmpty1.WriteValueInit' in response from server with id: '7'.
  Domain: TcHmi.System.Symbol
  as result of: Code: 2050/0x802, Message: INVALID_DOMAIN
    Reason: Invalid domain
    Domain: TcHmiSrv
How to take logs for Extension module
Using SQLite ( Some HMI engineering version it is built in and some don't have)
For taking a log by using log4net see the following:
https://www.hemelix.com/software/log4net-for-hmi-extension/
Sufficient logging allows answering nearly any question about what a program is doing. There are two sides we see to increased visibility: the first is visibility into what our code is doing after it’s running and people are using the software we have written. The second is visibility into your code during development. There are different ways to take logs depending on the framework we are talking about. On this page, we shall describe how we can take logs for the Beckhoff HMI extension module.
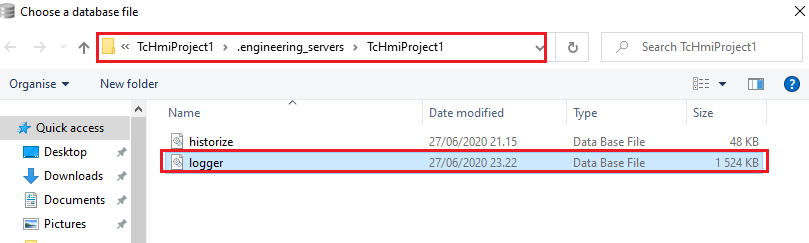
TcHmiSrv is the namespace where we have Context. ITcHmiSrvExtHost interface has a method send. This can be used to write a log file to the HomeAutomationMainDoorStatusReader\.engineering_servers\HomeAutomationMainDoorStatusReader as SQlite database. HomeAutomationMainDoorStatusReader is our project name.
namespace TcHmiSrv.Management
{
    public interface IExtension
    {
        ErrorValue Init(ITcHmiSrvExtHost host, Context context);
    }
}
We need to hold the host and context and call send method to record in SQLite database.
         // Sends a message with the specified context, name, parameters and severity.
        public void Send(Context context, string name, IEnumerable<string> parameters = null, Severity severity = Severity.Severity_Info)
        {
            Message message = new Message(context, severity, name);

            if (parameters != null)
            {
                foreach (string parameter in parameters)
                {
                    message.Parameters.insert(message.Parameters.Size.ToString(), parameter);
                }
            }

            _host.send(context, message);
        }
This is an example when the init method is called we can record an appropriate message to the database.
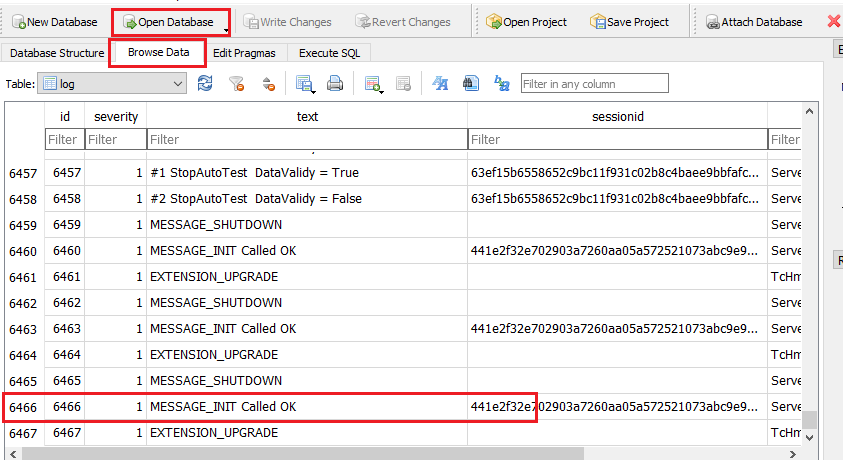
_logger.Send(context, "MESSAGE_INIT Called OK");
The logger database file can be opened by the SQLite browser. Here are the screenshots for our home automation system step by step.
Finally we browse the database and see that our text is there.
We can use log4Net as well that we have described on this page https://www.hemelix.com/software/log4net-for-hmi-extension/
YouTube Video
References:
=> https://infosys.beckhoff.com/english.php?content=../content/1033/te2000_tc3_hmi_engineering/87759849078974712843.html&id=3745752989537607837 (List of TwinCAT3 HMI extension)
Download the sample from the link given above.
Next, let’s try to understand how to display SQL data to HMI at https://www.hemelix.com/sql/sql-data-modeling/
Ask questions related to Hemelix sample code and design at Google group https://groups.google.com/g/hemelix