TwinCAT HMI Popup

We are learning HMI, right? We want to click on a machine icon and then we want a PopUp or similar that will give us an option to update settings. How can we achieve this? If you go through this section, you will be master of this shortly. When we create a Popup, our target is to pass data from the PLC to the Popup and give the user an option to modify some variables in the Popup, and that data should be changed in the PLC. This article describes how these can be achieved with a few real examples with source code.
Download the sample code Popup_DataBackAndForth, If you think this is useful please share it among your network.
Example 1 : Introduction to PopUp
Most PopUps are TwinCAT HMI user control. These are reusable components made by Beckhoff. We can add user control to our projects by using the TwinCAT framework or by JavaScript code. Updating UI based on user interaction has made JavaScript so popular.
We shall explain all the steps necessary to start a simple PopUp when we press on the Beckhoff logo as shown in the following images.
=>If we press on the Beckhoff logo, it will show a dialog with the text Hello World
=>If we press on the top right corner cross the dialog will be closed.
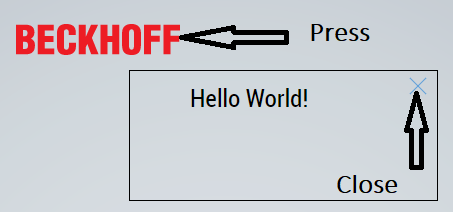
Figure 01: Design a popup dialog
Design :
When we press on the Beckhoff image, we shall show the dialog as shown in the above images. We should be able to drag the dialog around and then we can close it by clicking on the Cross image. We can open as many dialogs needed.
=>Create a sample HMI project by using Visual Studio.
=>Create two folders Script and UserControl in the solution
=>Add close_normal.svg to the Images folder (or any other images, if you don’t have the image then download the project first.)
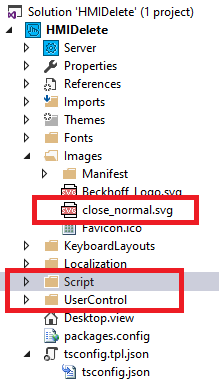
Figure 02: Folder structure in Visual Studio
=>Add a user control (select project | right click | add | new item then user control)
=>Insert a Textblock ( make Identifier as header) also insert an image and configure it’s Src as Images/close_normal.svg
=>Add a parameter to the user control (DeviceName, type String)
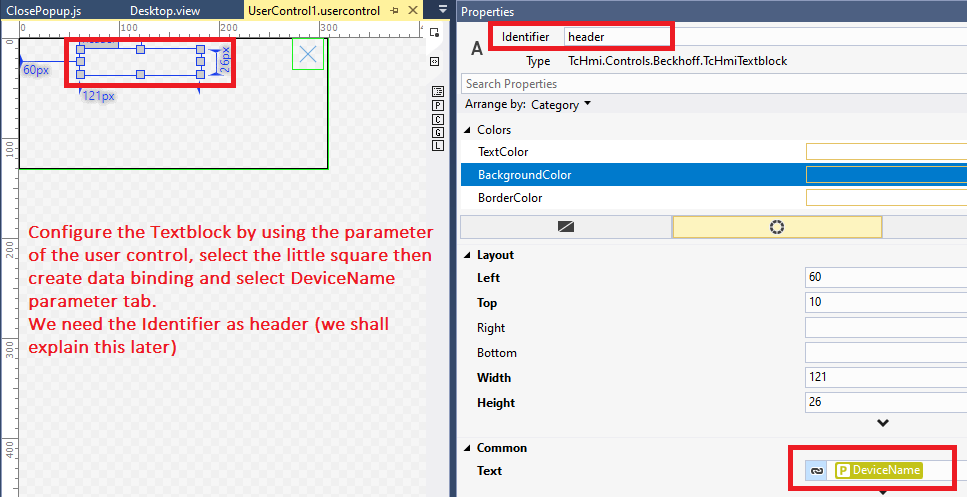
Figure 03: Configuring text block for popup
See the user control parameter as shown in the following image. Remember the Attribute Name, it will be needed when we update the parameter name by program in JavaScript.
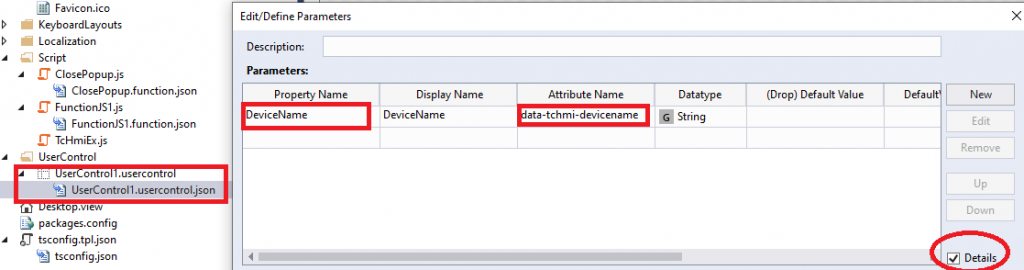
Figure 04: Configuring parameter for device name
=>Insert two JavaScript file to the solution (project | right-click | new item | Function JavaScript), name those functions appropriately (I kept one default name FunctionJS1.js and another one as ClosePopup.js)
=>Add a special JavaScript file (TcHmiEx.js from the zip file, download the file and extract)
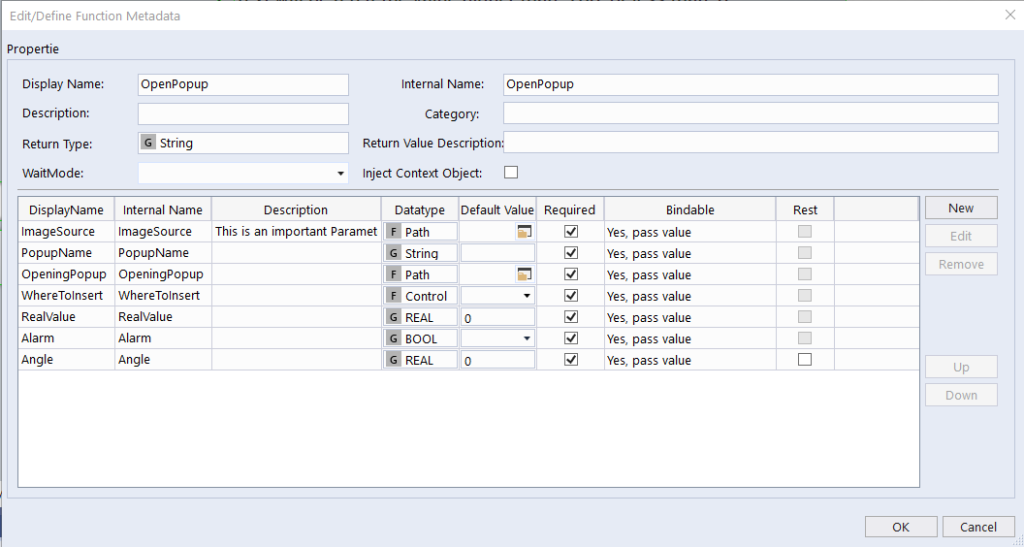
=>Insert parameters for those functions ( three for FunctionJS1 and one for ClosePopup, note Datatype of each parameter)
=>DisplayName, this will be passed to the Textblock in the control
=>Content, what will be displayed by the function (user control)
=>WhereToInsert, we need a parent control, in this case, we shall use Desktop, meaning the control will be displayed on the Desktop
=>ObjectAround, for ClosePopup parameter of type Object
Parameters of function FunctionJS1.js and ClosePopup.js are shown below.
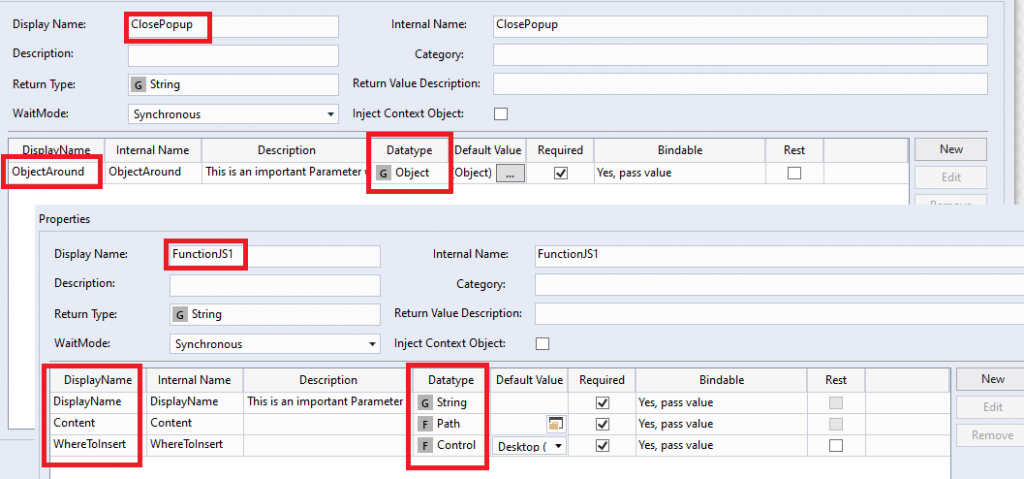
Figure 05: Configuring function
Now we are ready to build and check if so far done OK or not. If we open the two JavaScript function we should see that we have right parameters on each functions.
=>We configure the Pressed event for the Beckhoff image as shown in the following image.
=>Select the Image and then event (lighting bolt) and press on the edit icon
=>Drag FunctionJS1 from left side to the right side and configure each parameter.
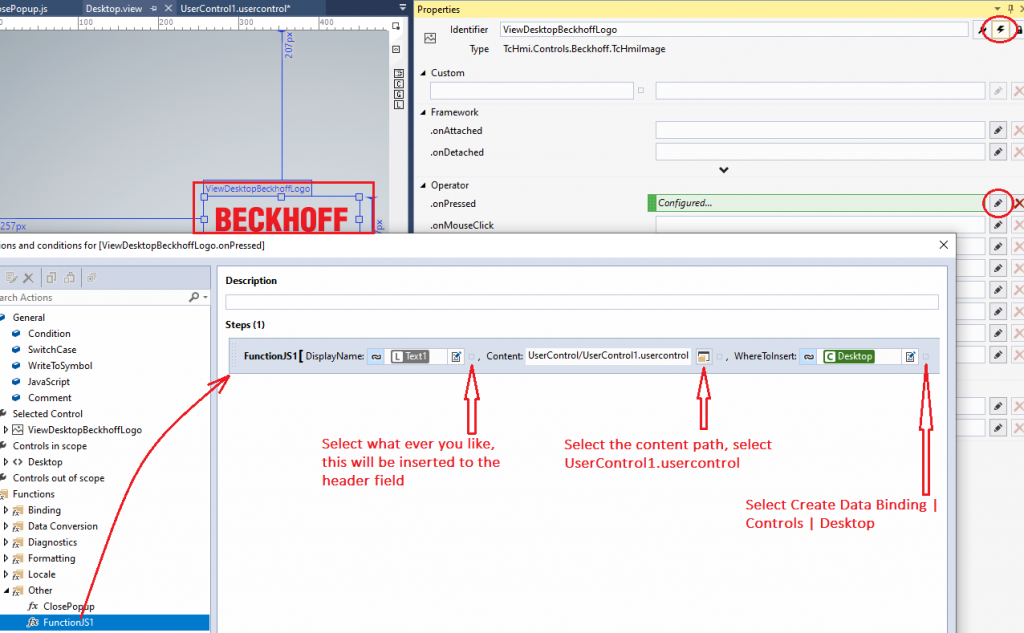
Figure 06: Calling function and configuring parameter
Now we do the same for closing the Popup
=>Select the cross image in the user control and then event (lighting bolt) and press on the edit icon
=>Drag ClosePopup from left side to the right side and configure parameter ObjectAround and select UserControl1 as shown in the following image.
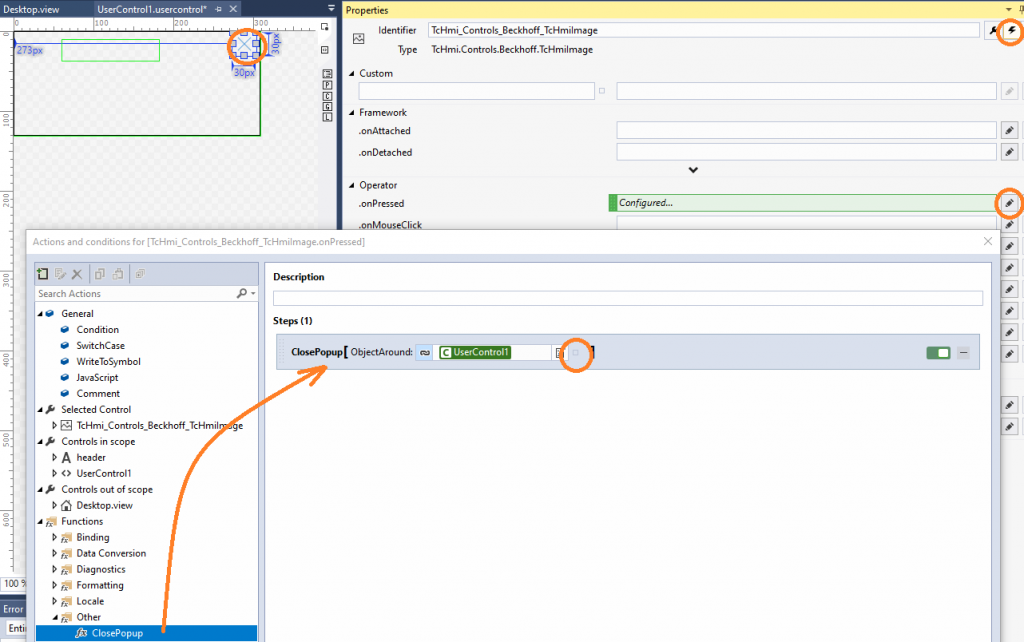
Figure 07: Configuring the ClosePoup function
=>Now we are ready for completing the JavaScript code, copy-paste the following code for FunctionJS1, there might be mismatches in parenthesis with the HMI version to another version.
            function FunctionJS1(DisplayName, Content, WhereToInsert) {
                var PopupUuid = String("Popup_" + TcHmiEx.Utilities.generateUuidv4());
                var popupParameters = [];
                var popupType = Content.split(".");
                var popup;
                var PopParameters = [];
                var WhereToInsert;
                popupType = popupType[popupType.length - 1].toLowerCase();
                popupParameters['data-tchmi-left'] = TcHmiEx.Utilities.ClickCoordinates.x;
                popupParameters['data-tchmi-top'] = TcHmiEx.Utilities.ClickCoordinates.y;
                if (WhereToInsert == undefined) { WhereToInsert = "Desktop" }
                popupParameters['data-tchmi-height'] = 600;
                popupParameters['data-tchmi-width'] = 600;
                popupParameters['data-tchmi-zindex'] = "1000";
                popupParameters['data-tchmi-devicename'] = DisplayName; // we are using data-tchmi-devicename field to show the device name (Hello world)
                if (popupType == "usercontrol") {
                    popupParameters['data-tchmi-target-user-control'] = Content;  //Passing the content to create user control, more in the infosys
                    popup = TcHmi.ControlFactory.createEx(
                        'tchmi-user-control-host',
                        PopupUuid,
                        popupParameters
                    );
                }
                var desktop = TcHmi.Controls.get(WhereToInsert.__id);
                if (desktop && popup) {
                    desktop.addChild(popup);  //We are adding the popup to Desktop
                    TcHmiEx.Utilities.dragElement(document.getElementById(PopupUuid));
                }
                return;
            }
=>Now fill the ClosePoup function with the following code, now our code is complete and ready to test! If you could not follow along, download the project and try, if you think I need to update this document please drop a mail to me. If you think this is useful please share it with your network.
            function ClosePopup(ObjectAround) {
                TcHmi.Controls.get(String(ObjectAround.__parent.__id)).destroy();
            }
Download the sample code HMIBasicPopUP_Hemelix.zip, If you think this is useful please share it among your network.
Example 2 : Changing text color of a text block in UserControl
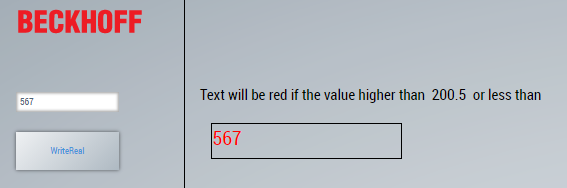
Figure 08: Usercontrol update based on the value of a PLC variable
We have very simple PLC program with 2 variables as shown in the following snippet. When the value of dataReal is between 200.5 and -0.1 the the anyAlarm is false. If we change the value in PLC or if we write the value in Textbox then the text color will be changed.
//Header
PROGRAM MAIN
VAR
dataReal : REAL := 0.0;
anyAlarm : BOOL := FALSE;
END_VAR
//Body
IF  dataReal < 200.5  AND dataReal > -0.1 THEN
anyAlarm := FALSE;
ELSE
anyAlarm := TRUE;
END_IF
We have very simple PLC program with 2 variables
Design of the user control:
=>Make a user control with a Textblock
=>Drag and drop it to the desktop view
=>Configure text block in the user control as shown in the following figure
=>Configure the .onAttached events
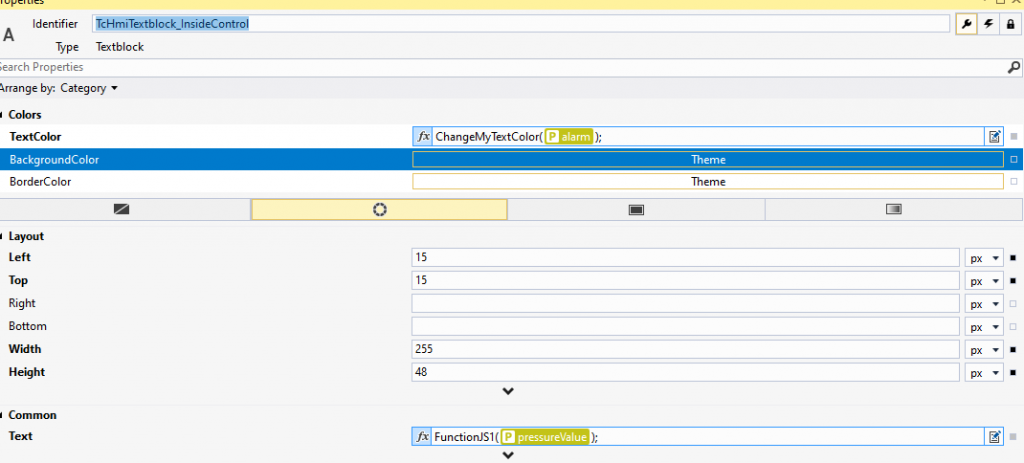
Figure 09: Calling a function for changing data which comes as a parameter
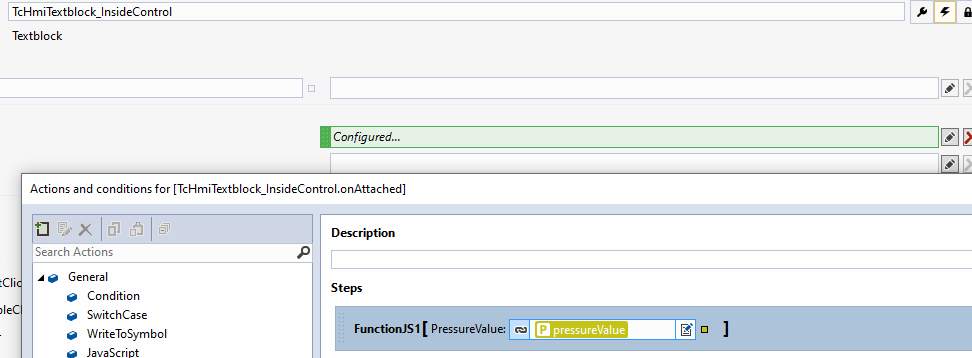
Figure 10: Calling a function during onAttached event
See the code for ChangeMyTextColor function:
(function (TcHmi) {

    var ChangeMyTextColor = function (par1) {

        var myColorRed = {
            color: "red"
        };
        var myColorWhite = {
            color: 'white'
        };
        console.log(`par1 = ${par1}`);
        if (par1 == true) {
            return myColorRed;
        } else {
            return myColorWhite;
        }
    };

    TcHmi.Functions.registerFunction('ChangeMyTextColor', ChangeMyTextColor);
})(TcHmi);
See the code for FunctionJS1 function
(function (TcHmi) {
    var FunctionJS1 = function (PressureValue) {
        var ss = PressureValue.toString();
        return ss;
    };
    TcHmi.Functions.registerFunction('FunctionJS1', FunctionJS1);
})(TcHmi);
Pass the two PLC variables (you have to map the symbol first) as shown in the following image.
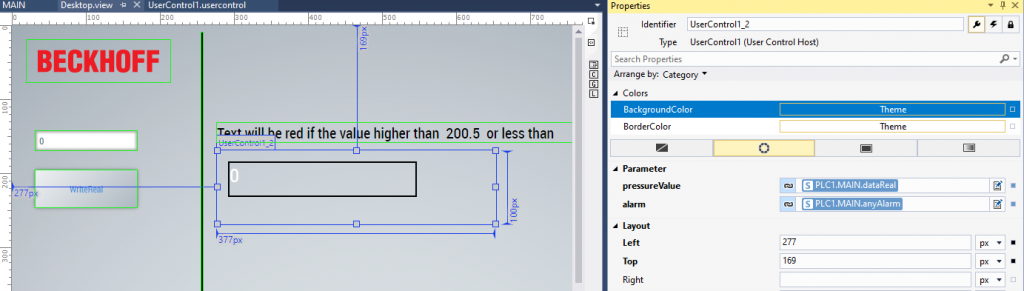
Figure 11: Passing parameters to user controls
Download the working project (UserControl_TextBoxManipulation_hemelix)
Example 3: Showing a popup when click on user control and make change to the variable in PLC
We shall continue working on the previous project (with slight modifications).
Updated PLC code: we have a timer that can be started by setting the boolean variable startTimer. dataInt variable is increased by 4 till 360 and then it resets to 0. dataRealPLC can be set to any value. If the value is greater than 200 or less than 0 then anyAlarm will be true and the text color will be read. We shall display the same value on the popup and the text value will have the same color. We have a Start/Stop button on the popup, if we press this button then the image will start to rotate. If we press on the image then the icon will be changed.
Simple PLC Program
//Header
PROGRAM MAIN
VAR
dataRealPLC : REAL := 0.0;
anyAlarm : BOOL := FALSE;
dataInt : INT := 0;
machineTypeInt : INT :=0;  //New
myTimer : TON ;
startTimer : BOOL := FALSE;
END_VAR
//Body of the updated program
IF  dataRealPLC > 200.0  OR dataRealPLC < 0.0 THEN
 anyAlarm := TRUE;
ELSE
anyAlarm := FALSE;
END_IF
myTimer(IN := startTimer, PT := T#100MS);
IF (myTimer.Q = TRUE)  THEN
 myTimer(IN := FALSE);
dataInt := dataInt +4;
END_IF
IF  dataInt > 360  THEN
dataInt := 0;
END_IF
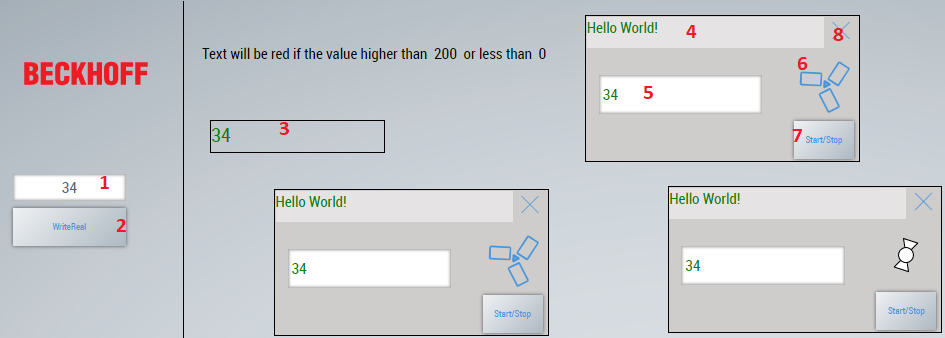
Figure 12: Sample Popup, passing parameters back and forth
What the sample will do?
1 => a simple edit box where we can insert a real number and then if we press on the button that will be written to PLC and it will be updated to the dialog. If the dialog is open then the number will be updated to the edit box (5).
2 => the button takes the value and write it to the user control 3 as well as to the PLC.
3 => whenever we change the value in the edit box (1 or in edit box 5) that will be changed to PLC as well as to this control. If we do mouse press on this control (3) a dialog will be open. The dialog can be drag anywhere in the desktop (4, Hello World) and can be close by clicking on the dialog header (8).
4 => Header of the dialog, can be drag by mouse press around Desktop.
5 => a simple edit box, same content will be displayed here as well here. Content of edit box 1, edit box 5 will be the same. If the value is above 200 or less than 0 then there will be an active alarm. The alarm will go away if we reset the value in the specified range (0 to 200).
6 => an image passed as a parameter. If we press on the image then it will change the icon as well as machineTypeInt variable in the PLC. The image will swap.
7 => Start/Stop button, if we press on the button then startTimer variable will be true and the dataInt will start increasing till 360, the image will start rotating (We could have used single text start or stop based on the rotation status, but anyway it is straight forward work).
8 => the dialog can be closed
In the above image, we are showing 3 popup of same types.
Download this sample Popup_DataBackAndForth
Design steps:
STEP 01:
Make sure when we press on the WriteReal button then PLC real variable is updated. The linking process is shown in the following image. Write To Symbol is built in function that we are using. We take the string from the editBox and convert it to float and then we write the value.
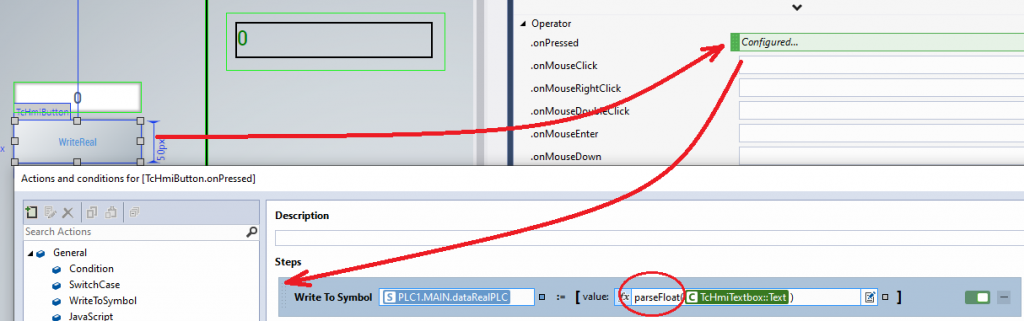
Figure 13: Passing data when a button is pressed
STEP 02:
=>Make a user control with simple textBlock. Set the Text to a string by converting the parameter value of someRealParameter. Also use ChangeMyTextColor function to set the color of TextColor as we did in the previous example.
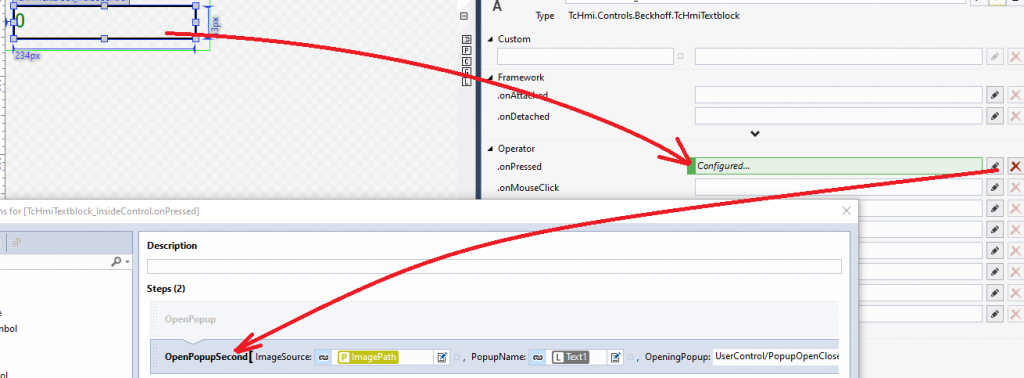
=>Configure the onPressed event and call OpenPopupSecond javascript function with appropriate parameters.
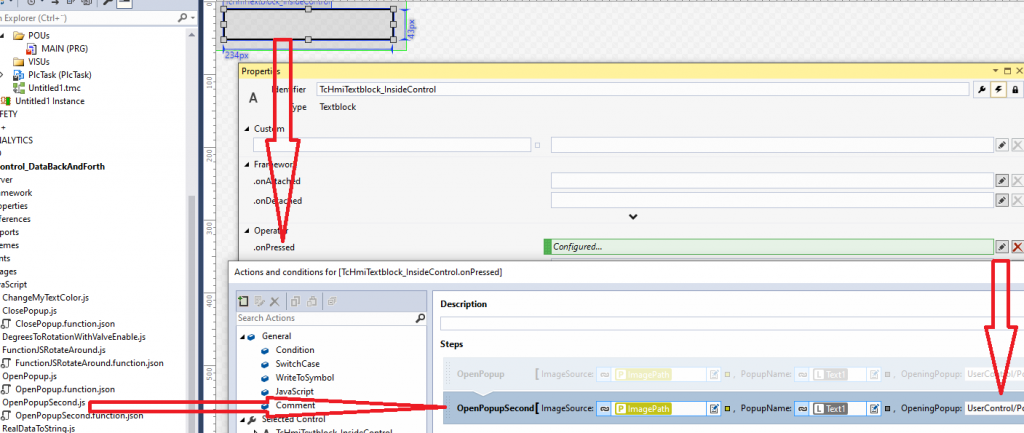
Figure 14: Configure a function for opening popup
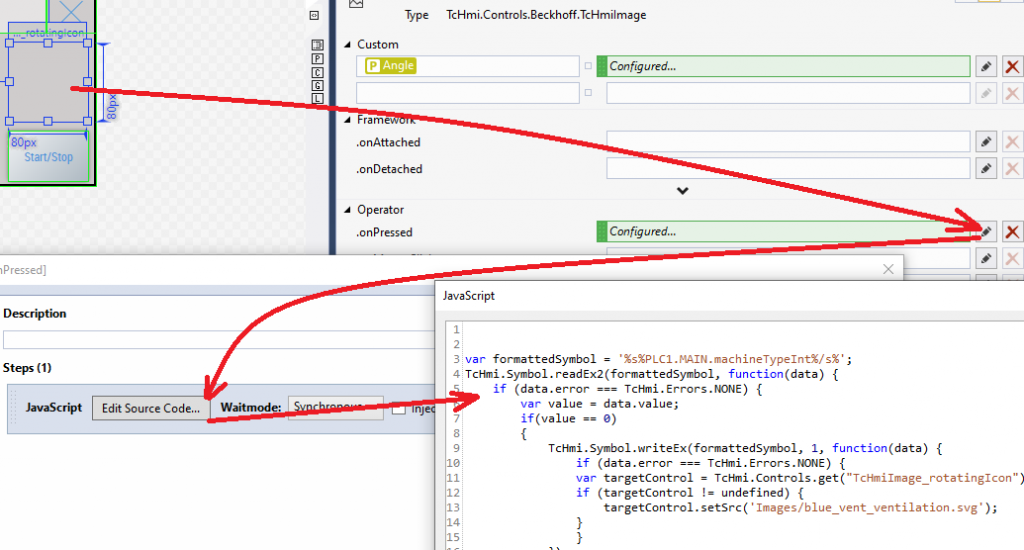
STEP 03: How the ICON is being changed?
If we see the first user control on the desktop (PLCDataDisplay_UserControl_1) we see it’s parameters are configured like the following.
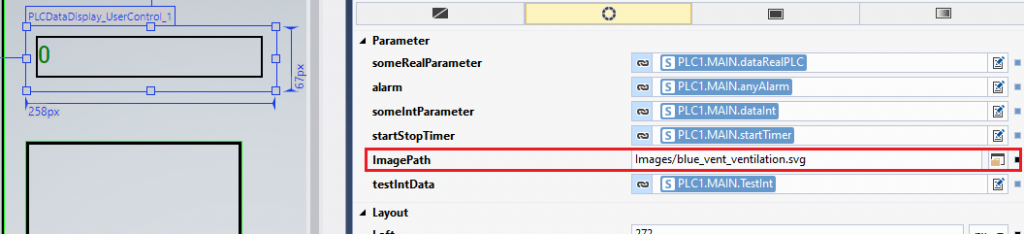
Figure 15: Configure parameters
Now we go back to the user control design for PLCDataDisplay_UserControl . If we highlight the text block (not the host), we see that we have configured the .onPressed by calling the JavaScript function (OpenPopupSecond for the textblock, not the host) with the following parameters. These parameters are passed to the function when the user click on the text block
var OpenPopupSecond = function OpenPopupSecond(ImageSource, PopupName, OpeningPopup, WhereToInsert, Alarm, RealValue, testingIntData, Angle) {
       //Code
}
Function parameters
When we press the icon number 6 on the above image (first image), we executed embedded code. This symbol can be a parameter as well, for example, %pp%someRealParameter%/pp%. We can update variables in the PLC by changing the parameter. We can read write these parameters just like server variables (note the %pp% and %s%).
var formattedSymbol = '%s%PLC1.MAIN.machineTypeInt%/s%';
TcHmi.Symbol.readEx2(formattedSymbol, function(data) {
    if (data.error === TcHmi.Errors.NONE) {
        var value = data.value;
        if(value == 0)
        {
            TcHmi.Symbol.writeEx(formattedSymbol, 1, function(data) {
                if (data.error === TcHmi.Errors.NONE) {
                var targetControl = TcHmi.Controls.get("TcHmiImage_rotatingIcon");
                if (targetControl != undefined) {
                    targetControl.setSrc('Images/blue_vent_ventilation.svg');
                }
                }
            });
        } else {
            TcHmi.Symbol.writeEx(formattedSymbol, 0, function(data) {
                if (data.error === TcHmi.Errors.NONE) {
                var targetControl = TcHmi.Controls.get("TcHmiImage_rotatingIcon");
                if (targetControl != undefined) {
                    targetControl.setSrc('Images/Ball_valve.svg');
                }
                }
            });
        }
    } else {
        console.log(" readEx2 failed");
    }
});
Now how do we swap the image when we pressed on the image. We are using embedded javascript code for this purpose.
Now we are ready to test the app.
YouTube Videos
Introduction to Popup
TwinCAT HMI Popup development, step by step
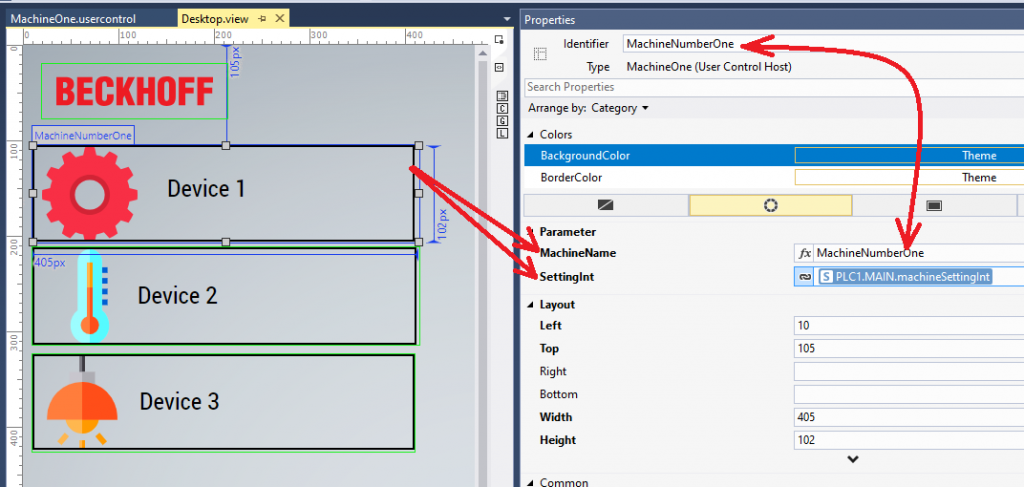
Example 4: Showing a popup for the different setting popup
In the above example, we have explained how to show similar settings pop up for all devices. We assumed that all the settings are similar for all devices. But let’s say, we have different devices which need a different kind of settings. In this sample, we shall how to pop up different settings and explain them.
Updated PLC code:
//Header
PROGRAM MAIN
VAR

dataRealPLC : REAL := 0.0;
anyAlarm : BOOL := FALSE;
dataInt : INT := 0;
machineTypeInt : INT :=0;
myTimer : TON ;
startTimer : BOOL := TRUE;
machineSettingInt : INT :=0; //for device 1
machineSettingReal : REAL :=0; //for device 2
machineSettingString : STRING ; //for device 3

END_VAR
//Body of the updated program
IF  dataRealPLC > 200.0  OR dataRealPLC < 0.0 THEN
	anyAlarm := TRUE;
ELSE
	anyAlarm := FALSE;
END_IF
myTimer(IN := startTimer, PT := T#5000MS);
IF (myTimer.Q = TRUE)  THEN
	myTimer(IN := FALSE);
	dataInt := dataInt +4;
	machineSettingInt := machineSettingInt +1;
	machineSettingReal := machineSettingReal +0.25;
	machineSettingString:= CONCAT('Hemelix ', INT_TO_STRING(machineSettingInt));
END_IF
IF  dataInt > 360  THEN
	dataInt := 0; //Used for rotation of an image in other example
	machineSettingInt := 0;
	machineSettingReal := 0;	//Just reset something to avoid over flow
END_IF
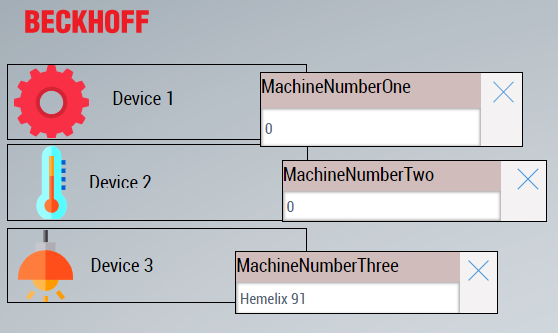
Three different types of settings dialog are shown. Though they look similar, those are independent popups. In this case, device 1 can have 2 settings, device 2 can have 4 settings, etc. We can handle these with a single popup as well but in this case, we have to hide fields based on the popup. In this case, we implement a single type of popup for each device.
In the above image, we are showing 3 dialogs.
Download the project TcHmiHeaderThree_Hemelix.zip
Design steps:
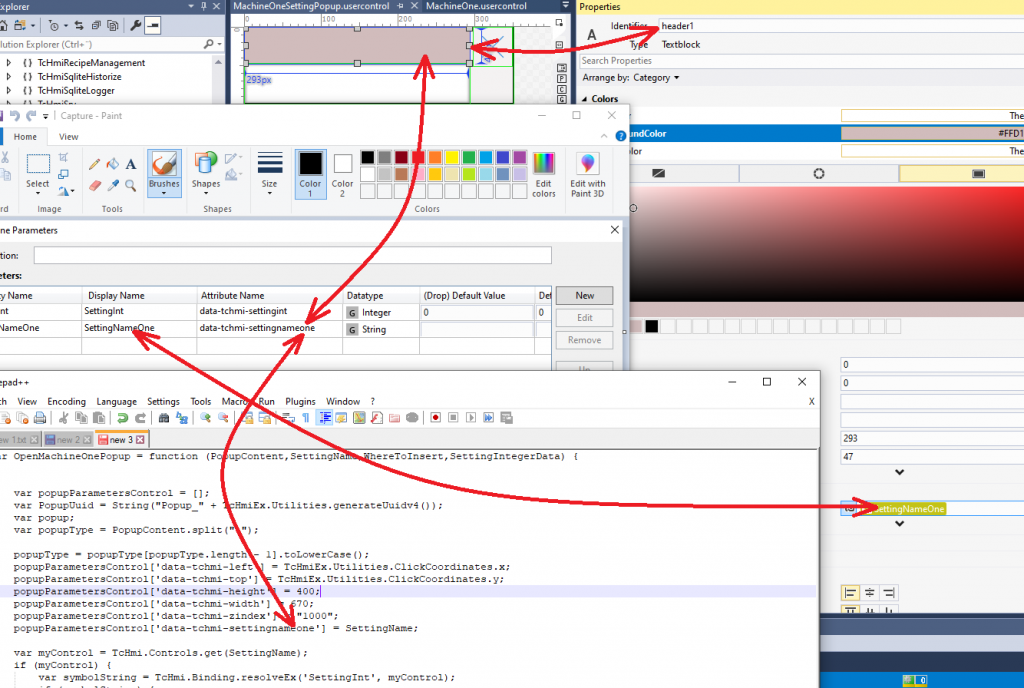
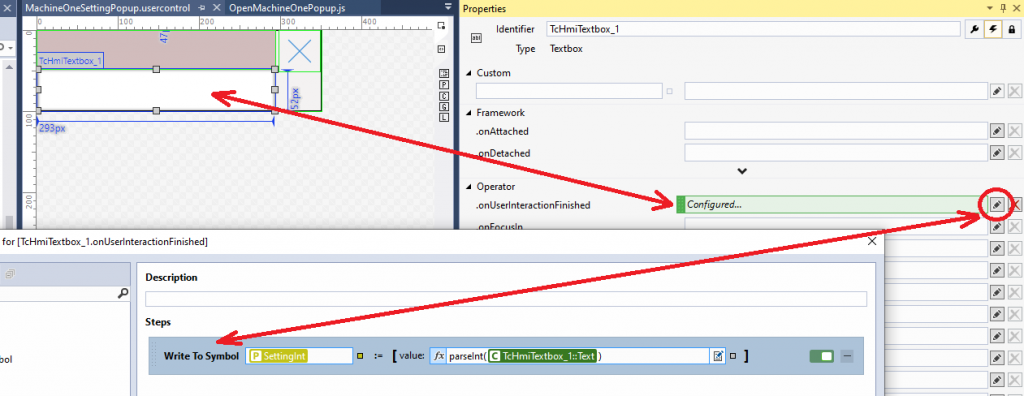
STEP 01:
=> Name the setting name as header1 (for one similar set up settings for our first type is MachineOneSettingPopup.usercontrol)
=> more coming soon…
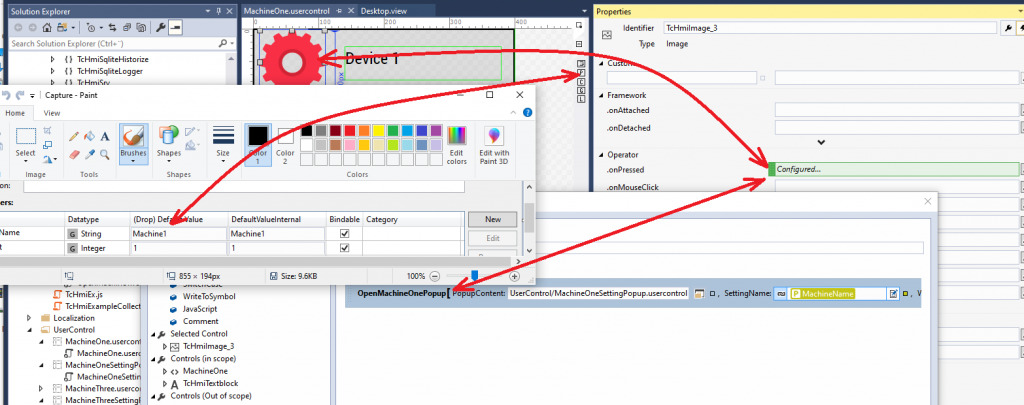
(function (TcHmi) {
    var OpenMachineOnePopup = function (PopupContent,SettingName,WhereToInsert,SettingIntegerData) {
        var popupParametersControl = [];
        var PopupUuid = String("Popup_" + TcHmiEx.Utilities.generateUuidv4());
        var popup;
        var popupType = PopupContent.split(".");
        popupType = popupType[popupType.length - 1].toLowerCase();
        popupParametersControl['data-tchmi-left'] = TcHmiEx.Utilities.ClickCoordinates.x;
        popupParametersControl['data-tchmi-top'] = TcHmiEx.Utilities.ClickCoordinates.y;
        popupParametersControl['data-tchmi-height'] = 400;
        popupParametersControl['data-tchmi-width'] = 670;
        popupParametersControl['data-tchmi-zindex'] = "1000";
        popupParametersControl['data-tchmi-settingnameone'] = SettingName;
        var myControl = TcHmi.Controls.get(SettingName);
        if (myControl) {
            var symbolString = TcHmi.Binding.resolveEx('SettingInt', myControl);
            if (symbolString) {
                popupParametersControl['data-tchmi-settingint'] = symbolString.toString();
            }
        }
        if (WhereToInsert == undefined) { WhereToInsert = "Desktop" }
        if (popupType == "usercontrol") {
            popupParametersControl['data-tchmi-target-user-control'] = PopupContent;
            popup = TcHmi.ControlFactory.createEx(
                'tchmi-user-control-host',
                PopupUuid,
                popupParametersControl
            );
        }
        var desktop = TcHmi.Controls.get(WhereToInsert.__id);
        if (desktop && popup) {
            desktop.addChild(popup);
            TcHmiEx.Utilities.dragElement(document.getElementById(PopupUuid));
        }
        return;
    };

    TcHmi.Functions.registerFunction('OpenMachineOnePopup', OpenMachineOnePopup);
})(TcHmi);
Implementation of dragElement method
// Make elements draggable
TcHmiExampleCollection.Utilities.dragElement = function (elmnt) {
    var pos1 = 0, pos2 = 0, pos3 = 0, pos4 = 0;
    console.log(`elmnt.id = ${elmnt.id}`);
    //console.log(`par1 = ${par1}`);
    if (document.getElementById(elmnt.id + ".header1")) {
        // if present, the header3 is where you move the DIV from:
        document.getElementById(elmnt.id + ".header1").onmousedown = dragMouseDown;
        //document.getElementById(elmnt.id + ".header1").ontouchstart = dragMouseDown;
    } else if (document.getElementById(elmnt.id + ".header2")) {
        // if present, the header3 is where you move the DIV from:
        document.getElementById(elmnt.id + ".header2").onmousedown = dragMouseDown;
        //document.getElementById(elmnt.id + ".header3").ontouchstart = dragMouseDown;
    } else if (document.getElementById(elmnt.id + ".header3")) {
        // if present, the header3 is where you move the DIV from:
        document.getElementById(elmnt.id + ".header3").onmousedown = dragMouseDown;
        //document.getElementById(elmnt.id + ".header3").ontouchstart = dragMouseDown;
    } else {
        // otherwise, move the DIV from anywhere inside the DIV:
        elmnt.onmousedown = dragMouseDown;
        //elmnt.ontouchstart = dragMouseDown;
    }
STEP 02:
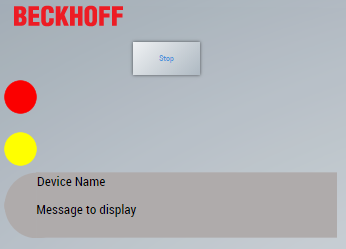
Example 5: How to Show Popup and cancel it automatically
This section shows how to show pop up when some interesting events happen. This will explain how to show the dialog and cancel the dialog after 5 seconds. The concept can be used to shows when some variable changes its status.
In this sample, we have 3 PLC variables and when it is true then it displays a note for 5 seconds. The variables are changed back to false (by JavaScript so that the note can be shown again).
First, we have created a simple PLC program that will simulate 3 Boolean variables and a variable for the starting timer. The timer and a local counter will set those 3 variables if those are false. The source code can be downloaded by clicking on the link in this section.
Simple PLC Program for generating signal:
PROGRAM MAIN
VAR
alarmList :  BOOL:= FALSE;
warningList :  BOOL:= FALSE;
infoList :  BOOL:= FALSE;
myTimer : TON; // Timer for simulating the alarm as it is coming from devices
startTimer : BOOL := FALSE; // From UI we press to start the timer
counter : DINT :=0;
END_VAR
myTimer(IN:= startTimer, PT:=T#1S);
IF myTimer.Q = TRUE THEN
myTimer(IN:= FALSE);
counter:= counter +1;
END_IF
IF ( ( counter MOD 30 ) = 10 ) AND NOT alarmList THEN
alarmList:= TRUE;
END_IF
IF ( ( counter MOD 30 ) = 20 ) AND NOT warningList THEN
warningList:= TRUE;
END_IF
IF ( ( counter MOD 30 ) = 29 ) AND NOT infoList THEN
infoList:= TRUE;
END_IF
IF counter > 200000 THEN
counter:= 0;
END_IF
When any of the variables is true then an info note is shown. That note is killed by JavaScript after 10 seconds and the corresponding variable is set back to false, so a new note can be shown (just for demo purposes).
How this has been designed:
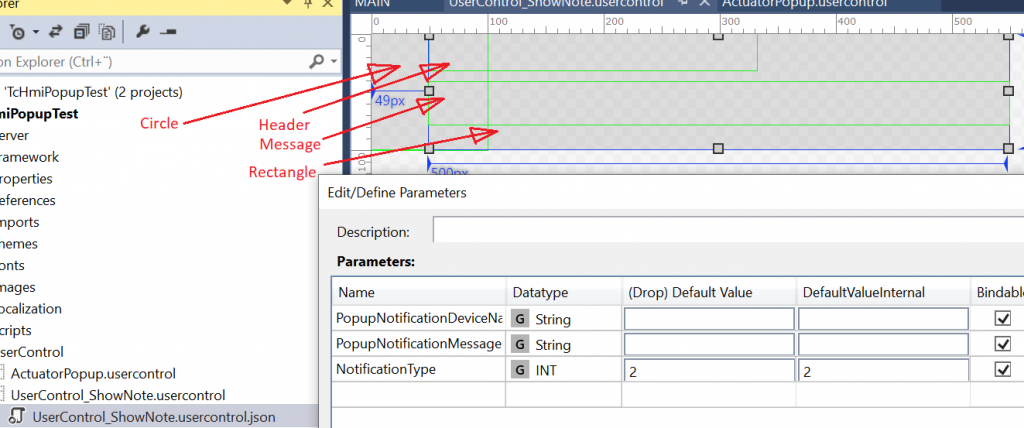
A circle and rectangle with a suitable layout have been used. FillColor and StrokeColor will be updated during initialization based on the notification type as shown below.
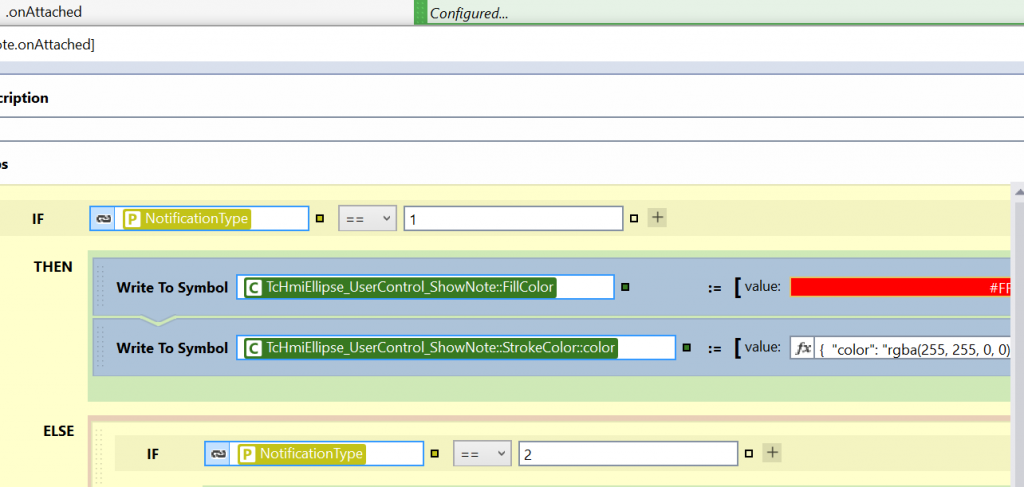
One of the important issue I found is notification type. Based on same notification type, I want to display 3 different kinds of note. This Notification type is passed to the JavaScript function which creates the note. The same notification type is used during the onAttached event. See the PopupOpen JavaScript function. Control properties come from the parameters name, for example data-tchmi-popupnotificationmessag (in the code below) is notification message parameter all in small font.
        popupParametersPopupControl['data-tchmi-height'] = Height;
        popupParametersPopupControl['data-tchmi-width'] = Width;
        popupParametersPopupControl['data-tchmi-zindex'] = "1000";
        popupParametersPopupControl['data-tchmi-notificationtype'] = NotificationType;
        popupParametersPopupControl['data-tchmi-popupnotificationdevicename'] = Header;
        popupParametersPopupControl['data-tchmi-popupnotificationmessage'] = Message;
Following is the complete function that does the magic. Read the comment in the code to make it clear.
(function (TcHmi) {
    var PopupOpen = function (Content,Header,Message,NotificationType,HorizontalAlignment,VerticalAlignment,HorizontalDistance,VerticalDistance,Height,Width,WhereToInsert,AddWhereclicked) {
        if (TcHmi.Controls.get(String('PopupInstance'+Content)) || Content == null) {
            return;
        }
        var PopupUuid = String("Popup_" + TcHmiExampleCollection.Utilities.generateUuidv4());
        var PopParameterStartIndex;
        var popupParametersPopupControl = [];
        var PopParameters = [];
        var popup;
        var popupType = Content.split(".");
        popupType = popupType[popupType.length - 1].toLowerCase();
        if (Content == undefined) { Content = "" }
        if (HorizontalAlignment == undefined) { HorizontalAlignment = "Top" }
        if (VerticalAlignment == undefined) { VerticalAlignment = "Left" }
        if (HorizontalDistance == undefined) { HorizontalDistance = 0 }
        if (VerticalDistance == undefined) { VerticalDistance = 0 }
        if (Height == undefined) { Height = 100 }
        if (Width == undefined) { Width = 100 }
        if (WhereToInsert == undefined) { WhereToInsert = "Desktop" }
        if (HorizontalAlignment == 'Left') {
            popupParametersPopupControl['data-tchmi-left'] = HorizontalDistance;
        }
        else if (HorizontalAlignment == 'Center') {
            TcHmi.Log.warn('Please use left/right');
        }
        else if (HorizontalAlignment == 'Right') {
            popupParametersPopupControl['data-tchmi-right'] = HorizontalDistance;
        }
        if (VerticalAlignment == 'Top') {
            popupParametersPopupControl['data-tchmi-top'] = VerticalDistance;
        }
        if (VerticalAlignment == 'Middle') {
            TcHmi.Log.warn('Please use left/right');
        }
        if (VerticalAlignment == 'Bottom') {
            popupParametersPopupControl['data-tchmi-bottom'] = VerticalDistance;
        }
        /// For clicking consider using the following code
        if (AddWhereclicked == true) {
            popupParametersPopupControl['data-tchmi-left'] = TcHmiExampleCollection.Utilities.ClickPressCoordinates.x;
            popupParametersPopupControl['data-tchmi-top'] = TcHmiExampleCollection.Utilities.ClickPressCoordinates.y;
        }
        /// For automatic notification generating use the following code that will read a control and set the note
        //Read the location of the circle and position the note to right place
        switch (NotificationType) {
            case 1:
                var targetControlCircleAlarm = TcHmi.Controls.get("TcHmiEllipse_Alarm");
                if (targetControlCircleAlarm != undefined) {
                    var top = targetControlCircleAlarm.getTop();
                    var left = targetControlCircleAlarm.getLeft();
                    popupParametersPopupControl['data-tchmi-left'] = left;
                    popupParametersPopupControl['data-tchmi-top'] = top-25;
                }
                break;
            case 2:
                var targetControlCircleWarning = TcHmi.Controls.get("TcHmiEllipse_Warning");
                if (targetControlCircleWarning != undefined) {
                    var top = targetControlCircleWarning.getTop();
                    var left = targetControlCircleWarning.getLeft();
                    popupParametersPopupControl['data-tchmi-left'] = left;
                    popupParametersPopupControl['data-tchmi-top'] = top-25;
                }
                break;
            case 3:
                var targetControlCircleInfo = TcHmi.Controls.get("TcHmiEllipse_Info");
                if (targetControlCircleInfo != undefined) {
                    var top = targetControlCircleInfo.getTop();
                    var left = targetControlCircleInfo.getLeft();
                    popupParametersPopupControl['data-tchmi-left'] = left;
                    popupParametersPopupControl['data-tchmi-top'] = top-25;
                }
                break;
            default:
                var targetControlCircleAlarmDefault = TcHmi.Controls.get("TcHmiEllipse_Alarm");
                if (targetControlCircleAlarmDefault != undefined) {
                    var top = targetControlCircleAlarmDefault.getTop();
                    var left = targetControlCircleAlarmDefault.getLeft();
                    popupParametersPopupControl['data-tchmi-left'] = left;
                    popupParametersPopupControl['data-tchmi-top'] = top-25;
                }
        }
        popupParametersPopupControl['data-tchmi-height'] = Height;
        popupParametersPopupControl['data-tchmi-width'] = Width;
        popupParametersPopupControl['data-tchmi-zindex'] = "1000";
        popupParametersPopupControl['data-tchmi-notificationtype'] = NotificationType;
        popupParametersPopupControl['data-tchmi-popupnotificationdevicename'] = Header; // Comes as parameter
        popupParametersPopupControl['data-tchmi-popupnotificationmessage'] = Message;   // Comes as parameter
        var documentSizeX = document.body.clientWidth;
        var documentSizeY = document.body.clientHeight;
        if (popupType == "usercontrol") {
            popupParametersPopupControl['data-tchmi-target-user-control'] = Content;
            popup = TcHmi.ControlFactory.createEx(
            'tchmi-user-control-host',
            PopupUuid,
            popupParametersPopupControl
            );
        }
        else if (popupType == "content") {
            popupParametersPopupControl['data-tchmi-target-content'] = Content;
            popup = TcHmi.ControlFactory.createEx(
            'tchmi-region',
            PopupUuid,
            popupParametersPopupControl
            );
        }
        var targetControlCircle = TcHmi.Controls.get("TcHmiEllipse_UserControl_ShowNote");
        if (targetControlCircle != undefined) {
            console.log("note found");
        }
        var desktop = TcHmi.Controls.get(WhereToInsert.__id);
        if (desktop && popup ) {
            desktop.addChild(popup);
            TcHmiExampleCollection.Utilities.dragElement(document.getElementById(PopupUuid));
        }
        var c = 0;
        var t;
        var timer_is_on = 0;
        function timedCount() {
            c = c + 1;
            t = setTimeout(timedCount, 1000);
            if (c == 10) {
                myStopFunction(); //Reset variables in PLC
                stopCount(); //Destroy the timer and release
            }
        }
        function startCount() {
            if (!timer_is_on) {
                timer_is_on = 1;
                timedCount();
            }
        }
        function stopCount() {
            clearTimeout(t);
            timer_is_on = 0;
            c = 0;
        }
        startCount();
        function myStopFunction() {
            var myoldcontrol = TcHmi.Controls.get(popup.__id).destroy();
            if (myoldcontrol == undefined) {
                console.log("not Found ");
            } else {
                console.log("Found ");
            }
            if (NotificationType == 1) { //Write to the PLC variable to false, it was set true by timer
                TcHmi.Symbol.writeEx('%s%PLC1.MAIN.alarmList%/s%', false, function (data) {
                    if (data.error === TcHmi.Errors.NONE) {
                        console.log("alarmList Write OK");
                    } else {
                        console.log("alarmList Write NOT OK");
                    }
                });
            }
            if (NotificationType == 2) {  //Write to the PLC variable to false, it was set true by timer
                TcHmi.Symbol.writeEx('%s%PLC1.MAIN.warningList%/s%', false, function (data) {
                    if (data.error === TcHmi.Errors.NONE) {
                        console.log("warningList Write OK");
                    } else {
                        console.log("warningList Write NOT OK");
                    }
                });
            }
            if (NotificationType == 3) {  //Write to the PLC variable to false, it was set true by timer
                TcHmi.Symbol.writeEx('%s%PLC1.MAIN.infoList%/s%', false, function (data) {
                    if (data.error === TcHmi.Errors.NONE) {
                        console.log("infoList Write OK");
                    } else {
                        console.log("infoList Write NOT OK");
                    }
                });
            }
        } //myStopFunction
    };
    TcHmi.Functions.registerFunction('PopupOpen', PopupOpen); //TwinCAT
})(TcHmi);
Download the sample code Tc HmiPopupTest_Hemelix.zip
If you like this please share it inside your network.
Relationship between JavaScript function and popup user control
In this section we shall show what are the relationship between JavaScript function and the user control (the control used for popup)
The control names inside the popup is marked with number for easy reference.
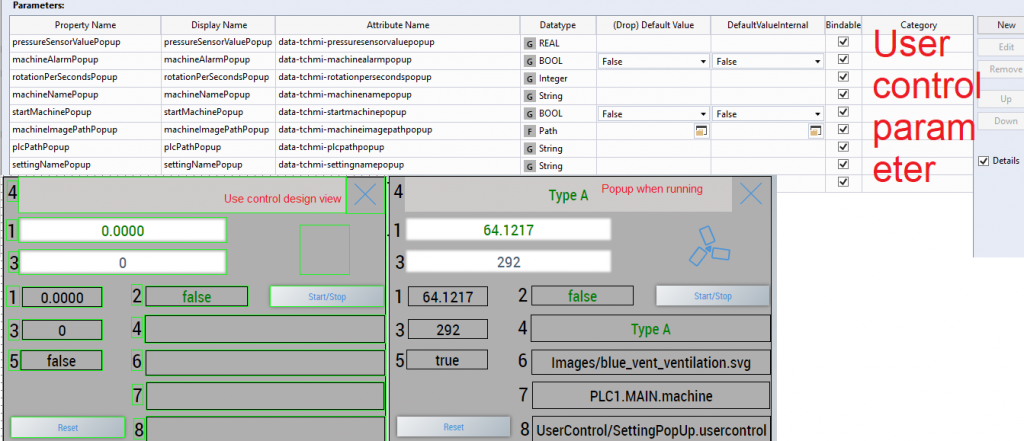
            function SettingsPopup(pressureSensorValuePopFn, machineAlarmPopFn, rotationPerSecondsPopFn, machineNamePopFn, startMachinePopFn, machineImagePopFn, settingsNamePopFn, popUpPathPopFn, whereToInsertPopFn) {
                console.log(`pressureSensorValuePopFn = ${pressureSensorValuePopFn}`);
                console.log(`machineAlarmPopFn = ${machineAlarmPopFn}`);
                console.log(`rotationPerSecondsPopFn = ${rotationPerSecondsPopFn}`);
                console.log(`machineNamePopFn = ${machineNamePopFn}`);
                console.log(`startMachinePopFn = ${startMachinePopFn}`);
                console.log(`machineImagePopFn = ${machineImagePopFn}`);
                console.log(`settingsNamePopFn = ${settingsNamePopFn}`);
                console.log(`popUpPathPopFn = ${popUpPathPopFn}`);
                console.log(`whereToInsertPopFn = ${whereToInsertPopFn}`);
                /*
                 * //User control variable
                 1.pressureSensorValuePopup
                 2.machineAlarmPopup
                 3.rotationPerSecondsPopup
                 4.machineNamePopup
                 5.startMachinePopup
                 6.machineImagePathPopup
                 7.plcPathPopup
                 8.settingNamePopup
                 * */
            /*
             * Popup Function variable
             1.pressureSensorValuePopFn
             2.machineAlarmPopFn
             3.rotationPerSecondsPopFn
             4.machineNamePopFn
             5.startMachinePopFn
             6.machineImagePopFn
             7.settingsNamePopFn
             8.popUpPathPopFn
             * */
                var popupParametersControl = [];
                var PopupUuid = String("Popup_" + TcHmiEx.Utilities.generateUuidv4());
                var popup;
                var popupType = popUpPathPopFn.split(".");
                popupType = popupType[popupType.length - 1].toLowerCase();
                popupParametersControl['data-tchmi-left'] = TcHmiEx.Utilities.ClickCoordinates.x;
                popupParametersControl['data-tchmi-top'] = TcHmiEx.Utilities.ClickCoordinates.y;
                popupParametersControl['data-tchmi-height'] = 600;
                popupParametersControl['data-tchmi-width'] = 550;
                popupParametersControl['data-tchmi-zindex'] = "1000";
                var myControl = TcHmi.Controls.get('BaseUserControl_Settings');
                if (myControl) {
                    var symbolRealParameter = TcHmi.Binding.resolveEx('pressureSensorValueBase', myControl); // note that pressuresensorvaluebase != pressureSensorValueBase
                    if (symbolRealParameter) {
                        popupParametersControl['data-tchmi-pressuresensorvaluepopup'] = symbolRealParameter.toString();  //1
                    }
                    var symbolMachineAlarm = TcHmi.Binding.resolveEx('machineAlarmBase', myControl);
                    if (symbolMachineAlarm) {
                        popupParametersControl['data-tchmi-machinealarmpopup'] = symbolMachineAlarm.toString();  //2
                    }
                    var symbolrotationPerSeconds = TcHmi.Binding.resolveEx('rotationPerSecondsBase', myControl);
                    if (symbolrotationPerSeconds) {
                        popupParametersControl['data-tchmi-rotationpersecondspopup'] = symbolrotationPerSeconds.toString();  //3
                    }
                    var symbolmachineName = TcHmi.Binding.resolveEx('machineNameBase', myControl);
                    if (symbolmachineName) {
                        popupParametersControl['data-tchmi-machinenamepopup'] = symbolmachineName.toString();  //4
                    }
                    var symbolstartMachine = TcHmi.Binding.resolveEx('startMachineBase', myControl);
                    if (symbolstartMachine) {
                        popupParametersControl['data-tchmi-startmachinepopup'] = symbolstartMachine.toString();  //5
                    }
                }
                // machineimagepathpopup work but machineimagepathpopfn does not work (it does not show the image)
                popupParametersControl['data-tchmi-machineimagepathpopup'] = machineImagePopFn;  //6
                //Without the following does not show the content, data-tchmi-settingnamepopup is parameter for popup user control
                popupParametersControl['data-tchmi-settingnamepopup'] = settingsNamePopFn; //7
                //Without the following does not show the content
                popupParametersControl['data-tchmi-plcpathpopup'] = popUpPathPopFn; //8
                if (whereToInsertPopFn == undefined) { whereToInsertPopFn = "Desktop" }
                if (popupType == "usercontrol") {
                    popupParametersControl['data-tchmi-target-user-control'] = popUpPathPopFn;
                    popup = TcHmi.ControlFactory.createEx(
                        'tchmi-user-control-host',
                        PopupUuid,
                        popupParametersControl
                    );
                }
1 to 5 are server variables.
    var symbolMachineAlarm = TcHmi.Binding.resolveEx('machineAlarmBase', myControl);
    if (symbolMachineAlarm) {
       popupParametersControl['data-tchmi-machinealarmpopup'] = symbolMachineAlarm.toString();  //2 see the image
    }
6, 7, and 8 are passed to the function call.
   // machineimagepathpopup work but machineimagepathpopfn does not work (it does not show the image)
   popupParametersControl['data-tchmi-machineimagepathpopup'] = machineImagePopFn;  //6
   //Without the following does not show the content, data-tchmi-settingnamepopup is parameter for popup user control
   popupParametersControl['data-tchmi-settingnamepopup'] = settingsNamePopFn; //7
   //Without the following does not show the content
   popupParametersControl['data-tchmi-plcpathpopup'] = popUpPathPopFn; //8
Parameters that are sent to the JavaScript functions, can’t be accessed from the control by readEx2 function. The parameters which we can read are the parameters of the user control. The following code snippet reads all the parameters and write it to console if we press on empty area of the popup.
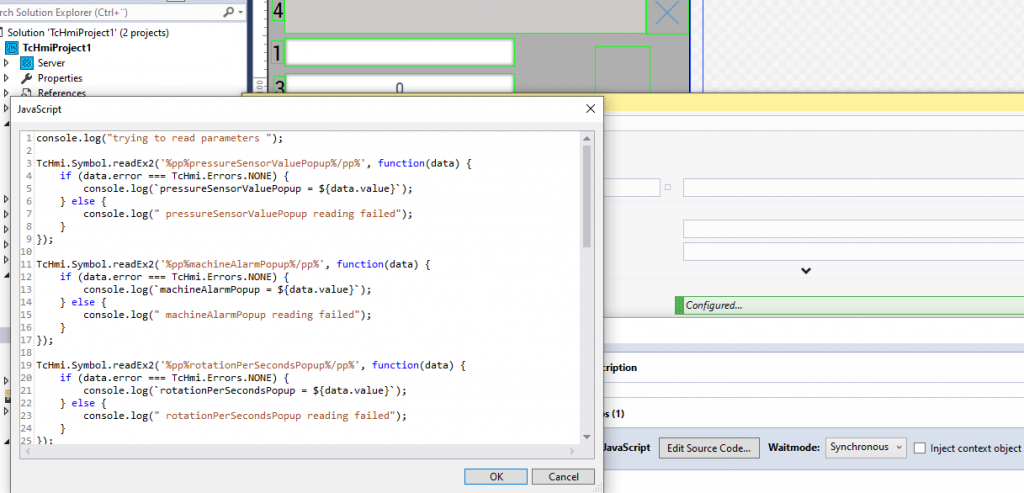
Download the working sample MachineStruct_Hemelix.zip
Download the sample from the link given above.
Tips 01:
You have created a popup but you can’t drag the popup by header, instead, you can move the whole dialog by pressing anywhere. Also, you can’t edit the content in the text box.
Solution: Rename the header of popup that includes ‘header’ for example ‘header1’, ‘headerSettingsDialog’ etc
JavaScript object to JSON string:
The person has some properties such as Test1, Test2, etc. These are read from UI.
let comboboxState = combobox.getSelectedIndex();
let timeString = new Date().toLocaleString();
const person = {
  Test1: test1.getText(),
  Test2: parseInt(test2.getText()),
  Test3: checkBoxStateChecked,
  CurrentTime: timeString,
  ComboBox: comboboxState
};
var myJSONString = JSON.stringify(person);
console.log(myJSONString);
Tips 02:
In popupParameter, we have written the following code primarily.
var myControl = TcHmi.Controls.get('BaseUserControl_Settings');
if (myControl) {
var symbolRealParameter = TcHmi.Binding.resolveEx('pressureSensorValueBase', myControl); // note that pressuresensorvaluebase != pressureSensorValueBase
if (symbolRealParameter) {
popupParametersControl['data-tchmi-pressuresensorvaluepopup'] = symbolRealParameter.toString();
}
data-tchmi-pressuresensorvaluepopup parameter of the user control. We can pass any parameter that can be accessed by JavaScript code from anywhere of the user control. In this case, we can write back to the variable via parameter.
Tips 03:
We don’t need to resolve the binding always.
If we know the address of the variable then we can establish it inside the popup code
For example, if we know the path then we can construct symbol expression.
var symbol = 'PLC1.MAIN.ArrayGate[0]';
let finalPath= '%s%'.concat(symbol).concat('.MotorName%/s%');
popupParametersControl['data-tchmi-pressuresensorvaluepopup'] = finalPath;
Tips 04:
If the sample does not compile and you get an error, then you can remove the references and put the references back. But make sure the extension and Nuget package (for example Beckhoff.TwinCAT.HMI.Controls) match your HMI Engineering version
For example, in our sample, we are using the Nuget package Beckhoff.TwinCAT.HMI.Controls, we do the following:
=> Remove (uninstall the package) the package (our case, Beckhoff.TwinCAT.HMI.Controls) from the references
=> Re-install the packages (our case Beckhoff.TwinCAT.HMI.Controls) version as our HMI Engineering version
=> Build the solution
Tips 05:
Popup as user control or content? User controls are created multiple time and stay visible but if we create content then it will be single time.
if (popupType == "content") {
            popupParameters['data-tchmi-target-content'] = Content;
            popup = TcHmi.ControlFactory.createEx(
            'tchmi-region',
            PopupUuid,
            popupParameters
            );
        }
Tips 06:
When we have a dialog, then sometimes we see that clicking on button it may not change the value in the PLC. For example, in the following Start/Stop button we press but the actual start variable is not updated. It can work for the first time it works and it does not work afterwards. If you close the dialog and open it then it works. Somehow, TwinCAT framework does not pass the data to low level.
One solution to this is that if we write the toggle value first, then it should work. It will write true correctly.
var retdata1= await WriteDataToServer('%pp%startstop%/pp%', false);
var retdata2= await WriteDataToServer('%pp%startstop%/pp%', true);

Tips 07:
When we set the height of the pop-up, we provide the width and height in the following way. If this is bigger than the actual user control, then we have a transparent area on the right and bottom side.
popupParameters['data-tchmi-height'] = 600;
popupParameters['data-tchmi-width'] = 600;
Solution: Check the actual user control size and set the height accordingly.
Download the sample from the link given above.
See next how to use subscription in JavaScript at https://www.hemelix.com/scada-hmi/twincat-hmi/mapping-and-subscription-using-js/
Ask questions related to Hemelix sample code and design at Google group https://groups.google.com/g/hemelix