Objects Savings in TwinCAT HMI
The Configuration window is the central configuration tool in the TwinCAT HMI framework. It offers an overview of all project elements and configures many settings. Furthermore, the user management and all data types can be configured via the window.

Figure 01: Accessing Configuration view
In this article, we shall examine how to update and manage a JavaScript object in three different ways.
=> Global Object (as declared in code behind file)
=> Internal object (as declared in HMI internal variable)
=> Server object (as declared in HMI Server variable)
If you have issues to understand JavaScript you could review the page at https://www.hemelix.com/scada-hmi/twincat-hmi/twincat-hmi-async-function/
We shall save a simple object and update it by the read and write method with the following key-value pair.
var globalAddress = {
    'building no': 3960,
    street: 'North 1st street',
    state: 'CA',
    country: 'USA'
};
The UI is shown in the following image. The ID for all those controls (which we are manipulating) is as follows:
Building => TcHmiTextbox_Building (the textBox control)
Street => TcHmiTextbox_Street (the textBox control)
State => TcHmiTextbox_State (the textBox control)
Country => TcHmiTextbox_Country (the textBox control)
Where to save => TcHmiCombobox (combo box control, should indicate which variable we want to manipulate)
Empty object => If selected it will write an empty object {}
Read => TcHmiButton_Read (Read the object)
Write => TcHmiButton_Write (Write the object)
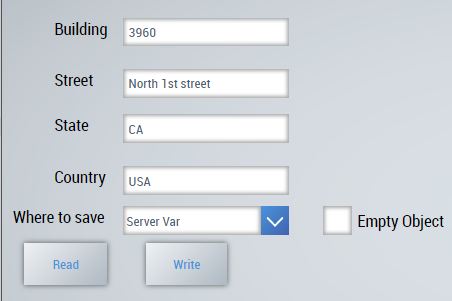
Figure 02: The test application UI
We declare the global address variable in a code behind the file. The code behind the file will be loaded first so we have a chance to declare it. These 4 textboxes are updated from the JavaScript object and vice versa. We shall update the address field and save the address object to HMI Server/internal and read it back. Let’s do the following steps:
=> Create an HMI project name HMIObjectTest
=> Bring the all controls as shown in the above image ( 4 textblocks, 4 testboxes, 1 checkbox, and 2 buttons)
=> Rename those control IDs as mentioned previously.
=> Add a code behind the JavaScript file (Select Project | Add New Item (from the context menu) add CodeBehind1.js file)
=> Add the following code at the beginning of the file
function ReadDataFromServer(symbolParameter) {
    return new Promise((resolve, reject) => {
        var symbol = new TcHmi.Symbol(symbolParameter);
        symbol.readEx(function (data) {
            if (data.error === TcHmi.Errors.NONE) {
                resolve(data.value);
            } else {
                console.log(`Error in ReadDataFromServer ${symbolParameter}`);
                console.log(`data.details.code = ${data.details.code}`);
                reject(data.error);
            }
        });
    });
}
function WriteDataToServer(symbolParameter, dataParameter) {
    return new Promise((resolve, reject) => {
        var symbol = new TcHmi.Symbol(symbolParameter);
        TcHmi.Symbol.writeEx(symbolParameter, dataParameter, function (data) {
            if (data.error === TcHmi.Errors.NONE) {
                resolve(data.error);
            } else {
                console.log(`Error in WriteDataToServer ${symbolParameter}, ${dataParameter} `);
                console.log(`data.details.code = ${data.details.code}`);
                reject(data.error);
            }
        });
    });
}
var globalObject = {
    'building no': 3960,
    street: 'North 1st street',
    state: 'CA',
    country: 'USA'
};Now we do the actual fun part.
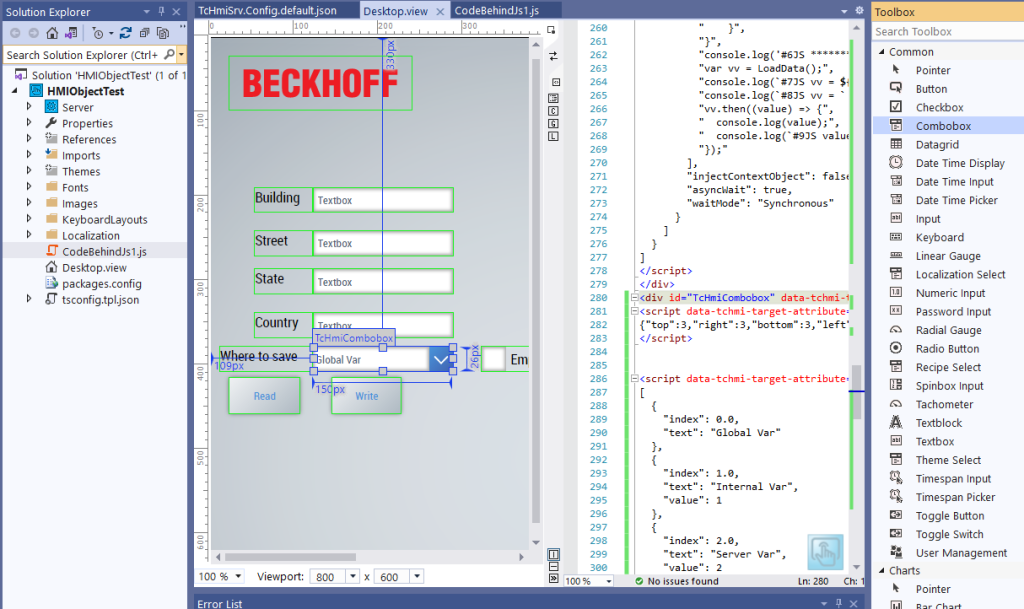
Figure 03: Full development view of the sample application
=> Select the where to save textblock control and bring the event editor (F4 | Show Events, lighting bolt)
=> Press on the pencil icon, see the next image
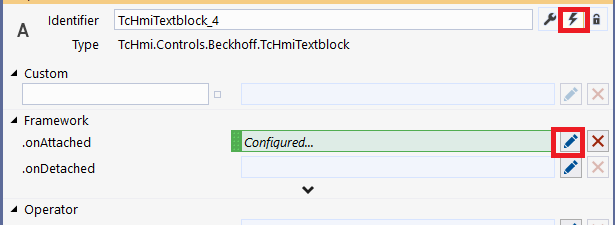
Figure 04: Show Events and .onAttached Event
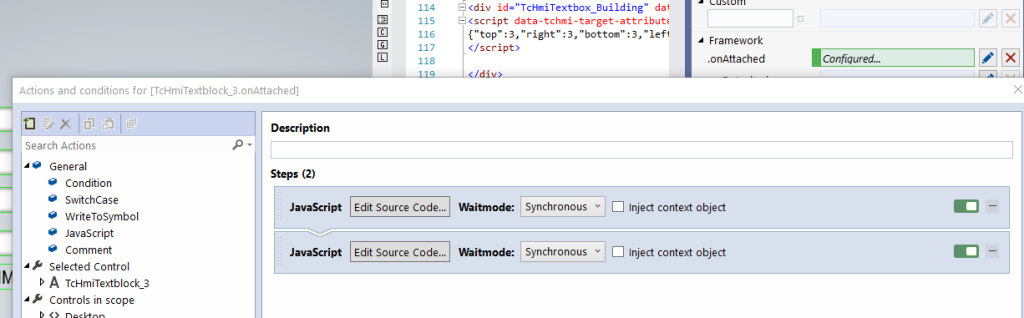
Figure 05: Steps for inserting JavaScript code
=> Drag and drop the JavaScript from the left pane to the right pane 2 times for inserting JavaScript code, the first one for initializing the controls in our UI, 2nd one for doing some extra experiments related to asynchronous function calls (more in the JavaScript sections)
=> Press on the first Edit Source Code and get an editor and insert the following code (make sure IDs are the same and include some error checking)
var textBuildingControl = TcHmi.Controls.get('TcHmiTextbox_Building');
var textStreetControl = TcHmi.Controls.get('TcHmiTextbox_Street');
var textStateControl = TcHmi.Controls.get('TcHmiTextbox_State');
var textCountryControl = TcHmi.Controls.get('TcHmiTextbox_Country');
textBuildingControl.setText(address['building no']);
textStreetControl.setText(address.street);
textStateControl.setText(address.state);
textCountryControl.setText(address.country);
console.log('Attached Read Done!');
=> Create a HMI server/internal symbol (name serverObject/internal) as described at https://www.hemelix.com/scada-hmi/twincat-hmi/twincat-hmi-data-savings/, Datatype must be Object type.
=> Press on the second Edit Source Code and get an editor and insert the following code (we shall observe the behavior of async call)
console.log('#1JS code with Attached event');
async function LoadData() {
    try {
 var dataRead = await ReadDataFromServer('%s%serverObject%/s%');
console.log(`#2JS dataRead = ${dataRead}` );
console.log(`#3JS dataRead = ` + JSON.stringify(dataRead) );
let x = {greeting: "hello"};
let str = "I would like to say the greeting " + x.greeting;
console.log('#4JS '+str);
        return dataRead;
    }
    catch (error) {
        console.log(`#5JS error occurred while calling LoadData error = ${error}` );
    }
}
console.log('#6JS *****************');
var vv = LoadData();
console.log(`#7JS vv = ${vv}` );
console.log(`#8JS vv = ` + JSON.stringify(vv) );
vv.then((value) => {
  console.log(value);
  console.log(`#9JS value = ` + JSON.stringify(value) );
});
=> Now run the application and see that the fields are updated with the address defined in the code behind file (address object)
=> Observe that we have added some tags to the above code for the following call sequences (#1 etc)
=> Now open the debug console and examine the output, why those #1, #2, etc are not in order?
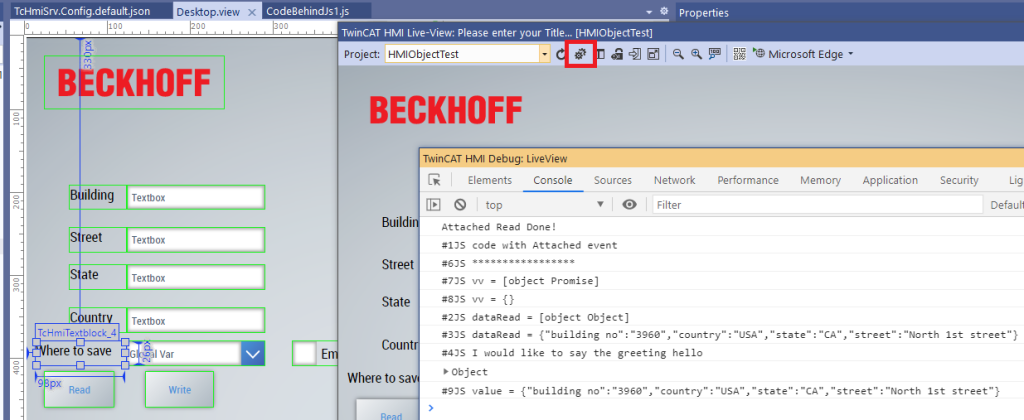
Figure 06: Output of JavaScript asynchronous call (for understanding)
We are not talking more about asynchronous functions here, if you have questions ask our Google group and check the JavaScript section. Now we continue developing the application.
=> Press on the Read button and bring the Show Event tab, edit .onPressed event, and insert the following code. Note that we are missing many error checking for simplification.
console.log('handle ReadButtonPress');
var textBuildingControl = TcHmi.Controls.get('TcHmiTextbox_Building');
var textStreetControl = TcHmi.Controls.get('TcHmiTextbox_Street');
var textStateControl = TcHmi.Controls.get('TcHmiTextbox_State');
var textCountryControl = TcHmi.Controls.get('TcHmiTextbox_Country');
var comboboxControl = TcHmi.Controls.get('TcHmiCombobox');

async function handleReadButtonPress() {
  try {
	var locationSelected = comboboxControl.getSelectedIndex();
	switch(locationSelected)
	{
	case 0:
	{
		textBuildingControl.setText(globalObject['building no']);
		textStreetControl.setText(globalObject.street);
		textStateControl.setText(globalObject.state);
		textCountryControl.setText(globalObject.country);
		console.log(`globalObject = ${JSON.stringify(globalObject)}`);
	}
	break;
	case 1:
	{
		var dataReadInternal = await ReadDataFromServer('%i%internalObject%/i%');
		textBuildingControl.setText(dataReadInternal['building no']);
		textStreetControl.setText(dataReadInternal.street);
		textStateControl.setText(dataReadInternal.state);
		textCountryControl.setText(dataReadInternal.country);
		console.log(`dataReadInternal = ${JSON.stringify(dataReadInternal)}`);
	}
	break;
	case 2:
	{
		var dataReadServer = await ReadDataFromServer('%s%serverObject%/s%');
		textBuildingControl.setText(dataReadServer['building no']);
		textStreetControl.setText(dataReadServer.street);
		textStateControl.setText(dataReadServer.state);
		textCountryControl.setText(dataReadServer.country);
		console.log(`dataReadServer = ${JSON.stringify(dataReadServer)}`);
	}
	break;
	default:
	{
	}
	break;
	}
  }
  catch(error) {
    console.log(`error occured in handleReadButtonPress = ${error}`);
  }
}
handleReadButtonPress();
=> Do the same for the Write button and add the following code
console.log('handleWriteButtonPress');
var textBuildingControl = TcHmi.Controls.get('TcHmiTextbox_Building');
var textStreetControl = TcHmi.Controls.get('TcHmiTextbox_Street');
var textStateControl = TcHmi.Controls.get('TcHmiTextbox_State');
var textCountryControl = TcHmi.Controls.get('TcHmiTextbox_Country');
var comboboxControl = TcHmi.Controls.get('TcHmiCombobox');
var checkboxControl = TcHmi.Controls.get('TcHmiCheckbox');
async function handleWriteButtonPress() {
  try {
    var locationSelected = comboboxControl.getSelectedIndex();
    var textBuilding = textBuildingControl.getText();
    var textStreet = textStreetControl.getText();
    var textState = textStateControl.getText();
    var textCountry = textCountryControl.getText();
    var toogleState = checkboxControl.getToggleState() =='Active'? true : false;
    switch(locationSelected)
    {
    case 0:
    {
       if(toogleState == false) {
        globalObject['building no'] = textBuilding;
        globalObject['street'] = textStreet;
        globalObject['state'] = textState;
        globalObject['country'] = textCountry;
        } else {
        globalObject = {};
        }
    }
    break;
    case 1:
    {
        let address1 = {
            'building no': textBuilding,
            street: textStreet,
            state: textState,
            country: textCountry
            };
       if(toogleState == true) {
        address1 = {};
        }
        var dataWrite = await WriteDataToServer('%i%internalObject%/i%', address1);
        console.log(`Write data to internal  dataWrite = ${dataWrite}`);
    }
    break;
    case 2:
    {
        let address2 = {
            'building no': textBuilding,
            street: textStreet,
            state: textState,
            country: textCountry
            };
       if(toogleState == true) {
        address2 = {};
        }
        var dataWrite2 = await WriteDataToServer('%s%serverObject%/s%', address2);
        console.log(`Write data to server dataWrite2 = ${dataWrite2}`);
    }
    break;
    default:
    {}
    break;
    }
  }
  catch(error) {
    console.log(`error occured in handleWriteButtonPress = ${error}`);
  }
}
handleWriteButtonPress();
How the sample works
Data will be read or written based on the combo box selection. The same is true for the write button. If the checkbox is checked an empty object will be written. We can test the sample code by using different types of data.
{} // empty objectWhen we start the application it will read data from the global object and display it on the UI. We can change the UI content and save it using the write button and Read back.
Accessing the server from different PC
If we change the global variable and internal variable from a PC and we can try to read the same variable from another PC. We can notice that those are not the same. The reason for this is that internal variables are session specific. The data varies from one session to another session. But for sever variables, we can access from any PC and we should observe that same value. The reason for this is that data is saved in the HMI server. Access time for the data in the HMI server is higher than global variables or internal symbols.
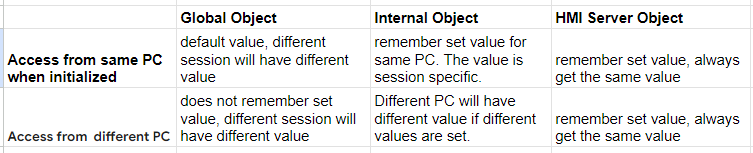
Figure 07: Comparison between two client
Download
Download the sample from the link given above and share it please!
YouTube Video
Tips
Tips 01:
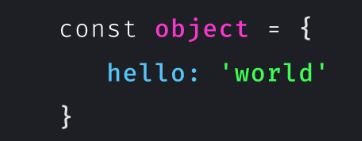
We declare an object in the following way, see key can be a number, plain text, or a string with space. Also, we show how the properties can be accessed.
const obj = {
  property1: 45, // property name may be an identifier
  2: 78, // or a number
  "property n": "hello", // or a string
};
console.log(obj.property1); //45
//console.log(obj."2"); //error
console.log(obj["2"]) //78
//console.log(obj.property n); //error
console.log(obj["property n"]) //78
Tips 02:
Whenever we want to transfer an object from one application to another application, we must transfer it as a string after conversion.
var dataString = JSON.stringify(obj);
console.log(dataString); //"{\"2\":78,\"property1\":45,\"property n\":\"hello\"}"
Tips 03:
When we have received the data as a string then we can convert the string to a JavaScript object. We can use the JavaScript objects for analysis in our application. It is hard to use strings in the application.
let returnObject = JSON.parse(dataString);
console.log(returnObject["property n"]) //hello
References
Download the sample from the link given above.
See next our Linear Gauge example at https://www.hemelix.com/scada-hmi/twincat-hmi/twincat-hmi-historize-symbol/
Ask questions related to Hemelix sample code and design at Google group https://groups.google.com/g/hemelix