
How to change device setting by popup
(YouTube video link at the end)
This article explains how motor configuration parameters can be modified using TwinCAT HMI. While the specific settings may vary depending on the motor type and manufacturer, we will demonstrate how to create a settings popup in TwinCAT HMI, save the parameter values to the PLC, and retrieve them for display in the popup. Additional settings can be integrated into the popup using the same approach.
Download the content: MotorSetting_Hemelix.zip
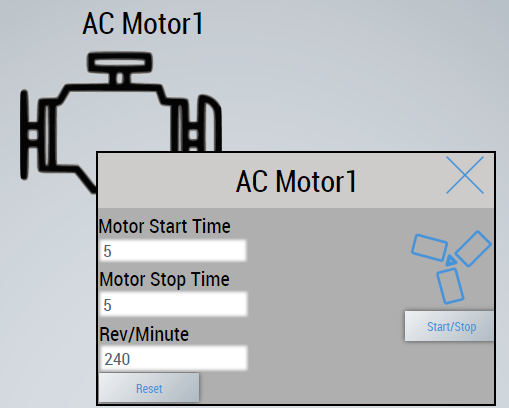
When the motor symbol is clicked in the HMI, a dialog window will appear, allowing the user to configure various parameters. These parameters are saved to the PLC. (Refer to the persistent data settings article in the PLC section at https://www.hemelix.com/automation/twincat-persistent-data/).
In this article, we will discuss how to:
Display persistent data in the pop-up dialog
Modify it within the HMI
Save the updated values back to the PLC
The data is saved at 100-second intervals to minimize the risk of data loss. This periodic saving ensures both data reliability and system stability.
Our configuration settings are structured as follows:
VAR PERSISTENT
	motorStartTime : INT;  //Seconds
	motorStopTime : INT;  //Seconds
        motorRPM : REAL; //rpm
END_VAR
We shall create a sample that can be used to load the settings (persistent data) to the HMI. If we edit the data, then we can save those to the PLC.
DESIGN STEPS :
=> Start Visual Studio and create an empty HMI project
=> Create two folders (UserControl and JavaScript)
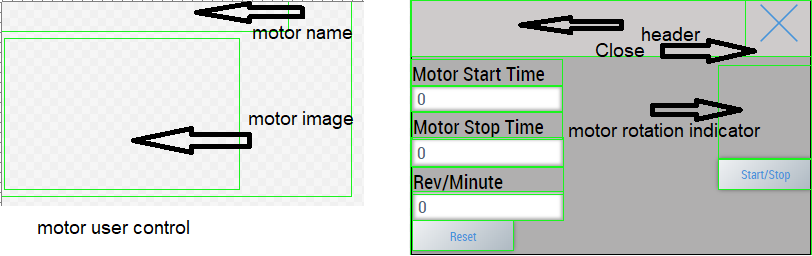
=> Create two user controls (motor.usercontrol for displaying the motor and SettingsPopup.usercontrol for displaying the settings as a popup)
=> See this article about user control if not familiar.
The left side image is the motor user control, and the right side image is for the pop-up where we can edit the settings and save them.
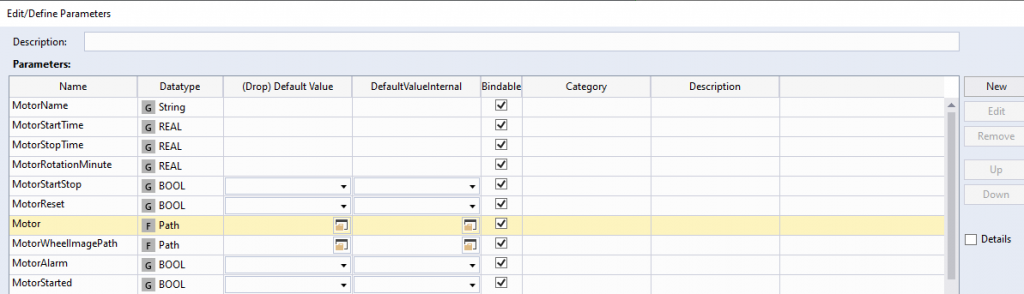
Add the following parameter name and datatype for motor user control
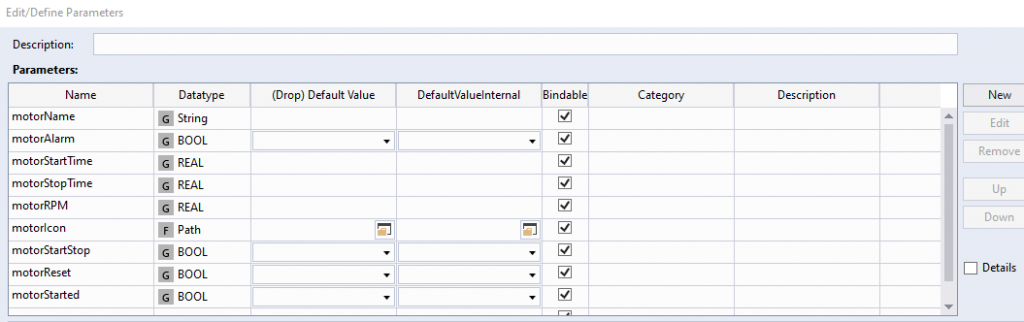
Add the following parameter name and datatype for popup settings user control
Now we have added the necessary parameters, let us start linking the PLC variable to the HMI variable. We have 3 parameters in the popup these are Motor Start Time, Motor Stop Time, and Revolution per minute. Motor start time means here is the motor start delay and motor stop delay (the name is a bit misleading). These parameters are stored in the persistent memory of the PLC. When we press the Start/Stop button, the motor will start after a delay, and that is equal to the motor start time. In the same way, when the motor is running and if we press stop, then the motor will stop after the motor stop time seconds.
//PLC Program
//Header
FUNCTION_BLOCK MotorAC
VAR_INPUT
END_VAR
VAR_OUTPUT
END_VAR
VAR
	motorName : STRING :='AC Motor';
	maxRotationValue : REAL := 0.0;
	rotationPerMinute : REAL := 0.0;
	myTimerStart : TON ;
	myTimerStop : TON ;
	motorAlarm : BOOL := FALSE;
	motorReset : BOOL := FALSE;
	index : INT := 1;
	initDone : BOOL := FALSE;

	startMotor : BOOL := FALSE;
	doMotorOutPut : BOOL := FALSE;
	motorStarted : BOOL := FALSE;
END_VAR
VAR PERSISTENT
	motorStartTime : REAL;  //Seconds
	motorStopTime : REAL;  //Seconds
	motorRPM : REAL; //rpm
END_VAR
//Body of the program
IF startMotor = TRUE AND motorStarted = FALSE THEN
	myTimerStart(IN:= startMotor AND NOT motorStarted, PT:= REAL_TO_TIME(motorStartTime*1000.0));
END_IF
	IF NOT startMotor AND motorStarted THEN
		myTimerStop(IN:= NOT startMotor AND motorStarted, PT:= REAL_TO_TIME(motorStopTime*1000.0));
	END_IF
IF NOT initDone THEN
	motorName := CONCAT(motorName, INT_TO_STRING(index)); //Should be done single time in a initialize
	IF motorRPM = 0.0 THEN // reset all
		motorRPM := 100.0;
		motorStartTime := 5.0;
		motorStopTime := 5.0;
	END_IF
	initDone := TRUE;
END_IF
IF  maxRotationValue > 100.0  OR maxRotationValue < 0.0 THEN
	motorAlarm := TRUE;
ELSE
	motorAlarm := FALSE;
END_IF
IF motorReset THEN
	motorAlarm := FALSE;
	startMotor := FALSE;
	motorReset := FALSE;
END_IF
IF myTimerStart.Q AND NOT motorStarted AND startMotor THEN
	doMotorOutPut:= TRUE;
	motorStarted := TRUE;
	myTimerStart(IN:= FALSE);
END_IF
IF myTimerStop.Q AND motorStarted THEN
	startMotor := FALSE;
	doMotorOutPut := FALSE;
	motorStarted := FALSE;
	myTimerStop(IN:= FALSE);
END_IF
When we press on the button (Start/Stop) then we write to the PLC variable startMotor by the following code. It toggle the startMotor variable in PLC.
var symbol = '%pp%motorStartStop%/pp%';
console.log(`startMachinePopup button pressed = ${symbol}`);
TcHmi.Symbol.readEx2( symbol, function (data2) {
    if (data2.error === TcHmi.Errors.NONE) {
        var result = data2.value;
        if(result == false) {
            TcHmi.Symbol.writeEx(symbol, true, function (data3) {
            if (data3.error === TcHmi.Errors.NONE) {
                console.log('Write true OK to motorStartStop');
            } else {
                console.log('Write true NOK to motorStartStop');
            }
        });
        } else {
            TcHmi.Symbol.writeEx(symbol, false, function (data4) {
            if (data4.error === TcHmi.Errors.NONE) {
                console.log('Write false OK to motorStartStop');
            } else {
                console.log('Write false NOK to motorStartStop');
            }
         });
        }
    }
});
When PLC sees that the startMotor variable is true, then it sets the motorStarted to true after the settings value. So we monitor the motorStarted variable in the PLC. If the variable is true then we start rotation and if the variable is false then we stop the rotation. The following JS code is used for this.
//30 rpm == 33.33333 minutes == 2000 seconds to rotate 360000 dg
var timeS = 2000;
var motorStartedParam = '%pp%motorStarted%/pp%';
var rpmMotor = '%pp%motorRPM%/pp%';

 TcHmi.Symbol.readEx2(rpmMotor, function(data) {
 if (data.error === TcHmi.Errors.NONE) {
        var rpm = data.value;
        console.log(rpm);
        timeS = (2000 *30)/rpm;
    }
});

 TcHmi.Symbol.readEx2(motorStartedParam, function(data) {

 if (data.error === TcHmi.Errors.NONE) {

   if(data.value == true) {

    var angle = 360000;

    console.log('motorStarted TRUE');
    var finalFrame = 'rotate('.concat(angle.toString()).concat('deg)');

    animationGlobal = new TcHmi.Animation('TcHmi_Controls_Beckhoff_TcHmiImage_MotorRotationImage', '');
    animationGlobal.addKeyframe('transform', 'rotate(0deg)', 0)
    .addKeyframe('transform', finalFrame, 1)
    .duration(timeS*1000);
    animationGlobal.run();
}
else
{
    console.log('Reset');
//Stop the animation and put back the beckhoff image to horizontal position
//I don't have reference to the animation object if I don't declare in code behind file or in some otherway
//At least if I declare the animation in a code behind  file  then I have access to the object and I can reset it or pause it
//Problem with pause the image does not go to the original shape
//Problem with reset, the animation does not start again if I create the animation in code behind file. If I declare it in code behind file and
//initialized in the embedded code then it is  fine.  But I am not sure related to memory leak or other performence issue.
//With subscription, I have similar issues.
//animationGlobal.pause();
animationGlobal.reset();
}
}
});
We shall add a Youtube Video here! Download the sample from the link given above.
Download the sample from the link given above.
See next how to show the device name for a short period HMI at https://www.hemelix.com/scada-hmi/twincat-hmi/device-name-for-a-short-time/
Ask questions related to Hemelix sample code and design at Google group https://groups.google.com/g/hemelix