
Data Savings in TwinCAT HMI
The Configuration window is the central configuration window in the TwinCAT HMI. It offers an overview of all elements in the project and enables the configuration of these elements. Furthermore, the user management and all data types can be configured via the window. We shall save objects to the HMI internal symbols and save the same object to the SQLite database by an extension example. We shall compare the time when reading Internal Symbol, Sever symbol, reading from PLC, and reading from SQL.
Video link at the end of this document
Follow the following steps to get the configuration window:
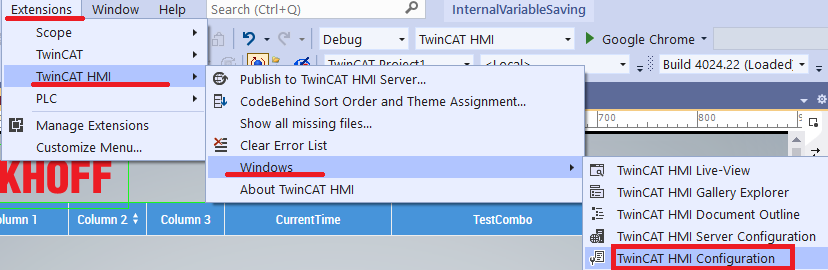
Figure 01: Browsing HMI configuration
There are many configuration options but we shall discuss only about the server symbols and internal symbols.
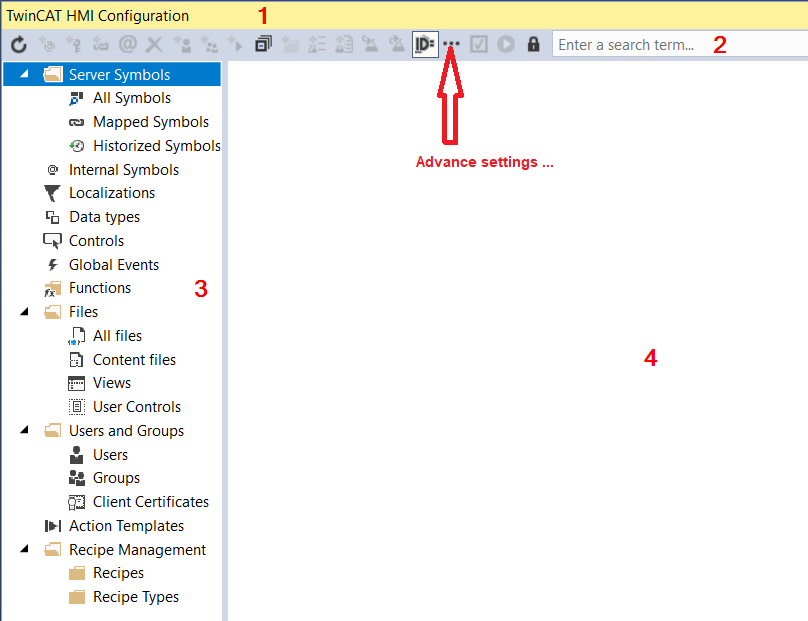
Figure 02: HMI configuration main window
The Configuration window contains
=> A toolbar (1),
=> A search bar (2), this helps to find the target object easily
=> A project element explorer (3)
=> All Symbols ( See at https://www.hemelix.com/scada-hmi/twincat-hmi/twincat-hmi-symbol/)
=>Mapped Symbols (See at https://www.hemelix.com/scada-hmi/twincat-hmi/twincat-hmi-symbol/)
=>Historized Symbols (See at https://www.hemelix.com/scada-hmi/twincat-hmi/twincat-hmi-historize-symbol/)
=>Internal Symbols (this page)
=>Localizations (See at https://www.hemelix.com/scada-hmi/twincat-hmi/hmi-localization/)
=>Events (See at https://www.hemelix.com/scada-hmi/twincat-hmi/alarms-and-events/)
=>Functions (See at https://www.hemelix.com/scada-hmi/twincat-hmi/twincat-hmi-async-function/)
=>Contents (See at https://www.hemelix.com/scada-hmi/twincat-hmi/twincat-hmi-region-and-content/)
=>Views (See at https://www.hemelix.com/scada-hmi/twincat-hmi/twincat-hmi-view/)
=>User Controls (See at https://www.hemelix.com/scada-hmi/twincat-hmi/twincat-hmi-user-control/)
=>User and Groups (See at https://www.hemelix.com/scada-hmi/twincat-hmi/hmi-user-management/)
=>Recipe Management (See at https://www.hemelix.com/scada-hmi/twincat-hmi/scada-hmi-recipe-management/)
=> A display area (4).
You can browse those examples freely and can share them anywhere!
Internal Symbols
Internal symbols are independent of the server and are valid within a browser instance. The internal symbols thus enable variables to be saved individually for each client.
The symbol can be a simple integer or it can be a complex JavaScript object. Since it is browser-specific data will be saved for the specific browser. That means, if we save data by Chrome to an Internal Symbol and if we read the same Internal Symbol by Edge browser we get the default value (not the value that was updated by Chrome).
Create Server Symbols:
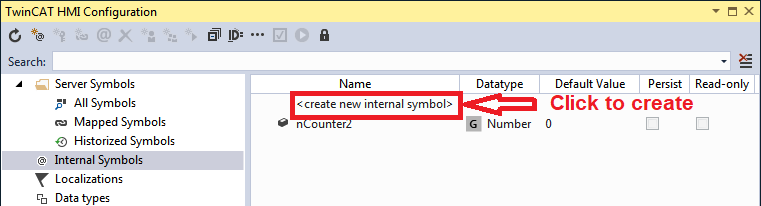
Figure 03: Creating internal symbol
Now we can configure the Internal Symbols by the following way.
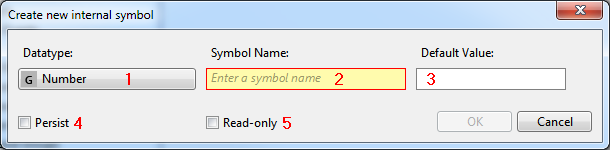
Figure 04: Different properties of internal symbol
1 Data type: Data type of the internal symbol. The selection is made via the combobox.
2 Symbol Name: Name of the internal symbol.
3 Default Value: Default value of the internal symbol that is set when loading the client.
4 Persist: Defines whether the symbol is saved persistently in the client. A persistent internal symbol is available at the next start of the HMI.
5 Read-only: Defines whether the symbol may only be read or whether read and write access is allowed.
Internal symbols defined in our sample code:

Figure 05: Internal symbol in our sample application
DeviceInternalData: Data as object and persist
loadFromPLC: Checkbox indicates should we load from PLC or from the Internal Symbol
SimpleInt: A simple integer that can be saved as Internal Symbol and can be checked from another browser for easy checking we have initialized with a value -99
How to read data from internal Symbol
console.log('Reading from internal variable');
var daraRead = await ReadDataFromServer('%i%DeviceInternalData%/i%');
//ReadDataFromServer defined in CodeBehind file
gridControl.setSrcData(daraRead);
const millis = Date.now() - start;
timeControl.setText(millis.toString());
How the sample works
We have two samples code. Those are identical (In the first sample, we read data from PLC or Database if the checkbox is selected or not). Those are described below.
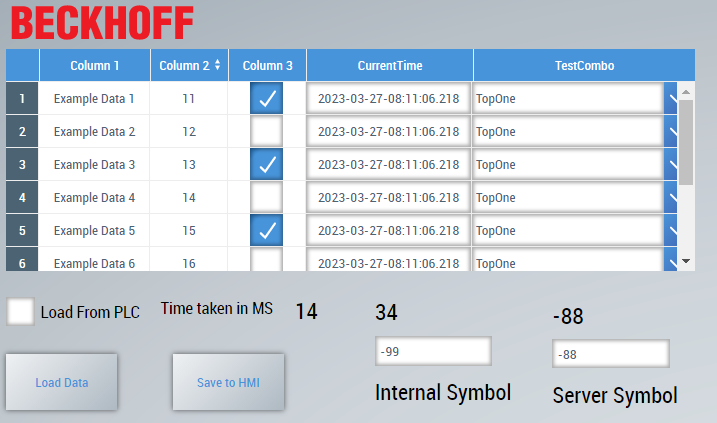
Figure 06: First sample HMI shows different elements of UI
Load From PLC/DataBase:
If we keep the checkbox checked then we read data from PLC (in the first sample) and in the second sample we read from Database. If it is not checked then we load the data from the Internal Symbol
Load Data:
If the Check box is selected then data is loaded from PLC/Database otherwise from from the internal variable (%i%DeviceInternalData%/i%). If data has not been set then nothing will be displayed. If data is read from PLC then the object is saved to global variable.
Save to HMI:
Data is saved from the global variable to the internal variable.
Time taken in MS:
This will measure the time and display it in the time text block. This show for reading similar data from database/PLC/Internal Symbol. We notice that the time taken to read data from Internal Symbol is much less than reading from PLC or DataBase.
Internal Symbol:
An integer type integer can be set easily by the textbox and the value can be checked in other types of browsers to check if the value changes. If we start browsing in a different browser we see that it shows the default value and it does not show the same value which was set in the other browsers. If we type the value that is set to the server internal variable.
Server Symbol:
An integer type integer can be set easily by the textbox and the value can be checked in other types of browsers to see if the value remains the same. If we type the variable then the value is set to the server variable.
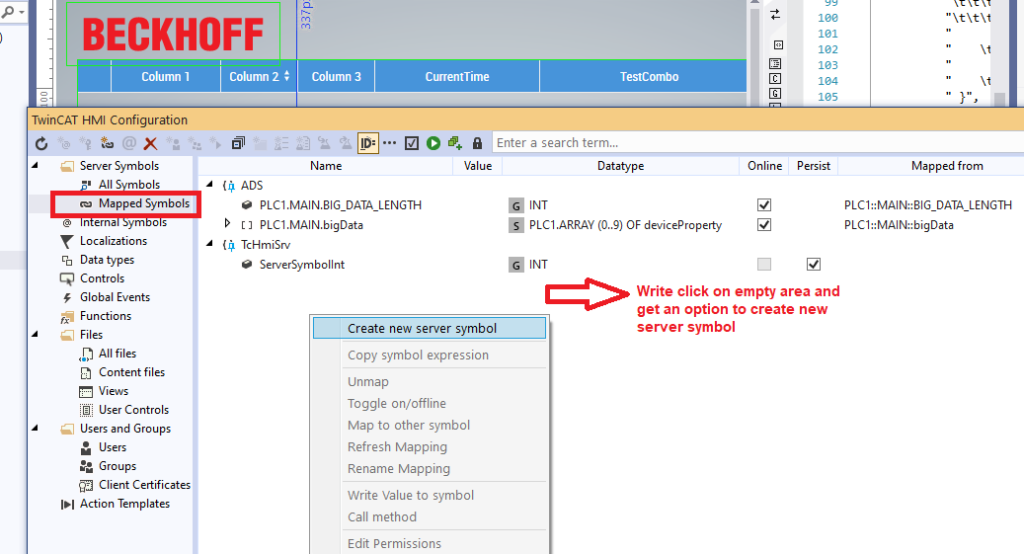
Figure 07: Server variable creation process
Sample One (InternalVariableSaving)
This sample works in the following way. If we press the read button it will read from the Internal Symbol (if the check box is not selected). If the check box is selected then it reads data from PLC. In either case, it records the operation time and displays it.
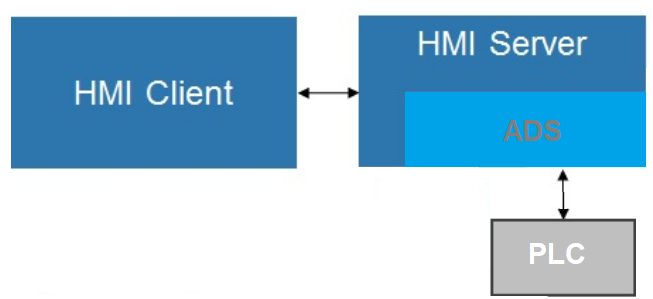
Figure 08: In the First sample, we read data from PLC and Internal Symbol
Sample Two (Saving to DataBase)
This sample works in the following way. If we press the read button it will read from the database (if the check box is selected). If the check box is not selected then it reads data from the Internal Symbol. In either case, it records the operation time and displays it.
See also https://www.hemelix.com/scada-hmi/twincat-hmi/data-grid-view/
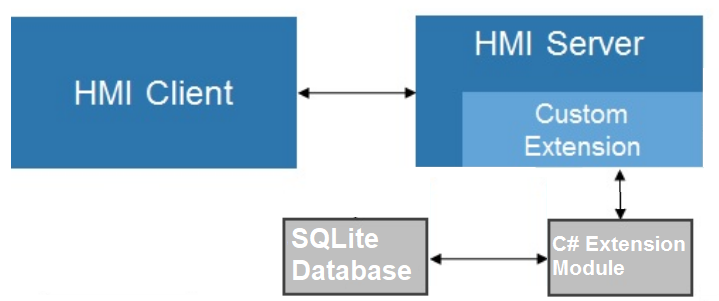
Figure 09: In the second sample, we read data from database and Internal Symbol
Server Symbols
Server symbols can be created centrally in the server under Mapped Symbols. They can also be used offline without a PLC. Clicking on the button Create Server Symbol opens a dialog for adding server symbols. With the server symbol, the actual data is located in the HMI server. The data will be the same for all browsers and all users. Since it is located on the server, it takes a longer time to access the data.
=> Select Mapped Symbols then create a new server symbol.
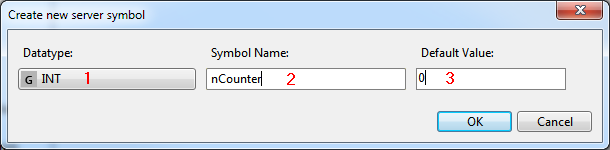
Figure 10: Setting server symbol properties
1 Data type: Data type of the new symbol.
2 Symbol Name: Name of the new symbol.
3 Default Value: Default value of the symbol that is assigned when starting the server.
The following image shows our server symbol creation process (ServerSymbolInt)

Figure 11: Server symbol created in our sample application
In the sample, we are executing or loading the HMI to different browsers (MS Edge and Google Chrome). We use the same address http://127.0.0.1:3001/bin/Default.html to load the HMI.
As we observe, the Time taken by the two browsers is a different
value of internal variables are different also, but the server variables are the same in both cases. Server variables are loaded from the HMI servers on the other hand Internal Symbols are loaded from the browser instances and the values are different.
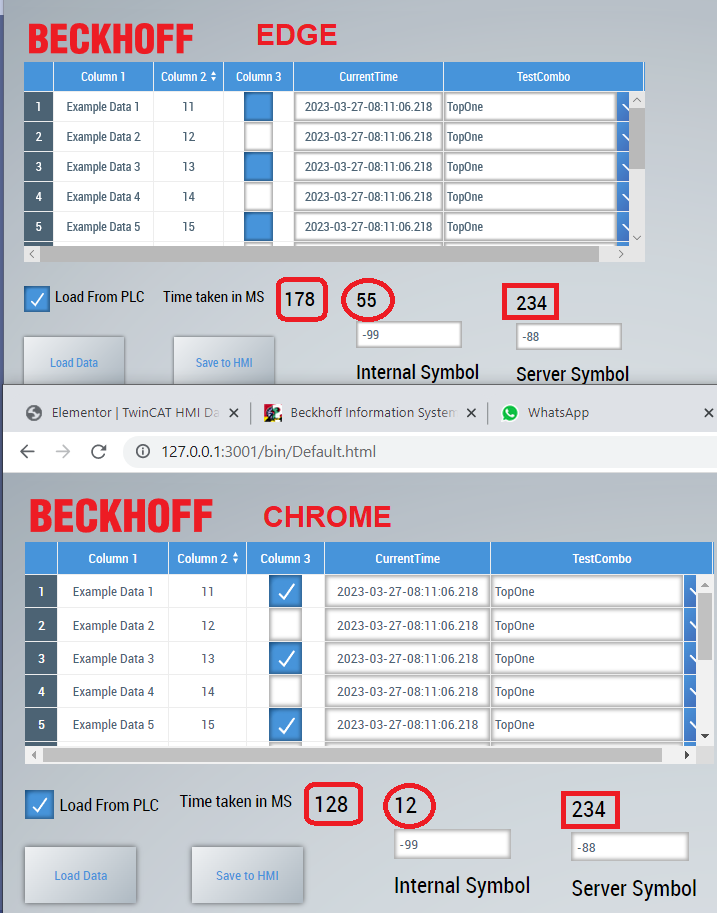
Figure 12: Comparison of different values in chrome and edge browsers
Time taken to load data for Edge/Chrome are 178/128
Internal symbol values are 55/12 and
Server symbol value 234/234 (this is same in both case as it is stored in the server)
Download
Download the sample from the link given above and share it please!
YouTube Video Link
Tips
Tips 01:
When we save the data as an object to the server symbol (stored in the server memory area), it will be overwritten every time we publish new content. So if this is a problem then we save the object by using JSON.stringify() as a string in the SQL database
Tips 02:
Internal symbol is session specific, if it is stored in the browser’s catch area, it means if we save an internal variable in one PC and we are saving the internal variable by accessing the HMI from another PC then the value could be different.
References
Download the sample from the link given above.
See next our Linear Gauge example at https://www.hemelix.com/scada-hmi/twincat-hmi/twincat-hmi-object-savings/
Ask questions related to Hemelix sample code and design at Google group https://groups.google.com/g/hemelix