TwinCAT HMI User Control inside another user control
The YouTube Video is at the end of the Document
We have learned user control in the previous tutorial (https://www.hemelix.com/scada-hmi/twincat-hmi/twincat-hmi-user-control/) and seen how we can create reusable UI components. It is like a class in a high-level programming language where we can create instances of classes as needed. We can include the class from another class and so on. In this way, we can build user control which contains another user control developed by ourselves. A usercontrol may contains another usercontrol.
CompoundUserControl_Parameter.zip (PLC data are passed as parameters from one level to another level )
CompoundUserControl_Subscription.zip (PLC data are read by subscription and then those fields are updated by JavaScript code )
The scenario is like this: We have a rotation sensor that will be used to sense the rotation speed of a motor (fictitious case). The motor is equipped with 2 wheels (each can have a different speed due to the gearbox or some other reasons). Each side will have rotation sensors. Since it is a fictitious case, our yard gate needs 2 motors. In the yard, we have 2 gates. We shall develop an HMI for this. The following image shows what the HMI is doing. We have a total of 4 motors, 8 sensors, and 2 gates, each has been designed as a user control. The rotation speed is simulated by a timer. If we change the timer interval then the rotation speed is changed. The default interval is 500 MS. If we click on the speed then it shows a popup by which we can change the speed (how the popup works, please take a look at https://www.hemelix.com/scada-hmi/twincat-hmi/more-on-javascript-and-usercontrol/). The following image shows when the HMI is running. We say Gate and Motor are compound user control (contain other user control), Rotation.usercontrol is the basic user control.
We have designed the UI in three different samples:
Design 1: In this sample, we pass the PLC variables for linking (no popup, meaning you can’t change the speed)
Design 2: In this sample, we use the subscription mechanism in HMI (you need to take a look at https://www.hemelix.com/scada-hmi/twincat-hmi/mapping-and-subscription-using-js/ before studying this example.)
Design 3: Changing parameters (speed of the motor by changing the timer interval), We shall describe the YouTube Video by using this sample.
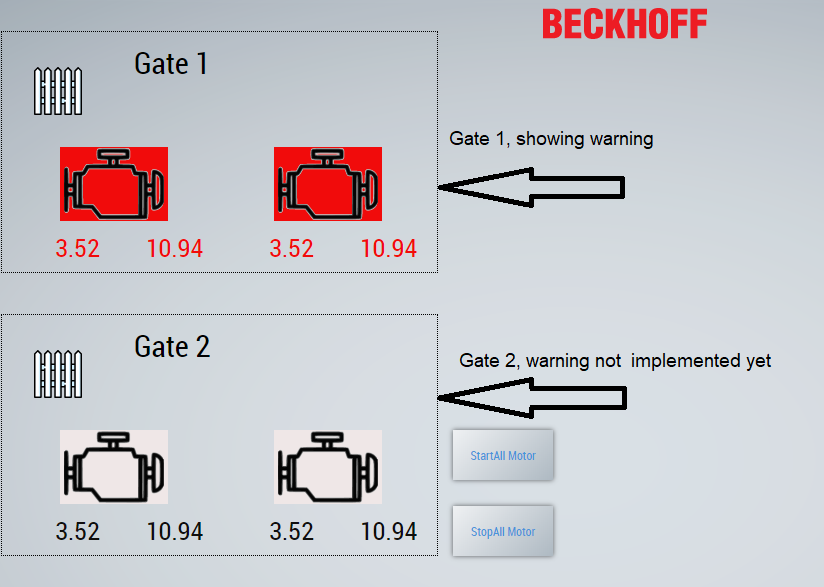
Figure 1: showing the final HMI, when the alarm is active then we change the motor background color and text color
Design 1: Parameter passing
In this design, we shall pass parameters from one level to another level as was done in the previous chapter. So this is not new and we have done the practice at https://www.hemelix.com/scada-hmi/twincat-hmi/twincat-hmi-user-control/
The sample can be downloaded from the above link and we shall not discuss it further. If you have any questions related to this, you could post a question to our google group. The following figure shows the subscription of the lower gate. We need to pass a similar number of parameters for the upper one as well.
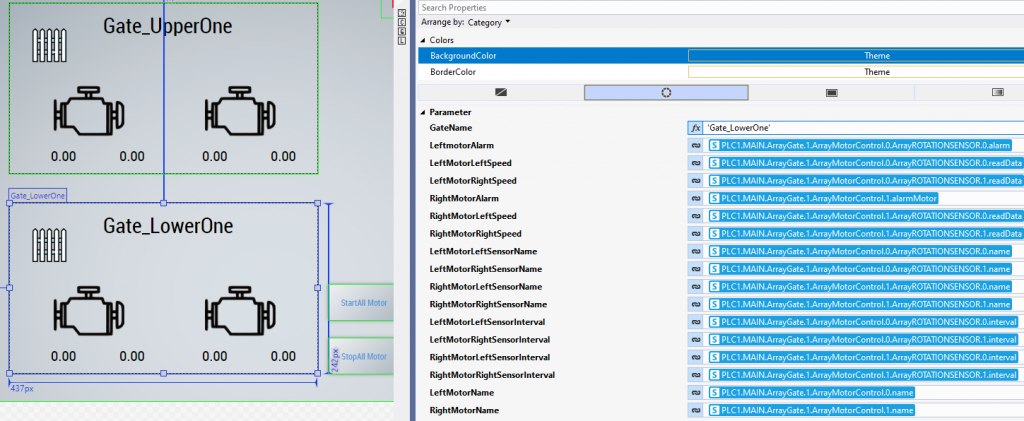
Figure 2: showing the final HMI, when the alarm is active then we change the motor background color and text color
How to reduce number of parameters
If we look at the above pictures, we are passing 18 parameters and if we have 200 similar devices, it would be a nightmare to link and pass all the symbol expressions.
In a real project, we can have thousands of parameters that we need to pass. We need to reduce the number of parameters. We have simplified from 18 to 2 and are passing now the following two parameters.
-Name of the gate (‘Gate_LowerOne’)
-PLC variable path of the gate (PLC1.MAIN.ArrayGate.0)
If we pass only these 2 parameters then we should be able to derive the rest from the path of the variable
As we see in the following picture, we are passing 18 parameters, if we have more devices then we can have more variables, easily it can easily explode in our heads!
In the following figure, we are configuring only the lower gate and we have so many variables to configure. Now compare both figures and notice the number of parameters.
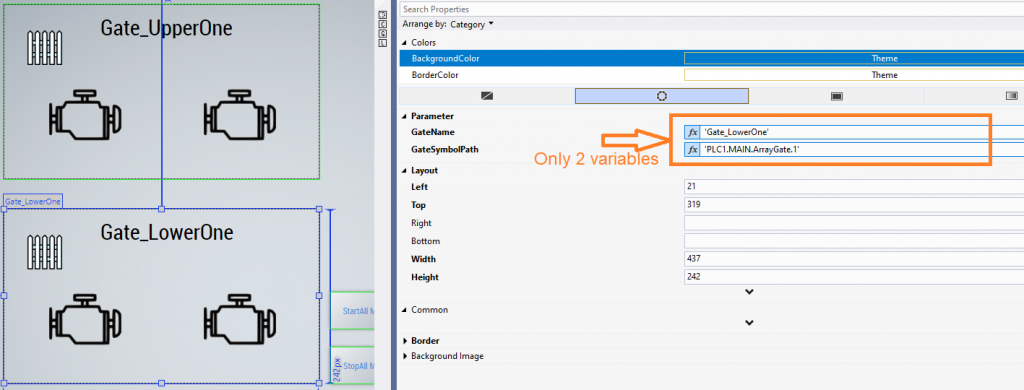
Figure 3: Reduced number of parameters for usercontrol
Since our devices and sub-devices are identical, it makes sense to use the reduced number of parameters. If we open the GateControl’s implementation, we see the left motor, right motor, gate image, and text block.
GateName directly goes to the text block (ID GateControlName)
GateImage is hard coded to Images/MainDoor.svg
The left motor name is passed as ‘LeftMotor’
MotorSymbol is passed as %pp%GateSymbolPath%/pp%.concat(‘.ArrayMotorControl.0’)
If we observe the motor parameters, we have the following parameters
RotationName => ‘RightRotationSpeed’
RotationSymbol => %pp%MotorSymbol%/pp%.concat(‘.ArrayROTATIONSENSOR.1’)
As we see we take the parameters and concat some string as a symbol (which should match the symbol expression)
Design 2: Subscription based
In this sample, we shall show how to fill the HMI field based on subscription. We shall not touch the upper gate but we shall change the lower gate based on subscription. More details are explained on this page
https://www.hemelix.com/scada-hmi/twincat-hmi/mapping-and-subscription-using-js/
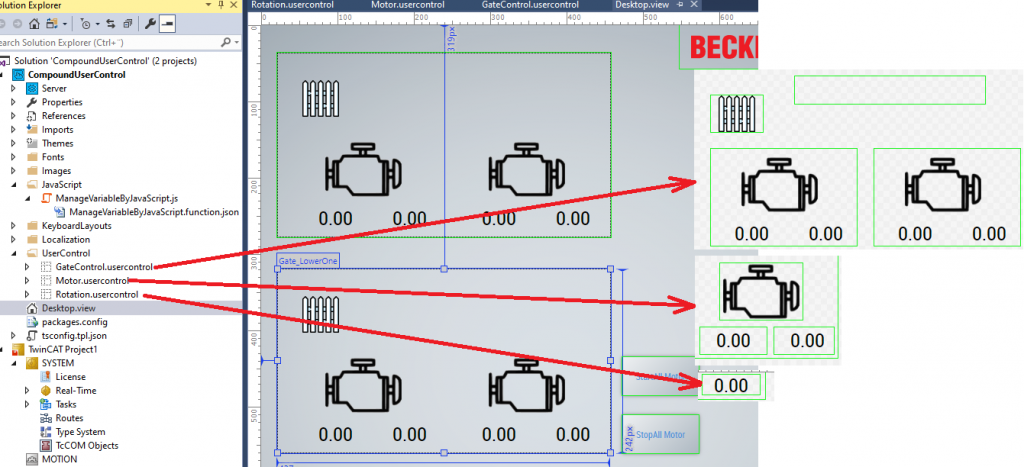
Figure 4: Showing each user control level.
Code snippet showing how to use subscription, the advantage of this is that we don’t link each variable, as you have seen it is confusing to use indices and so on while we are linking.
We shall describe about subscription on this page https://www.hemelix.com/scada-hmi/twincat-hmi/mapping-and-subscription-using-js/
// Keep these lines for a best effort IntelliSense of Visual Studio 2017 and higher.
/// <reference path="../../Packages/Beckhoff.TwinCAT.HMI.Framework.12.742.5/runtimes/native1.12-tchmi/TcHmi.d.ts" />
(function (/** @type {globalThis.TcHmi} */ TcHmi) {
    var Functions;
    (function (/** @type {globalThis.TcHmi.Functions} */ Functions) {
        var CompoundUserControl;
        (function (CompoundUserControl) {
            function ManageVariableByJavaScript(ControlName, GateName) {  //'Gate_LowerOne' 'Gate 2'  Use identifier not the control name

                if (TcHmi.Server.isWebsocketReady()) {
                    var myControl = TcHmi.Controls.get(ControlName.concat('.TcHmi_Controls_Beckhoff_TcHmiTextblock_GateControlName')); //Note actual field
                    if (myControl) {
                        myControl.setText(GateName);
                        var leftMotor = TcHmi.Controls.get(ControlName.concat('.Motor_LeftMotor'));
                        var rightMotor = TcHmi.Controls.get(ControlName.concat('.Motor_RightMotor'));
                        var sensorOne = TcHmi.Controls.get(ControlName.concat('.Motor_LeftMotor').concat('.Rotation__LeftSide').concat('.TcHmi_Controls_Beckhoff_TcHmiTextblock_MotorSpeed'));
                        var sensorTwo = TcHmi.Controls.get(ControlName.concat('.Motor_LeftMotor').concat('.Rotation__RightSide').concat('.TcHmi_Controls_Beckhoff_TcHmiTextblock_MotorSpeed'));
                        var sensorThree = TcHmi.Controls.get(ControlName.concat('.Motor_RightMotor').concat('.Rotation__LeftSide').concat('.TcHmi_Controls_Beckhoff_TcHmiTextblock_MotorSpeed'));
                        var sensorFour = TcHmi.Controls.get(ControlName.concat('.Motor_RightMotor').concat('.Rotation__RightSide').concat('.TcHmi_Controls_Beckhoff_TcHmiTextblock_MotorSpeed'));
                        var commands = [
                            {
                                'symbol': 'PLC1.MAIN.ArrayGate.1.ArrayMotorControl.0.startMotor'
                            },
                            {
                                'symbol': 'PLC1.MAIN.ArrayGate.1.ArrayMotorControl.1.startMotor'
                            },
                            {
                                'symbol': 'PLC1.MAIN.ArrayGate.1.ArrayMotorControl.0.ArrayROTATIONSENSOR.0.readData'
                            },
                            {
                                'symbol': 'PLC1.MAIN.ArrayGate.1.ArrayMotorControl.0.ArrayROTATIONSENSOR.1.readData'
                            },
                            {
                                'symbol': 'PLC1.MAIN.ArrayGate.1.ArrayMotorControl.1.ArrayROTATIONSENSOR.0.readData'
                            },
                            {
                                'symbol': 'PLC1.MAIN.ArrayGate.1.ArrayMotorControl.1.ArrayROTATIONSENSOR.1.readData'
                            }
                        ];
                        TcHmi.Server.subscribe(commands, 500, function (data) {
                            if (data.error !== TcHmi.Errors.NONE) {
                                // Handle TcHmi.Server class level error here.
                                return;
                            }
                            var response = data.response;
                            if (!response || response.error !== undefined) {
                                // Handle TwinCAT HMI Server response level error here.
                                return;
                            }
                            var commands = response.commands;
                            if (commands === undefined) {
                                return;
                            }
                            for (var i = 0, ii = commands.length; i < ii; i++) {
                                var command = commands[i];
                                if (command === undefined) {
                                    return;
                                }
                                if (command.error !== undefined) {
                                    // Handle TwinCAT HMI Server command level error here.
                                    return;
                                }
                                if (commands[i].symbol.localeCompare('PLC1.MAIN.ArrayGate.1.ArrayMotorControl.0.ArrayROTATIONSENSOR.0.readData') == 0) {
                                    if (sensorOne) {
                                        var num = command.readValue;
                                        sensorOne.setText(num.toFixed(2));
                                    }
                                }
                                if (commands[i].symbol.localeCompare('PLC1.MAIN.ArrayGate.1.ArrayMotorControl.0.ArrayROTATIONSENSOR.1.readData') == 0) {
                                    if (sensorTwo) {
                                        var num = command.readValue;
                                        sensorTwo.setText(num.toFixed(2));
                                    }
                                }
                                if (commands[i].symbol.localeCompare('PLC1.MAIN.ArrayGate.1.ArrayMotorControl.1.ArrayROTATIONSENSOR.0.readData') == 0) {
                                    if (sensorThree) {
                                        var num = command.readValue;
                                        sensorThree.setText(num.toFixed(2));
                                    }
                                }
                                if (commands[i].symbol.localeCompare('PLC1.MAIN.ArrayGate.1.ArrayMotorControl.1.ArrayROTATIONSENSOR.1.readData') == 0) {
                                    if (sensorFour) {
                                        var num = command.readValue;
                                        sensorFour.setText(num.toFixed(2));
                                    }
                                }
                            } //for
                        }); // subscribe
                } //   if (myControl)
                }//Web socket ready
            } //function ManageVariableByJavaScript(ControlName) {
            CompoundUserControl.ManageVariableByJavaScript = ManageVariableByJavaScript;
        })(CompoundUserControl = Functions.CompoundUserControl || (Functions.CompoundUserControl = {}));
        Functions.registerFunctionEx('ManageVariableByJavaScript', 'TcHmi.Functions.CompoundUserControl', CompoundUserControl.ManageVariableByJavaScript);
    })(Functions = TcHmi.Functions || (TcHmi.Functions = {}));
})(TcHmi);
Configure the lower gate and call the subscription method, subscription method has 2 parameters ControlName and GateName, both are string types. Once we have pressed on the StartMotor button then we see the motor speed changing (simulated in PLC with timer). The method calling mechanism is shown in the following picture (we shall explain this in a video tutorial)
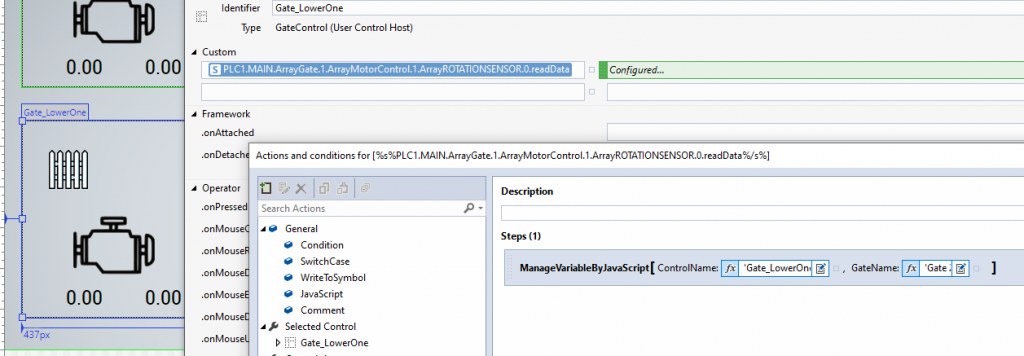
Figure 5: Shows how to control the Java Script method for subscription (how subscription works see the JavaScript chapter)
Design 3: Changing parameter of PLC program by Popup
This is example 3 based on the same example. Here we shall click on the rotation sensor data and change the timer interval for rotation speed simulation purposes. It means, by default the sensor is read by 500 MS interval. We shall change the time interval of the PLC when the user clicks on the rotation value.
We have considered only the lower part. If we press on a rotation value it will give an option to change the timer value in milliseconds so the data will be generated with that interval.
We have a button StartAllMotor and StopAllMotor, basically, these activate the timer and stop the timer for simulation (please see the PLC code in the zip file).
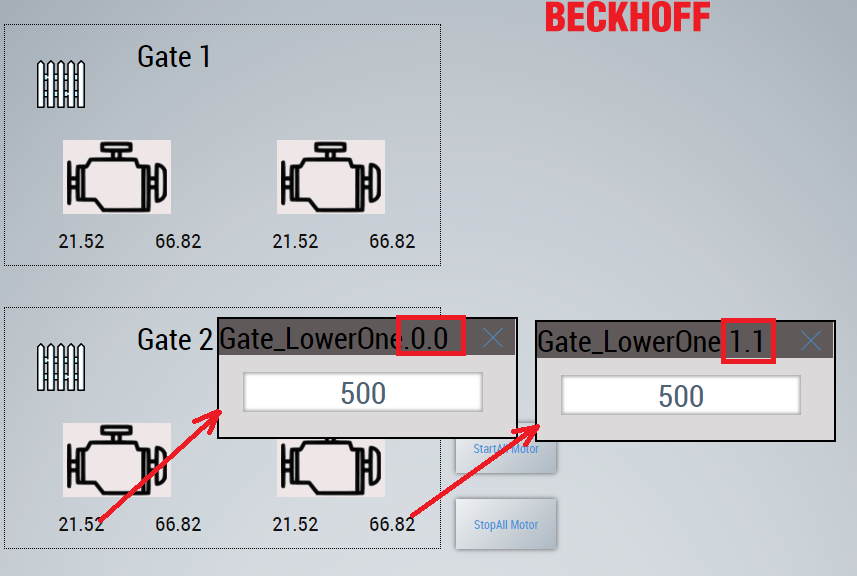
Figure 6: Display the gate id, motor id and the sensor index, we can detect which sensor has been pressed.
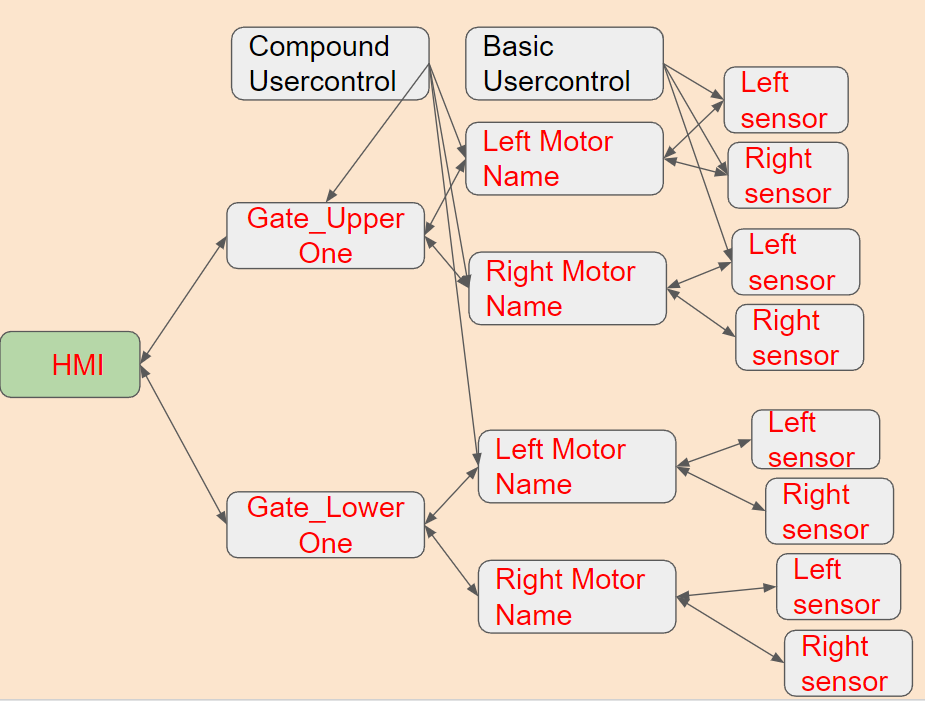
Figure 7: Showing all the user controls ( basic + compound user control)
How to design the HMI:
We need a HMI project, where we show the HMI (we shall focus on this part in this tutorial, see https://www.hemelix.com/scada-hmi/twincat-hmi/my-first-twincat-hmi/ for starting HMI)
We need a PLC project, we can copy paste the PLC code from the zip file (see how to start PLC program https://www.hemelix.com/automation/first-plc-program/)
=> Start a Beckhoff HMI project by
=> Design 4 user controls (Rotation, Motor, GateControl and TimerIntervalSetting)
=> Rotation.usercontrol (see user control at: https://www.hemelix.com/scada-hmi/twincat-hmi/twincat-hmi-user-control/)
Basic user control implements onPressed (shows the popup) and Custom event (for alarm to change text color)
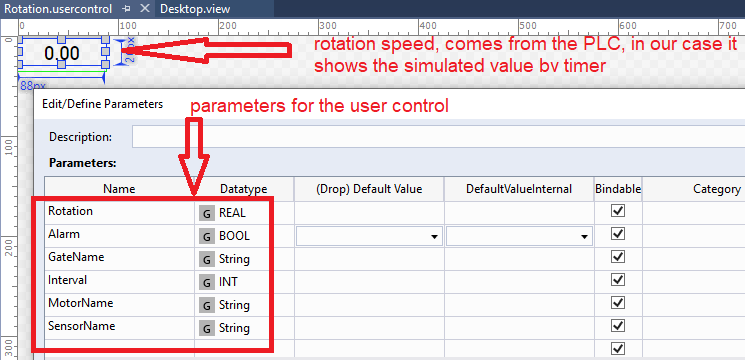
Figure 8: Design of the user control (Rotation.usercontrol) and it’s parameters
=> Motor.usercontrol
Motor user control contains 2 rotation user control and an motor image. A Custom event is implemented to change the background of motor to red when the alarm is active.
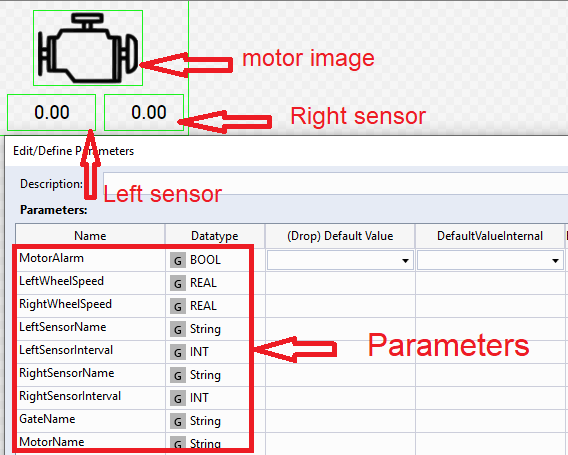
Figure 9: Design of the compound user control (Motor.usercontrol) and it’s parameters
=> GateControl.usercontrol
Gate user control contains 2 motor user control, gate name and an gate image. This is shown in the following
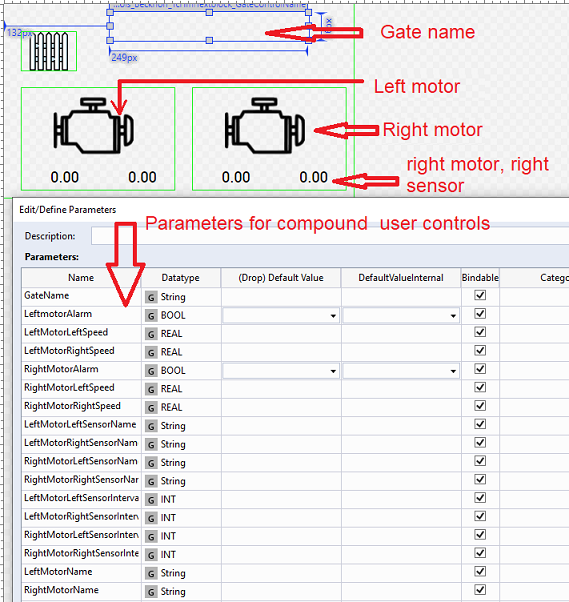
Figure 9: Design of the Gate user control and it parameters. Gate user controls are placed on the Desktop and configured with the parameters
=> TimerIntervalSetting.usercontrol
Basic user control that is displayed when user press on the rotation value. It shows the gate name and the motor and sensor indexes and shown in figure 4. For more about pop up take a look at https://www.hemelix.com/scada-hmi/twincat-hmi/more-on-javascript-and-usercontrol/
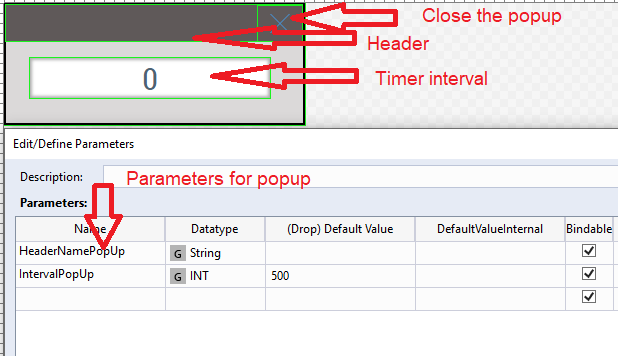
Figure 10: Design of the popup user control, this is displayed when user press on the rotation value. If we change the value then timer interval is changed in the PLC
If you see the SettingPopup method, you notice the following:
 function SettingsPopup(ParentControl, UserControl, WhereToInsert, GateName, MotorName, SensorName, Interval) {
 ...
 ...
 var myControl = TcHmi.Controls.get(ParentControl);  //Where we are using the control
 if (myControl) {
 popupParametersControl['data-tchmi-headernamepopup'] = GateName.concat('.').concat(MotorName).concat('.').concat(SensorName);
We are building the popup header by using concat method. Also notice that the gate identifier and name is ‘Gate_UpperOne’
=> Run the PLC program
=> Press on the StartAllMotor to simulate the sensor, there should be the same rotation values for all sensors.
=> If we press on the rotation value, it will pop up a dialog where we can change the 500 MS to something else.
=> If we change the value for example to 400 then the speed will be higher.
=> Download this source code (CompoundUserControl_Popup.zip) and check with the YouTube video.
=> If you think it is useful, you could share it to help us.
Advanced topics about Symbol, Symbol expression and Binding
We have described symbols, compound user control, and how to reduce the number of parameters passing for user control has been described. You need some knowledge about user controls, JavaScript, and subscription mechanisms in TwinCAT.
Here is the link to how you should go through the tutorial.
=> Symbol, Symbol Expression, and bindins this page https://www.hemelix.com/scada-hmi/twincat-hmi/twincat-hmi-symbol/
=> Compound user control, https://www.hemelix.com/scada-hmi/twincat-hmi/twincat-hmi-compound-user-control/
=> How to reduce the number of parameters when using compound user control, https://www.hemelix.com/scada-hmi/twincat-hmi/mapping-and-subscription-using-js/
You can watch the video, and go through the source code. If you have an issue then you can comment on the YouTube video or in our Google group
Mapping of compound control for HMI
When we have an array of objects then how can we map those variables?
ArrayGate : ARRAY [0..98] OF Gate ;
We have 99 items in the array, if we map those we can have the following Mapped Symbols. The field is shown by the HMI configuration up to 99. If we have more than 99 items in the array it does not show in an expanded way. It looks to me that if the array is more than 99 then we can’t map individual items in the array.
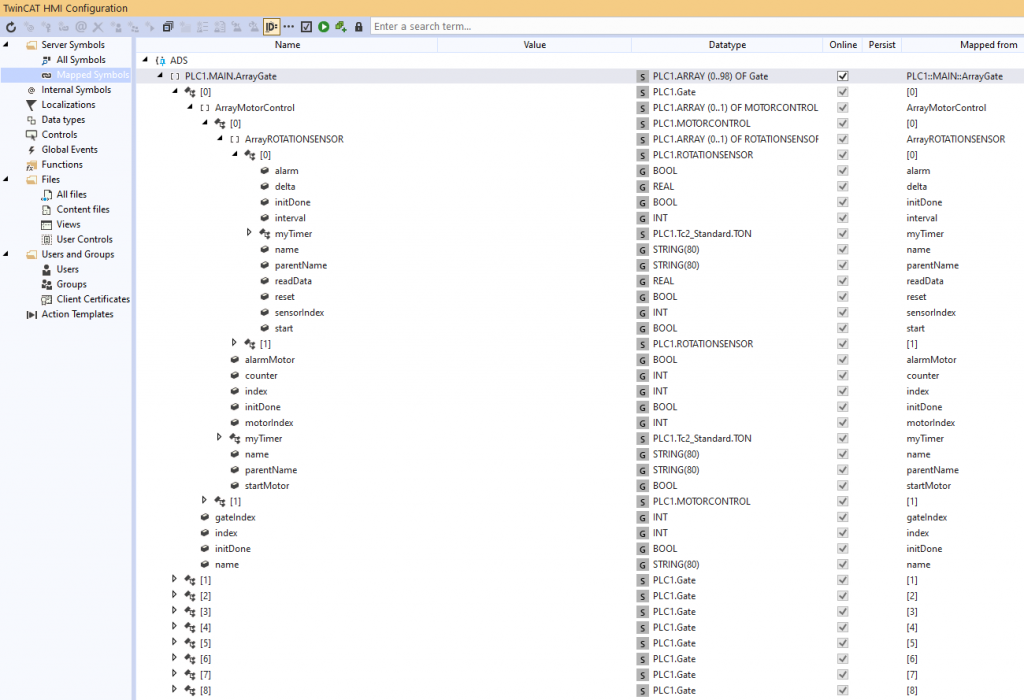
Figure 12: Mapped symbols view can show up to 99 items in HMI configuration
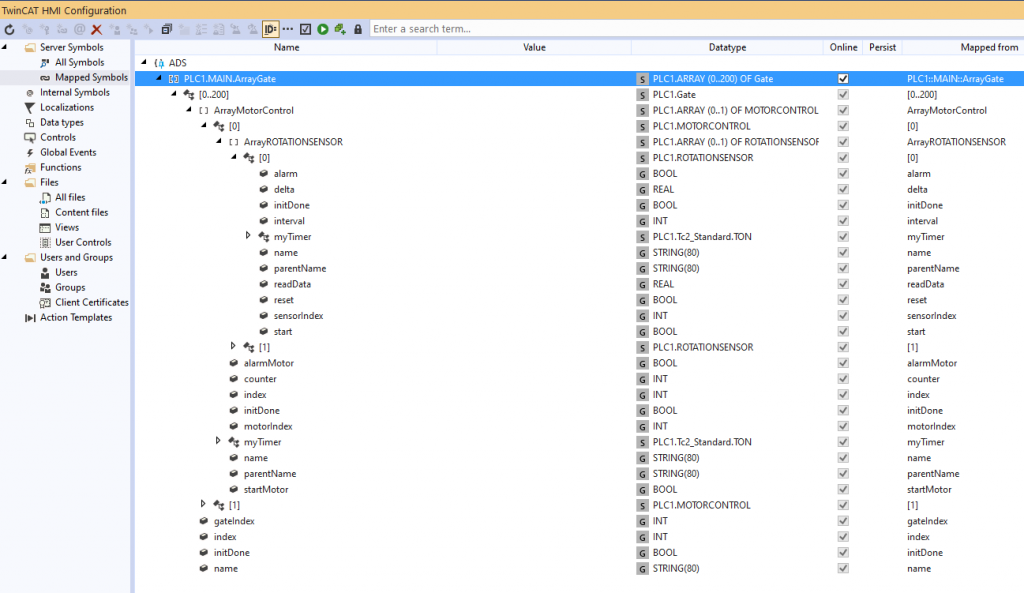
Figure 13: Mapped symbols view can’t show expanded view if the items are more than 99
If we have mapped an item from the array and then if we have mapped whole array then both mapping are available for use. This is shown in the following figure. We have reduced the array to 20 items.
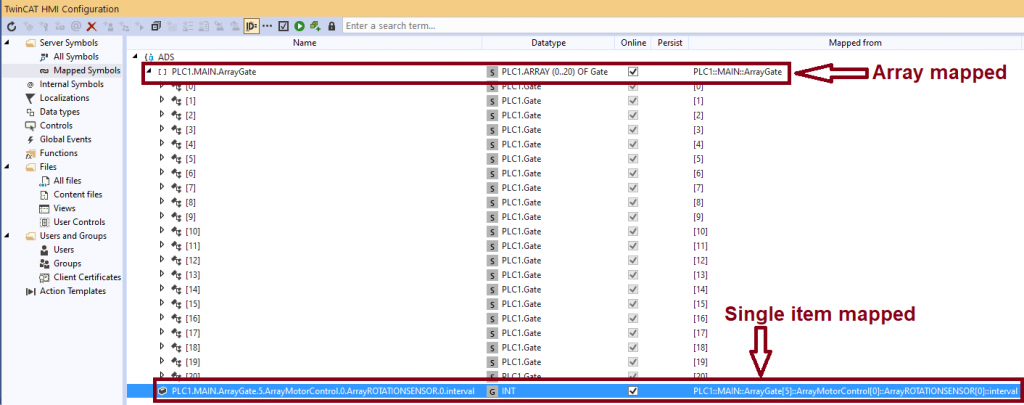
Figure 14: Mapped symbols view can go out of sync if we change the mapped symbols
If we have mapped an item from the array and then if we have mapped whole array then both mapping are available for use.
If we change the items in the array, it goes out of sync in the mapped variables view and that can be synced again in the following way. This can happens if the system does not find the runtime as well.
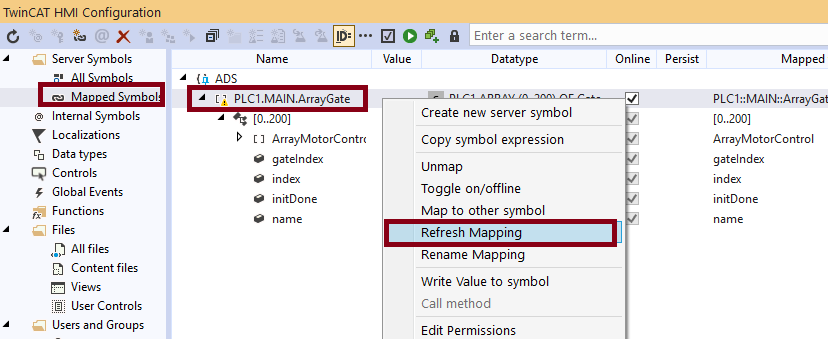
Figure 15: Mapped symbols view can go out of sync if we change the mapped symbols
Array items can be accessed from different levels. Following are the symbol expression on 3 different levels.
%s%PLC1.MAIN.ArrayGate%/s%
%s%PLC1.MAIN.ArrayGate.0.ArrayMotorControl.0.ArrayROTATIONSENSOR.0%/s%
%s%PLC1.MAIN.ArrayGate.5.ArrayMotorControl.0.ArrayROTATIONSENSOR.0.interval%/s%
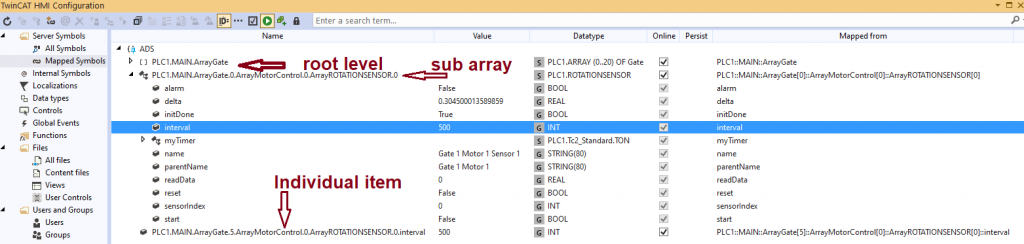
Figure 16: Mapped symbols in different level of the array (root level, individual variable and sub array level)
The modified compound user control application for testing an array with 201. In the upper left corner we are showing the Grid view (it only shows the gate level items), upper right corner we have 2 motor control of the 4th gate.
In the bottom area, we are showing the interval of the following items (left side by configuration and right side by subscription):
PLC1.MAIN.ArrayGate[5]::ArrayMotorControl[0]::ArrayROTATIONSENSOR[0]::interval
PLC1.MAIN.ArrayGate[5]::ArrayMotorControl[0]::ArrayROTATIONSENSOR[1]::interval
PLC1.MAIN.ArrayGate[8]::ArrayMotorControl[0]::ArrayROTATIONSENSOR[0]::readData
PLC1.MAIN.ArrayGate[3]::ArrayMotorControl[0]::ArrayROTATIONSENSOR[0]::readData
As we see the subscription is different than individual items and it is not possible to map individual items, we need to do the whole array.
When the Desktop view was attached we execute the following code for filling the left-side edit boxes.
 async function asyncFunctionCall() {
try {
    var interval1 = await ReadPLCVariable('%s%PLC1.MAIN.ArrayGate[5]::ArrayMotorControl[0]::ArrayROTATIONSENSOR[0]::interval%/s%');
    var interval2 = await ReadPLCVariable('%s%PLC1.MAIN.ArrayGate[5]::ArrayMotorControl[0]::ArrayROTATIONSENSOR[1]::interval%/s%');
    var readDat1 = await ReadPLCVariable('%s%PLC1.MAIN.ArrayGate[8]::ArrayMotorControl[0]::ArrayROTATIONSENSOR[0]::readData%/s%');
    var readData2 = await ReadPLCVariable('%s%PLC1.MAIN.ArrayGate[3]::ArrayMotorControl[0]::ArrayROTATIONSENSOR[0]::readData%/s%');
    var interval1Control = TcHmi.Controls.get('TcHmiTextbox_Interval1');
    interval1Control.setText(interval1.toString());
    var interval2Control = TcHmi.Controls.get('TcHmiTextbox_Interval2');
    interval2Control.setText(interval2.toString());
    var readDat1Control = TcHmi.Controls.get('TcHmiTextbox_ReadData1');
    readDat1Control.setText(readDat1.toString());
    var readDat2Control = TcHmi.Controls.get('TcHmiTextbox_ReadData2');
    readDat2Control.setText(readData2.toString());
    } catch(errorObject) {
    console.log(`ErrorCode = ${errorObject.ErrorCode}`);
    console.log(`ErrorText = ${errorObject.ErrorText}`);
  }
}
asyncFunctionCall();
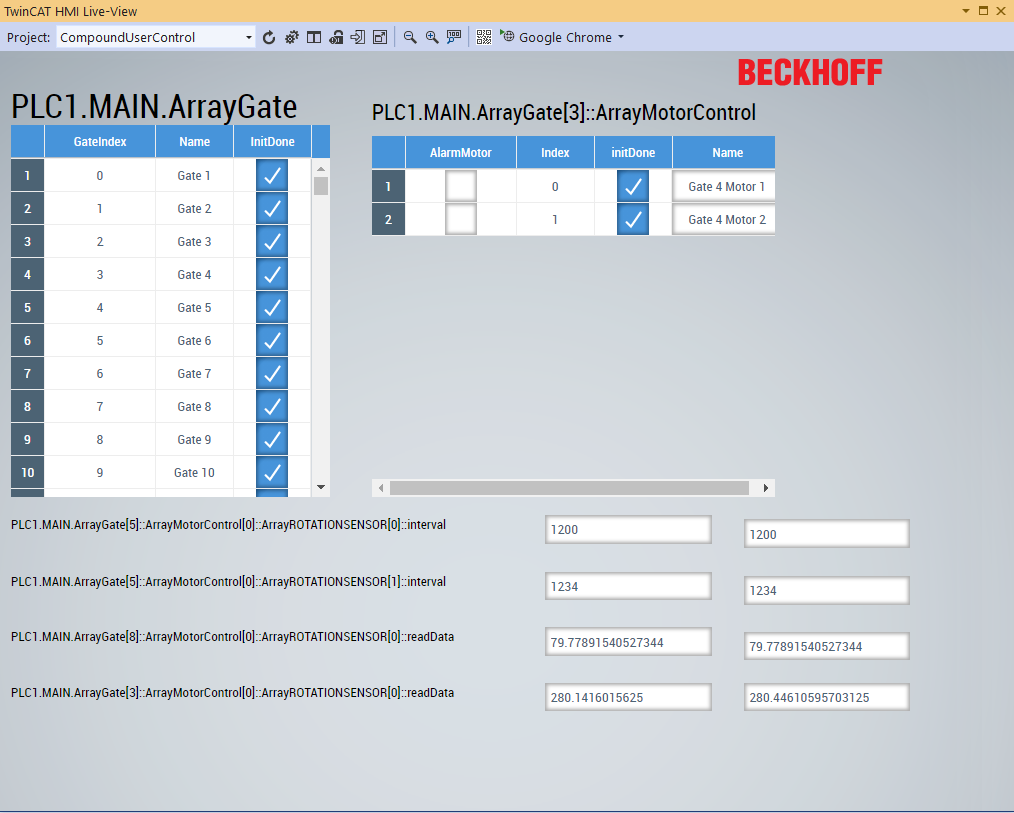
Figure 17: Showing data from an array of 201 items
Download the sample from the link given above.
Next, let’s try to understand what is a view at https://www.hemelix.com/scada-hmi/twincat-hmi/twincat-hmi-view/
Ask questions related to Hemelix sample code and design at Google group https://groups.google.com/g/hemelix