
TwinCAT HMI and OPC UA Server
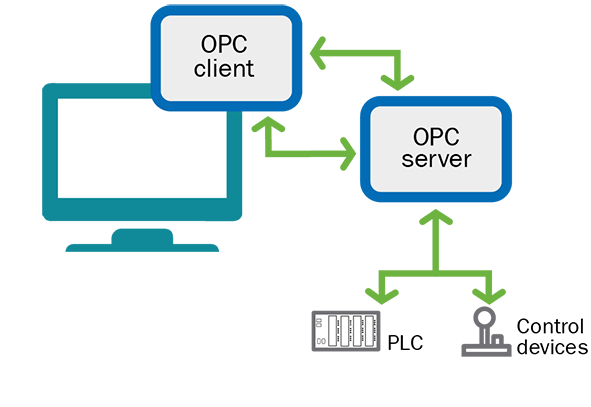
In the world of OPC UA, we have mainly two software, one is client and another is server. The server provides services to the clients. The server controls the resources and keeps track of information from the devices under the server’s possession which is controlled by the servers. For example, a server is controlling a motor, the server can give a command to start the motor, it knows the RPM, the server knows if the motor has an alarm or not. A client can get all this information from the server. The client can ask the server to start the motor. In this case, a client would be any software that can communicate with the server over the network.
OPC is the interoperability standard for the secure and reliable exchange of data in the industrial automation space and in other industries. It is platform-independent and ensures the seamless flow of information among devices from multiple vendors. The OPC Foundation is responsible for the development and maintenance of this standard (https://opcfoundation.org/).
If we take a look at the following images, we see that client and server are communicating with each other. The server controls a PLC and some devices. The OPC UA server has been designed in a standard way so that another client made by another vendor can use the OPC servers and control the devices or read-write data from the PLC. The following image shows the relations between client and server software.
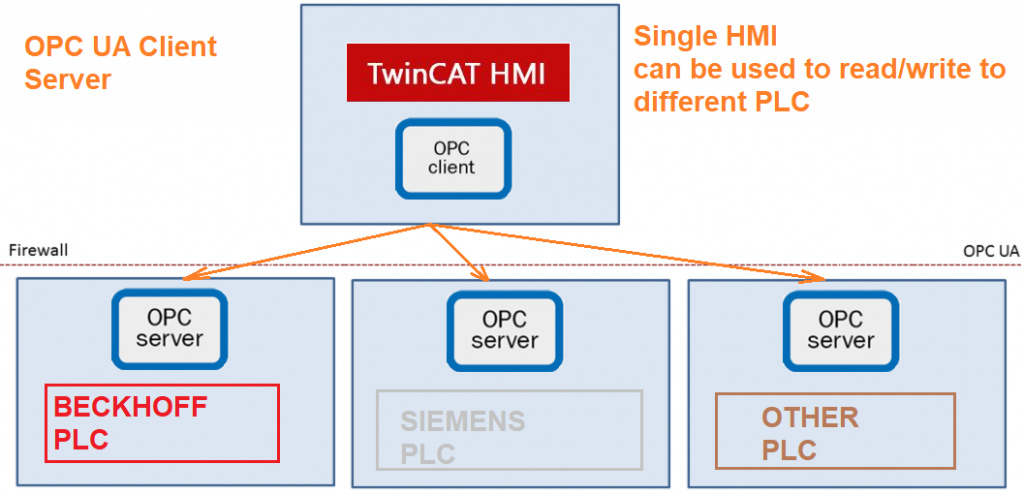
The following images explain how the HMI can be used to communicate data from the PLC, in this case, we must have the server running in the PLC. TwinCAT HMI may not be able to communicate with the devices if the devices have not implemented the server in the device. Many devices may not support the server automatically, you may need to activate it (for example in S7). If we are running the OPC UA server in a Rasberry Pi, we shall be able to contact the Rasberry Pi and read-write data from the TwinCAT HMI.
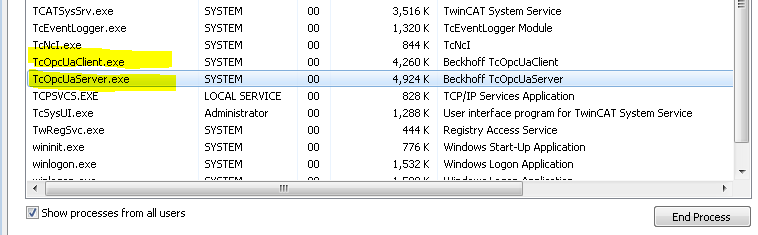
If you try to find the process in the PLC you may find a software called OPC UA client and OPC UA server as shown in the following images. We can run both client and server software in the same machine or only client or only server depending on our needs. The following image shows that OPC UA Client and Server software is running on a Beckhoff computer. The following image has been captured from the task manager of a Beckhoff PLC.
TwinCAT HMI works as a client, we can make the HMI software as a server as well also, but we don’t need server functionality in the HMI.
In this tutorial, we shall examine how we can get data from the OPC UA server and display at the HMI. We can write data to the server from the HMI as well. You can download the sample example and try.
How do I know if a device support OPC UA server or not, know more about the client? If we download the OPC UA expert tool from the unified automation that can be used to check if the device support OPC UA server or not.
If a device does not support the OPC UA server but still we need to communicate with the device with TwinCAT HMI then what are the option we have. In this case, we create a server extension, and then those data can be available in the HMI. In the following pages, we have a complete sample, you could take a look at https://www.hemelix.com/scada-hmi/twincat-hmi/twincat-hmi-server-extension/
Example Client 1 (TwinCAT HMI as client <> Beckhoff PLC):
In this case, we shall use HMI to communicate Beckhoff PLC, it will read and write data to and from the PLC. The PLC has an IP address 10.10.10.125 (just an example).
STEPS:
=> Fire Visual Studio and create an empty HMI project (see how to create the first HMI project)
=> Now we shall try to read the default values from the default OPC UA Server that is running in the PLC (you need to TF6100 | TwinCAT 3 OPC UA in your development environment and in the target PLC if not done already)
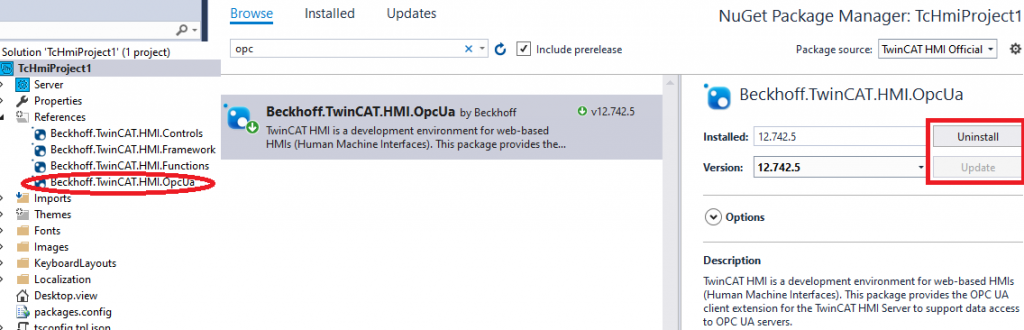
=> Install OPC UA NuGet package in the Visual Studio for OPC UA Client (Project | Manage Nuget Packages..)
=> Click on the Browse and find the package Beckhoff.TwinCAT.HMI.OpcUa package and install it.
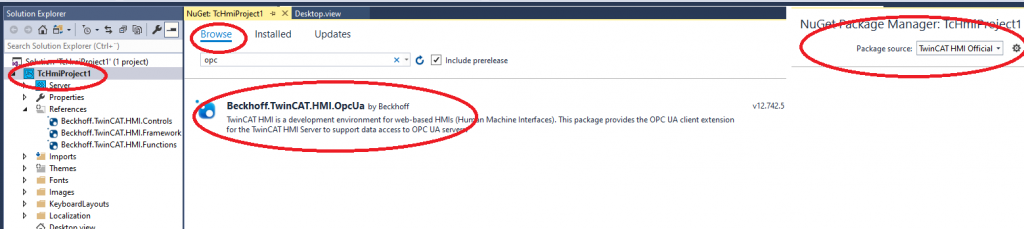
=> Select OpcUa and click install, finally it has been installed as seen in the following image.
=> Now we need to activate and configure the IP address of the PLC to TwinCAT HMI.
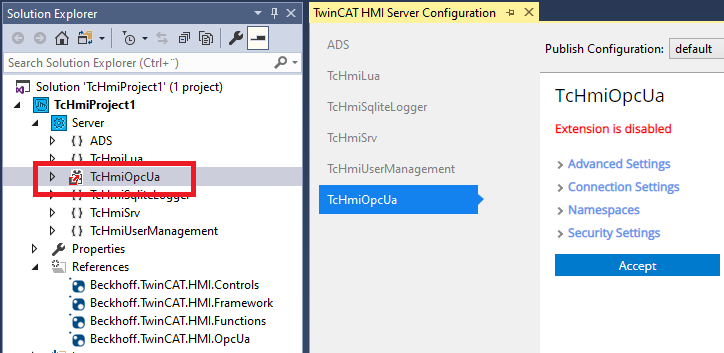
=> Right-click on the TcHmiOpcUa and activate it
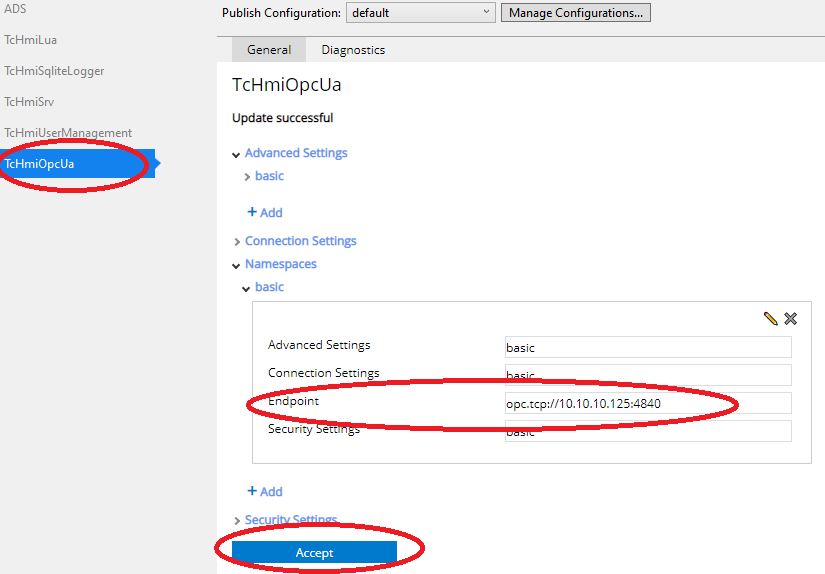
=> Go to TwinCATHMI | Windows | TwinCATHmiServer Configuration | TcHmiOpcUa and insert the IP address with port 4840 as shown in the following image.
=>Finally press on Accept.
=>Good to build the project as well.
If we have installed TF6100 | TwinCAT 3 OPC UA to the target PLC then the device manufacturer stores some data in the OPC UA server by default.
Now we shall show that data to HMI and also verify by using OPC UA Expert.
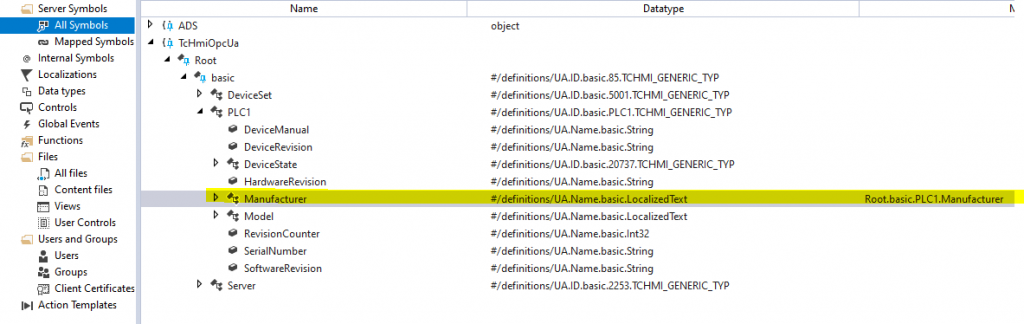
=> Map the variables from the OPC UA server just like the same way we do for PLC as shown in the following image.
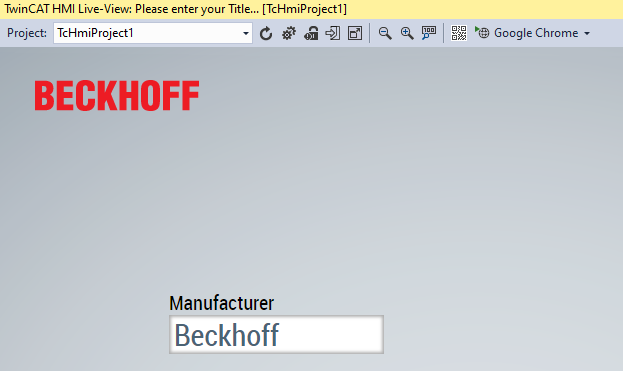
=>Configure the Desktop of the HMI for displaying the name of the PLC manufacturer.
The manufacturer is shown in the following image and that is shown as Beckhoff.
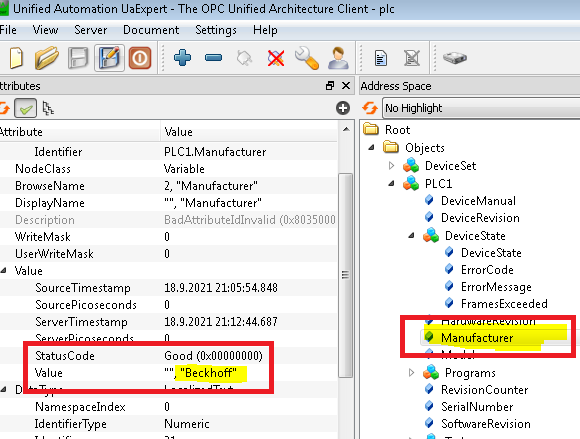
Now, let us verify the manufacturer name by reading the same with OPC UA Expert, as seen in the following image by the UA Expert, it is shown as Beckhoff.
So far what we have done is that we are not doing any useful work meaning that we don’t have any useful PLC application from where we can pick the variables and display them on the UI.
Before continuing, we need to clarify that though Beckhoff devices support OPC UA and if we had not installed the OPC Library, it would not work.
So we must remember to activate the OPC-related stuff to the PLC in question (it can be Siemens PLC, Schneider PLC, etc ).
You can download so far done sample from the previously mentioned link.
Now we shall introduce our motor settings PLC program to the same project and control the motor by using OPC UA. The sample done so far did just basic setup and there was no useful user program. We shall remove the ADS link from the HMI project and keep only the OPC UA link.
Convert the existing Hemelix setting project to use OPC UA Server in the TwinCAT PLC:
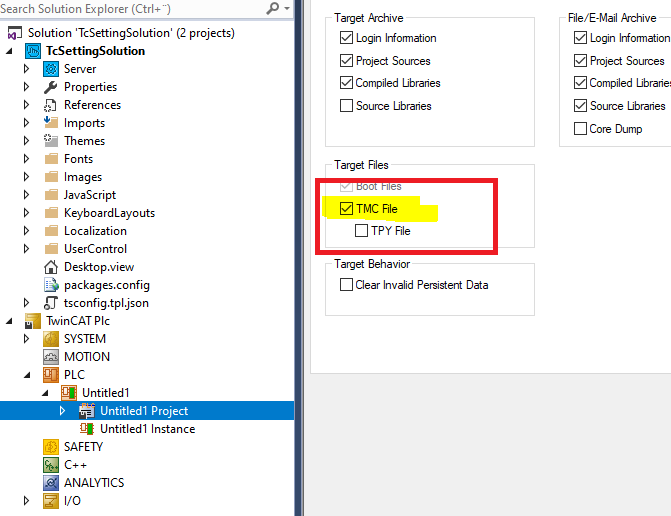
=>We tell the TwinCAT system to export TMC file as seen in the following image (The TwinCAT Module Class (TMC)is used for defining the class information for a module. It includes data type definitions and their application, provided and implemented interfaces, and data areas and data pointers. TMC: everything that is visible from outside must be defined with TMC editor.)
We tell by using the following attribute before the variable
{attribute 'OPC.UA.DA' := '1'}If we use this in front of a variable then the variable will be available for mapping in the HMI project. We use the following code in our MotorAC function block and build the whole project.
FUNCTION_BLOCK MotorAC
VAR_INPUT
END_VAR
VAR_OUTPUT
END_VAR
VAR
{attribute 'OPC.UA.DA' := '1'}
motorName : STRING :='AC Motor';
{attribute 'OPC.UA.DA' := '1'}
maxRotationValue : REAL := 0.0;
{attribute 'OPC.UA.DA' := '1'}
rotationPerMinute : REAL := 0;
myTimer : TON ;
{attribute 'OPC.UA.DA' := '1'}
startMotor : BOOL := FALSE;
{attribute 'OPC.UA.DA' := '1'}
motorAlarm : BOOL := FALSE;
{attribute 'OPC.UA.DA' := '1'}
motorReset : BOOL := FALSE;
index : INT := 1;
initDone : BOOL := FALSE;
END_VAR
VAR PERSISTENT
	{attribute 'OPC.UA.DA' := '1'}
	motorStartTime : REAL;  //Seconds
	{attribute 'OPC.UA.DA' := '1'}
	motorStopTime : REAL;  //Seconds
	{attribute 'OPC.UA.DA' := '1'}
	motorRPM : REAL; //rpm
END_VAR
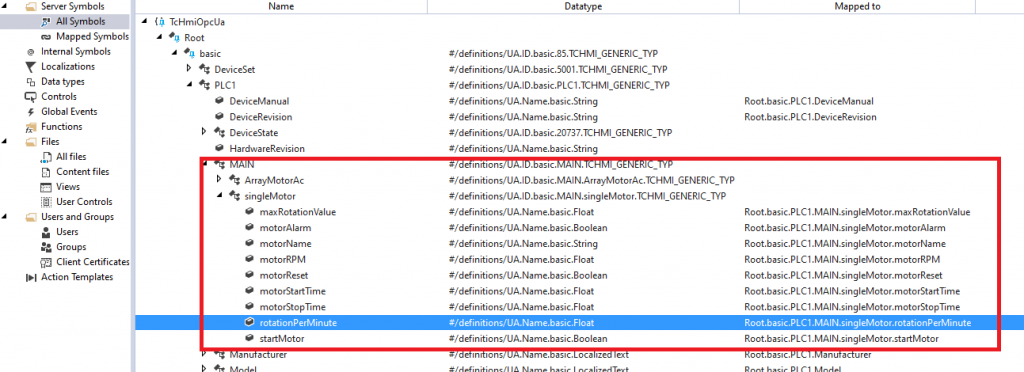
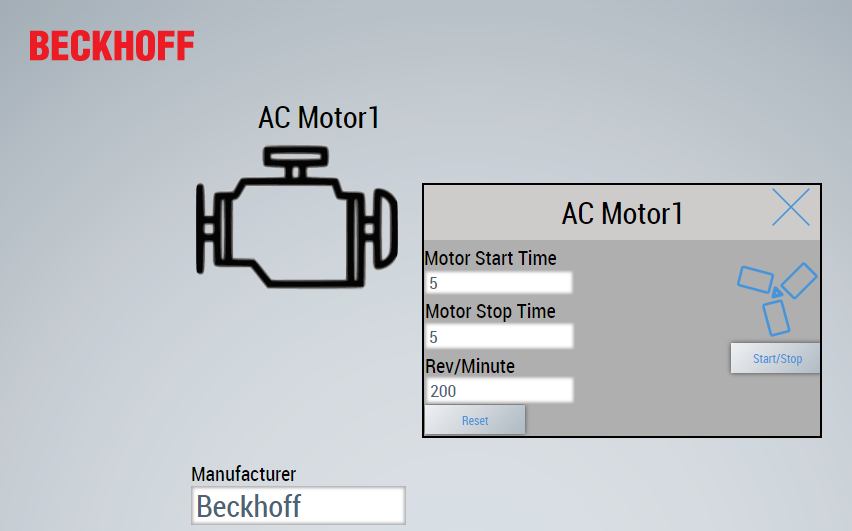
The final UI is shown in the following images.
Note: You may need to restart the Visual Studio as I have seen there is a mysterious reason, after restart the VS all are fine.
As promised always, we shall have a video tutorial here, so please visit us again.
References:
https://infosys.beckhoff.com/english.php?content=../content/1033/tf6100_tc3_opcua/1866801675.html&id=
(TwinCAT V2 and OPC UA Server)
https://infosys.beckhoff.com/english.php?content=../content/1033/tcopcuaserver/8841529355.html&id=6508850949278709411
TIPs:
Check if a PLC variable is available vis ADS, is it available via OPC UA Server?
The TwinCAT OPC UA Server automatically establishes a connection to the first PLC runtime on the local system. The PLC symbols marked in the PLC program for OPC UA are taken into account when the server is started. A comment at the appropriate position (instance, structure, variable) in the PLC program code is used for identification (see the following samples).
Sample 1
In this sample, the PLC variables bMemFlag1, bMemFlag2, bMemAlarm2, and iReadOnly are enabled via OPC UA. The PLC variable bMemAlarm1 should not be accessible via the OPC UA Server.
TwinCAT 3 (TMC import):
{attribute 'OPC.UA.DA' := '1'}
bMemFlag1 : BOOL;
{attribute 'OPC.UA.DA' := '1'}
bMemFlag2 : BOOL;
bMemAlarm1 : BOOL;
{attribute 'OPC.UA.DA' := '1'}
bMemAlarm2 : BOOL;
{attribute 'OPC.UA.DA' := '1'}
{attribute 'OPC.UA.DA.Access' := '1'}
iReadOnly : INT;
TwinCAT 2 (TPY import):
bMemFlag1 : BOOL; (*~ (OPC:1:some description) *)
bMemFlag2 : BOOL; (*~ (OPC:1:some description) *)
bMemAlarm1 : BOOL;
bMemAlarm2 : BOOL; (*~ (OPC:1:some description) *)
iReadOnly   : INT; (*~ (OPC:1:some description)
 (OPC_PROP[0005]:1:read-only flag) *)
Due to the additional comment OPC.UA.DA.Access the access level for the variable iReadOnly is set to “ReadOnly”. The various options can be found in the complete list of PLC comments (see List of attributes and comments).
References:
Download the sample from the link given above.
See next how to use JavaScript at https://www.hemelix.com/scada-hmi/twincat-hmi/twincat-hmi-async-function/
Ask questions related to Hemelix sample code and design at Google group https://groups.google.com/g/hemelix