Variable mapping and Subscription Using JavaScript
What is Polling and Subscription
In the polling model, client software (in our case the HMI) asks for some value from the server. Normally the client should ask the data if it has been changed. If the data has not been changed, there is no need to ask. In the polling mechanism, the client will ask irrespective of any data changes. This can be considered a waste of resources. It has been shown in the following figure, the HMI ask for data and field devices (or the server) responds with data. But this can be useful if we want to have time seriese data where we need data on the basis of time.
This is shown in the following figure, client asks and server (or the device) responds.
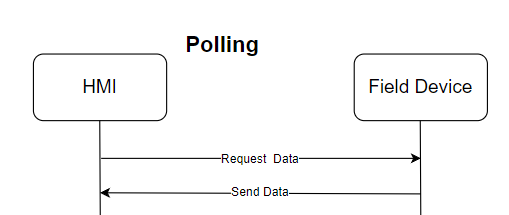
Figure 01: A typical gate valve with automation components
//We can call this method when we need the value of dataInt
//Though it is an asynchronous call we can convert it to a synchronous version
//see @ hemelix.com/scada-hmi/twincat-hmi/twincat-hmi-async-function/
var symbol = new TcHmi.Symbol('%s%PLC1.MAIN.dataInt%/s%');
symbol.readEx(function (data) {
    if (data.error === TcHmi.Errors.NONE) {
        var value = data.value;
        //Rotate the image here based on the result
    } else {
        // Handle error, show to user
    }
});
On the other hand, we can use another model called the subscription model. In this model, we tell the server, to notify me when different data has been changed. The server will notify us only when the data has been changed, so we don’t need to ask continuously. The following picture explains the scenario. We can tell the server or the field devices that if these variables [we can pass a list of variables] are changed then notify us. Typically this can be done when the HMI starts or the view/content starts. Data changes will be called when some subscribed data in the Field device has changed.
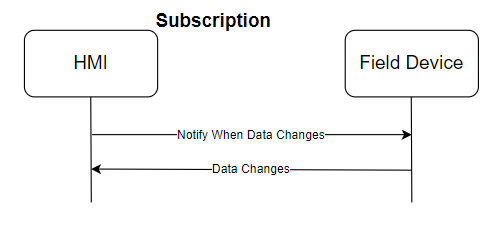
Figure 02: A typical gate valve with automation components
subscribe function takes 3 parameters
commands => a list of variables which we are interested in monitoring (normally a list of symbols)
time interval => how often we notify, typically this is done in 500 ms interval, if this is too big then we miss the data in the time interval.
a function => this function is called when data is changed. This data has response, error code etc.
TcHmi.Server.subscribe(commands, 500, function (data) {
    if (data.error !== TcHmi.Errors.NONE) {
        // Handle TcHmi.Server class level error here.
        return;
    }
	//Check what are changed and react based on that
});
If we want to change the subscribe function asyncronuous function, then we can change it in the following way.
TcHmi.Server.subscribe(commands, 500, async function (data) { Sample 1
What the sample 1 does:
The basic example of event notification. We shall use a custom event (provided by the TwinCAT framework) and rotate an image based on the angle generated by the PLC program. We receive the event and shift the image to simulate rotation.
For custom event we monitor %s%PLC1.MAIN.dataInt%/s% and as an action we call the following JavaScript function.
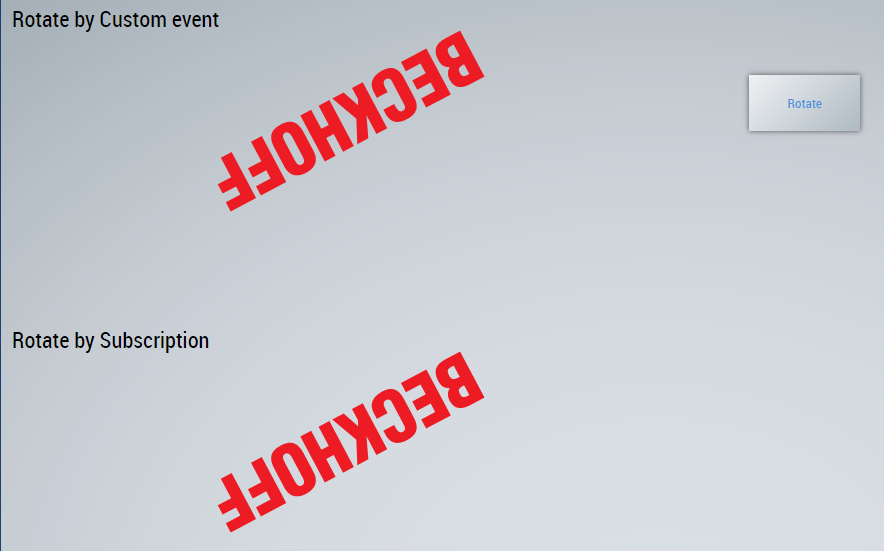
Figure 03: A typical gate valve with automation components
function RotateControlAroundCenter(MyControl, Angle) {
    var width = Math.round(MyControl.getWidth() / 2);
    var height = Math.round(MyControl.getHeight() / 2);
    var t = [{
        "transformType": "Origin",
        "x": width,
        "xUnit": "px",
        "y": height,
        "yUnit": "px",
        "z": 0,
        "zUnit": "px",
    }, {
        "transformType": "Rotate",
        "angle": Angle,
        "angleUnit": "deg"
    }
    ];
    MyControl.setTransform(t);
}
Rotating the image by subscription:
We call the following JavaScript function when the image have been attached.
function SubscribeAngleChange(MyControl) {
    var width = Math.round(MyControl.getWidth() / 2);
    var height = Math.round(MyControl.getHeight() / 2);
    var currentAngle = 0;
    if (TcHmi.Server.isWebsocketReady()) {
            var commands = [
                {
                    'symbol': 'PLC1.MAIN.dataInt'
                }
            ];
            TcHmi.Server.subscribe(commands, 500, function (data) {
                if (data.error !== TcHmi.Errors.NONE) {
                    return;
                }
                var response = data.response;
                if (!response || response.error !== undefined) {
                    return;
                }
                var commands = response.commands;
                if (commands === undefined) {
                    return;
                }
                for (var i = 0, ii = commands.length; i < ii; i++) {
                    var command = commands[i];
                    if (command === undefined) {
                        return;
                    }
                    if (command.error !== undefined) {
                        return;
                    }
                    if (commands[i].symbol.localeCompare('PLC1.MAIN.dataInt') == 0) {
                        currentAngle = command.readValue;
                        var t = [{
                            "transformType": "Origin",
                            "x": width,
                            "xUnit": "px",
                            "y": height,
                            "yUnit": "px",
                            "z": 0,
                            "zUnit": "px",
                        }, {
                            "transformType": "Rotate",
                            "angle": currentAngle,
                            "angleUnit": "deg"
                        }
                        ];
                        MyControl.setTransform(t);
                        console.log(`currentAngle = ${command.readValue}`);
                    }
                }
            }); //subscribe
    } //isWebsocketReady
} Edit: we added another data type to the sample as
dataWord : WORD := 8;
and added few subscription to test how same variable behaves when we assigned different type.
var commands = [
{
    'symbol': 'PLC1.MAIN.dataInt'
},
{
    'symbol': 'PLC1.MAIN.dataWord'
},
{
    'symbol': 'PLC1.MAIN.anyAlarm'
},
];
Handling the notification
//word
if (commands[i].symbol.localeCompare('PLC1.MAIN.dataWord') == 0) {
    currentAngle = command.readValue;
if (currentAngle == true) {
    console.log('currentAngle as dataWord compared to true = ' + currentAngle);
    console.log('typeof 1 ' + typeof (currentAngle));
} else {
    console.log('currentAngle as dataWord compared to false = ' + currentAngle);
    console.log('typeof 2 ' + typeof (currentAngle));
}
if (currentAngle == 8) {
    console.log('currentAngle as dataWord compared to 8 = ' + currentAngle);
    console.log('typeof 3 ' + typeof (currentAngle));
}
}
//bool
if (commands[i].symbol.localeCompare('PLC1.MAIN.startTimer') == 0) {
    currentAngle = command.readValue;
    console.log('typeof ' + typeof (currentAngle));
if (currentAngle == true) {
    console.log('currentAngle as startTimer compared to true = ' + currentAngle);
} else {
    console.log('currentAngle as startTimer compared to false = ' + currentAngle);
}
}
Sample 1 YouTube Video
Sample 2
Here are the rough functionalities of the sample:
There is a motor whose direction can be reversed by the contactor. When the forward contactor is active then it will open the gate but when both are active then it will close the gate. If we click on the Yard gate then it will show a popup with an open gate option. There is a proximity sensor that indicates that the gate is closed or not.
If the user press on the Open gate button then the motor starts and the gate opens. It takes 10 seconds to open the gate. The gate image moves to the left. Again the gate close takes 15 seconds. When the gate is at its home position then the proximity sensor indicates that it is in the closed position (home position).
Yard Gate, home position
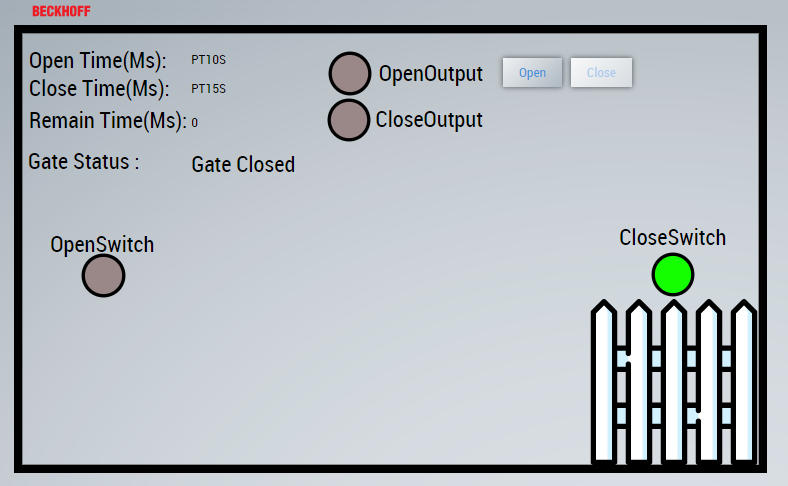
Figure 04: The yard gate is in home position, sensor is active
Yard Gate, open position

Figure 05: The yard gate is in open position, sensor is not active
Download the contents SubscriptionLinking_Hemelix.zip
You can find two projects in the solution, one is the PLC program and another is the HMI project, you will find a JavaScript function YardGateInit.
We are monitoring the four symbols (basically those four circles will change color when the following variable changes)
var commands = [
    {
    'symbol': 'PLC1.MAIN.fnYardDoor.doorCloseProximitySensor'
    },
    {
    'symbol': 'PLC1.MAIN.fnYardDoor.doorOpenProximitySensor'
    },
    {
    'symbol': 'PLC1.MAIN.fnYardDoor.doorOpeningOutput'
    },
    {
    'symbol': 'PLC1.MAIN.fnYardDoor.doorClosingOutput'
    }
];
//get only the tags
for (var key in commands) {
	console.log(commands[key].symbol);
  }
//output
PLC1.MAIN.fnYardDoor.doorCloseProximitySensor
PLC1.MAIN.fnYardDoor.doorOpenProximitySensor
PLC1.MAIN.fnYardDoor.doorOpeningOutput
PLC1.MAIN.fnYardDoor.doorClosingOutput
Changing text color in User control
Let us say we monitor the variable and we want to change the text color based on the value of the obstackcleDetected.
PLC1.MAIN.fnYardDoor.obstackcleDetected
If the value is true we make the text RED and in other cases yellow. We can declare the color variable as follows.
                var textControl = TcHmi.Controls.get('YardDoor_1.TcHmi_Controls_Beckhoff_TcHmiTextblock_5');
                var defaultColor = {
                    color: "rgba(255, 255, 0, 1)" //RED, GREEN, BLUE and ALPHA
                };
                var myColorRed = {
                    color: "red"
                };
                var myColorYellow = {
                    color: 'blue'
                };
0.0 rgba(255, 0, 0, 0.0) //fully transparent
0.2 rgba(255, 0, 0, 0.2)
0.4 rgba(255, 0, 0, 0.4)
0.6 rgba(255, 0, 0, 0.6)
0.8 rgba(255, 0, 0, 0.8)
1.0 rgba(255, 0, 0, 1.0) //fully opaque
Note YardDoor_1 is the identifier of the user control and
TcHmi_Controls_Beckhoff_TcHmiTextblock_5 is the identifier of the text control. So the text control can be accesses by using the following expression, ‘YardDoor_1.TcHmi_Controls_Beckhoff_TcHmiTextblock_5′
The actual text color is set by the following code
   if (commands[i].symbol.indexOf(".obstackcleDetected") > 0) {
       if (command.readValue == true) {
           textControl.setTextColor(myColorYellow);
           } else {
               textControl.setTextColor(defaultColor);
           }
       }
var thisColor = ‘#ff453300’; does it work setTextColor? => hash Alpha (00 to FF) RR, GG, BB
See the complete code:
 var textControl = TcHmi.Controls.get('YardDoor_1.TcHmi_Controls_Beckhoff_TcHmiTextblock_5');
 //var defaultColor = '16#FF0000FF'; //does not work
 var defaultColor = '#FFE821FF'; //does not work
 //var defaultColor = {
 //    color: "rgba(255, 255, 0, 1)"
                //};
                var myColorRed = {
                    color: "red"
                };
                var myColorYellow = {
                    color: 'blue'
                };
                if (TcHmi.Server.isWebsocketReady()) {
                    var commands = [
                        { 'symbol': 'PLC1.MAIN.fnYardDoor.obstackcleDetected' }
                    ];
                    TcHmi.Server.subscribe(commands, 1000, function (data) {
                        if (data.error !== TcHmi.Errors.NONE) {
                            console.log(`MonitorObstacle failed to subscribe data.details.code = ${data.details.code}`);
                            return;
                        }
                        var response = data.response;
                        if (!response || response.error !== undefined) {
                            console.log('MonitorObstacle wrong response in MonitorObstacle notification');
                            console.log(`MonitorObstacle data.details.code = ${data.details.code}`);
                            return;
                        }
                        var commands = response.commands;
                        if (commands === undefined) {
                            console.log('MonitorObstacle  initialization commands undefined');
                            console.log(`MonitorObstacle data.details.code = ${data.details.code}`);
                            return;
                        }
                        for (var i = 0; i < commands.length; i++) {
                            var command = commands[i];
                            if (command === undefined) {
                                console.log('MonitorObstacle  initialization commands undefined');
                                console.log(`MonitorObstacle data.details.code = ${data.details.code}, symbol = ${command.symbol}`);
                                return;
                            }
                            if (command.error !== undefined) {
                                console.log(commands[i].symbol);
                                console.log('MonitorObstacle initialization commands  for field devices, error has value, why?');
                                console.log(`MonitorObstacle data.details.code = ${data.details.code}, symbol = ${command.symbol}`);
                                return;
                            }
                            if (commands[i].symbol.indexOf(".obstackcleDetected") > 0) {
                                console.log('Change detected');
                                if (command.readValue == true) {
                                    console.log('Change detected alarm true');
                                    textControl.setTextColor(myColorYellow);
                                } else {
                                    console.log('Change detected alarm false');
                                    textControl.setTextColor(defaultColor);
                                }
                            }
                        } //for
                    });
                }//isWebsocketReady
Subscription and mixing synchronous and asynchronous call
We have seen in the previous section how to subscribe to a variable for monitoring purposes by using the HMI framework. Suppose we have 1000 variables that are coming from the database or PLC. It does not make sense to make a command manually and then subscribe to it.
The following code can be downloaded from the sample.
function MonitorVariable() {
var mainDataGrid = TcHmi.Controls.get("TcHmiDatagrid_Main");  // Grid where we update in HMI
var dataReadingStatus = '';
var commands = [];
var resultLoadDatabase;
async function LoadDataFromDataBase() {
try {
resultLoadDatabase = await ReadDataFromRemoteServer('%s%PLC1.MAIN.fnValve.ArrayForSub%/s%');
			console.log('LoadDataFromDataBase length = ' + resultLoadDatabase.length);
if (TcHmi.Server.isWebsocketReady()) {
for (var i = 0; i < resultLoadDatabase.length; i++) {
var sym = {
	'symbol': resultLoadDatabase[i]
	}
	commands.push(sym);
}
dataReadingStatus = await ReadDataFromRemoteServer('%s%PLC1.MAIN.fnValve.stateDescription%/s%');
console.log(`dataReadingStatus = ${dataReadingStatus}`);
TcHmi.Server.subscribe(commands, 1000, function (data) {
if (data.error !== TcHmi.Errors.NONE) {
console.log('subscribe for LoadDataFromDataBase symbolName  failed  ');
console.log(`data.details.code = ${data.details.code}`);
return;
}
var response = data.response;
if (!response || response.error !== undefined) {
console.log('wrong response in LoadDataFromDataBase symbolName notification');
console.log(`data.details.code = ${data.details.code}`);
return;
}
var commands = response.commands;
if (commands === undefined) {
console.log('LoadDataFromDataBase symbolName initialization commands undefined');
console.log(`data.details.code = ${data.details.code}`);
return;
}
for (var i = 0; i < commands.length; i++) {
var command = commands[i];
if (command === undefined) {
console.log('LoadDataFromDataBase initialization commands undefined => ' + command.symbol);
console.log(`data.details.code = ${data.details.code}`);
return;
}
if (command.error !== undefined) {
console.log(commands[i].symbol);console.log('LoadDataFromDataBase initialization commands error has value, why? => ' + command.symbol);
		console.log(`data.details.code = ${data.details.code}`);
		return;
}
if (command.symbol.indexOf(".upperProximitySensor") > 0) {
console.log('command.symbol at 1 :' + command.symbol);
var readvalue1 = command.readValue;
var obj = {
tag: command.symbol,
value: readvalue1
};
if (readvalue1) {
MyObjectObjectArray.push(obj);
} else {
if (MyObjectObjectArray.length > 0) {
var d = MyObjectObjectArray.filter(product => product.tag == command.symbol);
if (d.length > 0) {
var ind = MyObjectObjectArray.indexOf(d[0]);
MyObjectObjectArray.splice(ind, 1);
}
}
}
mainDataGrid.setSrcData(JSON.stringify(MyObjectObjectArray));
}
if (command.symbol.indexOf(".lowerProximitySensor") > 0) {
	console.log('command.symbol at 2 :' + command.symbol);
	var readvalue2 = command.readValue;
	var obj = {
	tag: command.symbol,
	value: readvalue2
	};
if (readvalue2) {
MyObjectObjectArray.push(obj);
} else {
if (MyObjectObjectArray.length > 0) {
var d = MyObjectObjectArray.filter(product => product.tag == command.symbol);
if (d.length > 0) {
	var ind = MyObjectObjectArray.indexOf(d[0]);
	MyObjectObjectArray.splice(ind, 1);
}
}
}
mainDataGrid.setSrcData(JSON.stringify(MyObjectObjectArray));
}
} // for
}); //Subscribe
} //Web socket
} catch (error) {
console.log(`error occured while calling LoadDataFromDataBase for terminalState = ${error}`);
	}
} // LoadDataFromDataBase
LoadDataFromDataBase();
}
The above code shows how we can get the variable from other sources (PLC or Database) and create a subscription list.
Download the sample which demonstrates the idea from this link. If we put upper upperProximitySensor and lowerProximitySensor to true then the grid view on the HMI will be updated.

Figure 06: UI of mixing function call
The following skeleton shows a mixing of asynchronous and synchronous functions.
function MonitorVariable() {
var yardGateStatus = '';
var commands = [];
var resultLoadDatabase;
async function LoadDataFromDataBase() {
try {
resultLoadDatabase = await ReadDataFromServer('%s%PLC1.MAIN.fnValve.ArrayForSub%/s%');
if (TcHmi.Server.isWebsocketReady()) {
yardGateStatus = await ReadDataFromServer('%s%PLC1.MAIN.fnValve.stateDescription%/s%');
TcHmi.Server.subscribe(commands, 1000, function (data) {
for (var i = 0; i < commands.length; i++) {
} // for
}); //Subscribe
} //Web socket
} catch (error) {
console.log(`error occured while calling LoadDataFromDataBase for terminalState = ${error}`);
}
} // LoadDataFromDataBase
LoadDataFromDataBase();
}
WebSocket
The WebSocket.readyState read-only property returns the current state of the WebSocket connection.
| Value | State | Description |
|---|---|---|
0 |
CONNECTING |
Socket has been created. The connection is not yet open. |
1 |
OPEN |
The connection is open and ready to communicate. |
2 |
CLOSING |
The connection is in the process of closing. |
3 |
CLOSED |
The connection is closed or couldn’t be opened. |
When web is ready then we can do read write variable. When the socket is open, we are able to read data from the server.
function CheckWebSocket()
{
    var readyState = TcHmi.Server.getWebsocketReadyState();
    if(readyState != null)
        {
            console.log(`Web socket not null`);
            readyState = TcHmi.Server.getWebsocketReadyState();
            if(readyState === WebSocket.OPEN){
                console.log(`Web socket ready`);
                } else {
                console.log(`Web socket NOT ready`);
            }
    } else {
        console.log(`Web socket null`);
    }
}
CheckWebSocket();
Tips
01. Say we want to write some value based on the parameters or we want to derive the variable name based on the parameters. How can we achieve it? One way could be to pass a string that contains the name of the device and add a sensor to the monitor. For example, in our yard gate case, we have 2 outputs and 1 input signal. Say input proximity sensor name is gateClosedDetector. If we pass PLC1.MAIN.YarfdGate and the variable could be PLC1.MAIN.YarfdGate.gateClosedDetector. So we can pass PLC1.MAIN.YarfdGate as a parameter and we can drive the map variable and do the subscription.
=>We can pass the string that can be bounded as function binding. In this way we can extract the name and we can use it. As we can see the text is visible in on the popup and we can resolve it in the console. If we want to manipulate any variable based on this parameter by pressing a button on the popup. Note in the image below, how we are passing ‘PLC1.MAIN.YardGate’ note the quotation mark and it has been pressed on the fx.
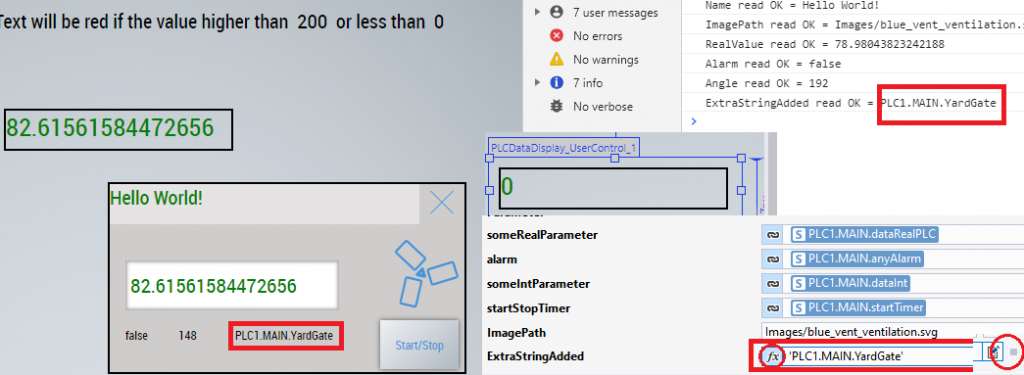
Figure 07: How to pass a symbol path as parameter
var formattedSymbol6 = '%pp%ExtraStringAdded%/pp%';
TcHmi.Symbol.readEx2(formattedSymbol6, function(data) {
    if (data.error === TcHmi.Errors.NONE) {
        var value = data.value;
        console.log(`ExtraStringAdded read OK = ${value}`);
    } else {
        console.log(" ExtraStringAdded failed");
    }
});
Download the modified code stringPassingtoPopup_hemelix.zip
How to read variable and initialized a control in Popup:
There are different ways to do this, we shall describe a method here. We have to initialize a control (image, Text, or whatever in the Popup by manipulating a PLC Path variable.)
We modify the sample, YardDoor control. When we create the Popup (whenever we press on the door icon, it will create a Popup). In that Popup, we introduced a textBox and we shall write the elapsed time (the value will be 1-time update). If we want to do it continuously we can use a subscription mechanism for example. As we see a textBox time is different for the popup.
Now TextControl id is TcHmi_Controls_Beckhoff_TcHmiTextblock_8 (though we should have meaningful name).
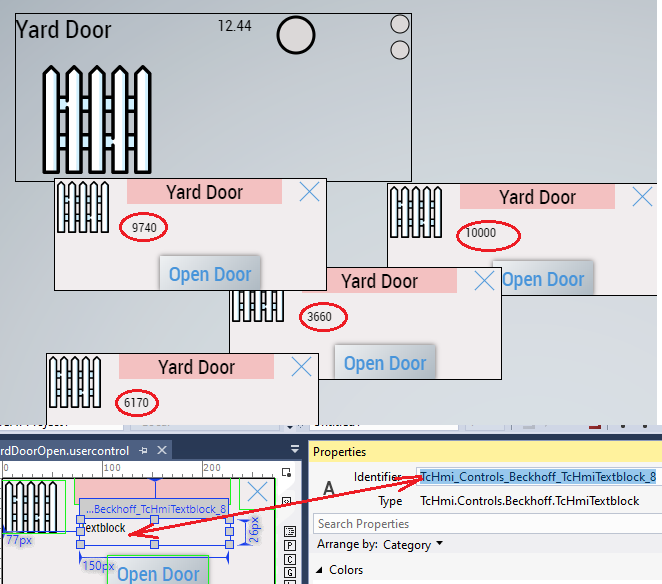
Figure 08: Relation between control id and the value in popup case
We introduce new Popup variable Device path as shown in the following image.
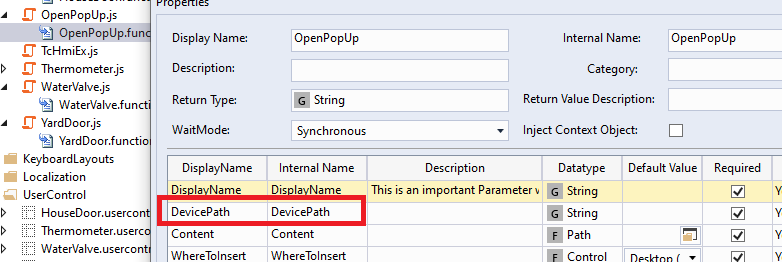
Figure 09: Variable path has been passed as DevicePath a string type
We are now passing the path as a string ‘PLC1.MAIN.fnYardDoor’ as shown in the following figure. There are few variable in the function block such as isClosed, obstacleDetected, timeElapsed etc. We just pass a single string and from there we create the full variable and read the value to manipulate or display.
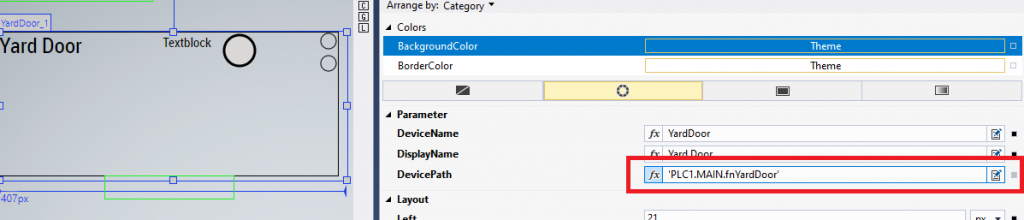
Figure 10: Way to pass symbol path (also called variable path)
The final embedded code is show in the following image. This whole project can be downloaded as well. First we read the parameter DevicePath which should be ‘PLC1.MAIN.fnYardDoor’. Now we can add .timeElapsed and read the server variable and initialized to the edit controls. If we move the yard gate then the value will be changed and and each time the text Box will show different value.
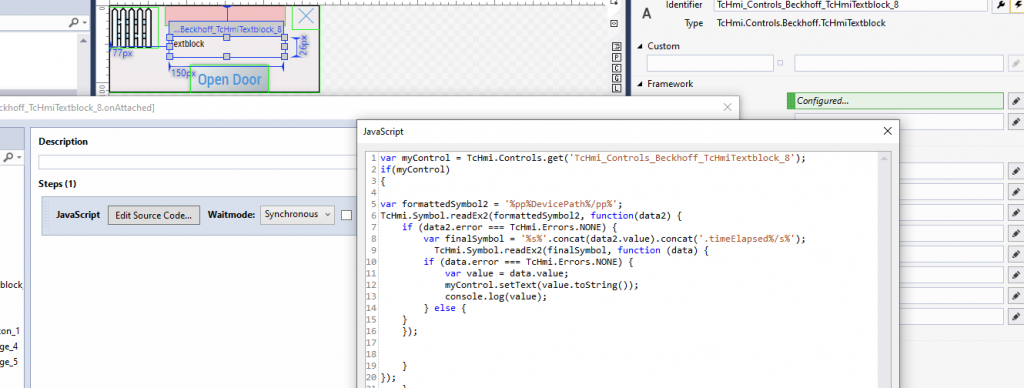
Figure 11: Building actual variable name from the parameter and reading it
Youtube video
Advanced topics about Symbol, Symbol expression and Binding
We have described symbols, compound user control, and how to reduce the number of parameters passing for user control has been described. You need some knowledge about user controls, JavaScript, and subscription mechanisms in TwinCAT.
Here is the link to how you should go through the tutorial.
=> Symbol, Symbol Expression, and bindins this page https://www.hemelix.com/scada-hmi/twincat-hmi/twincat-hmi-symbol/
=> Compound user control, https://www.hemelix.com/scada-hmi/twincat-hmi/twincat-hmi-compound-user-control/
=> How to reduce the number of parameters when using compound user control, https://www.hemelix.com/scada-hmi/twincat-hmi/mapping-and-subscription-using-js/
You can watch the video, and go through the source code. If you have an issue then you can comment on the YouTube video or in our Google group
Tips
01. When we subscribe a variable then it must be exact to the variable name and also the mapped path. If there is mismatch then we get an error code 513 as shown in the following figure.
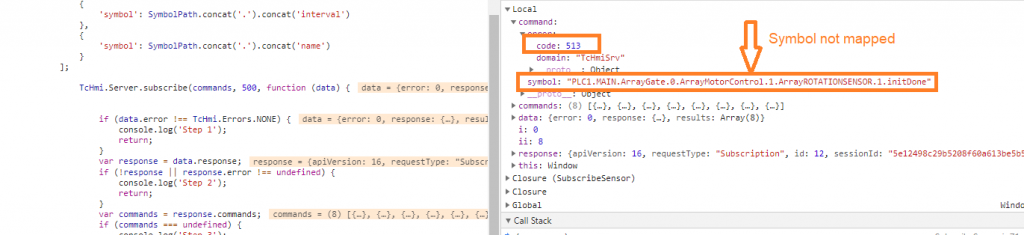
Figure 12: Subscription can fail due to various reason
02. The subscription variable is case-sensitive, for example, the following subscription returns an error
The code does not work, the reason is that the terminal state is in upper case.
if (TcHmi.Server.isWebsocketReady()) {
	var commands = [
		{ 'symbol': 'PLC1.MAIN.fnValve.terminalState' },
		{ 'symbol': 'PLC1.MAIN.fnValve.temperatureRealValue' }
	];
	TcHmi.Server.subscribe(commands, 1000, function (data) {
If we change the code to
if (TcHmi.Server.isWebsocketReady()) {
	var commands = [
		{ 'symbol': 'PLC1.MAIN.FNVALVE.TERMINALSTATE' },
		{ 'symbol': 'PLC1.MAIN.fnValve.temperatureRealValue' }
	];
	TcHmi.Server.subscribe(commands, 1000, function (data) {
03.
If we want to change the subscribe function to an asynchronous function, then we can do so in the following way.
TcHmi.Server.subscribe(commands, 500, async function (data) {
Inside the async function, we can call a function by using await.
References:
Know more about JSON, see https://json-schema.org/understanding-json-schema/basics.html
Difference among var let https://www.freecodecamp.org/news/var-let-and-const-whats-the-difference/
https://www.javascripttutorial.net/
https://javascript.info/promise-basics
https://jsfiddle.net/ (Online JavaScript Test)
https://developer.mozilla.org/en-US/docs/Learn/Getting_started_with_the_web/JavaScript_basics
https://developer.mozilla.org/en-US/docs/Web/JavaScript/Reference/Global_Objects/Array
https://www.w3schools.com/js/default.asp
https://www.w3schools.com/js/js_graphics_chartjs.asp (Drawings by JavaScript)
https://tools.knowledgewalls.com/json-to-string JSON String to String
http://www.jsondiff.com/ (Compare JS file)
https://infosys.beckhoff.com/english.php?content=../content/1033/te2000_tc3_hmi_engineering/3758305291.html&id= (HMI error code)
JavaScript tutorial: https://masteringjs.io/fundamentals
Download the sample from the link given above.
See next how to read and write variables efficiently at https://www.hemelix.com/scada-hmi/twincat-hmi/reading-writing-variables-in-javascript/
Ask questions related to Hemelix sample code and design at the Google group https://groups.google.com/g/hemelix