How to publish to HMI Server
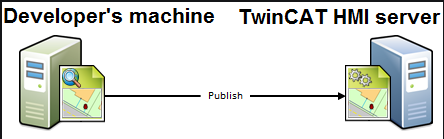
Beckhoff HMI/SCADA project is built with Microsoft Visual Studio. We shall describe how to publish the project to the remote server so any client from anywhere can access the HMI/SCADA. We need to install the TF2000 | TC3 HMI Server from the Beckhoff web page. We shall follow the following steps for publishing data to the HMI/SCADA server.
There are two variations of the server:
For non development environment (only the server)

For development environment
We can have some basic information about the client server before publishing the HMI to the server. HMI Server is a program that can manage many clients (depending on the licensing model) in TwinCAT. We as a developer, develop the HMI and then finally push the contents to the server from where a different client can access the content. The general idea is shown in the following picture.
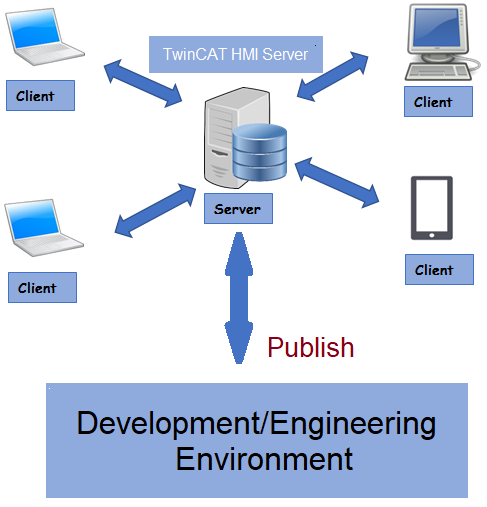
Some Beckhoff PLCs can run PLC programs and can work as HMI servers. In that case, we use the Server connection address and ADS AMS net ID in the Engineering environment.
If the PLC program and HMI Server run on different machines then we should use the ADS information of the PLC and the Server publishing address should be the IP of the HMI Server.
Figure 1: HMI big picture
STEP 0:
We must install the license for the server. Beckhoff allows every 7 days a free development license, so for test and development purposes, we can use it conveniently. For the actual product, we must buy the license from Beckhoff. But how to activate the 7 days free license on the server? We shall describe these steps here. One easy way to create a small Beckfoff PLC project and activate the necessary license for 7 days. We can create the project on the server or our client’s computer and push it to the server. In the visual studio project, under license, we can select “Manage License” tab and select all the features we need. After this, we activate the 7 days trial license.
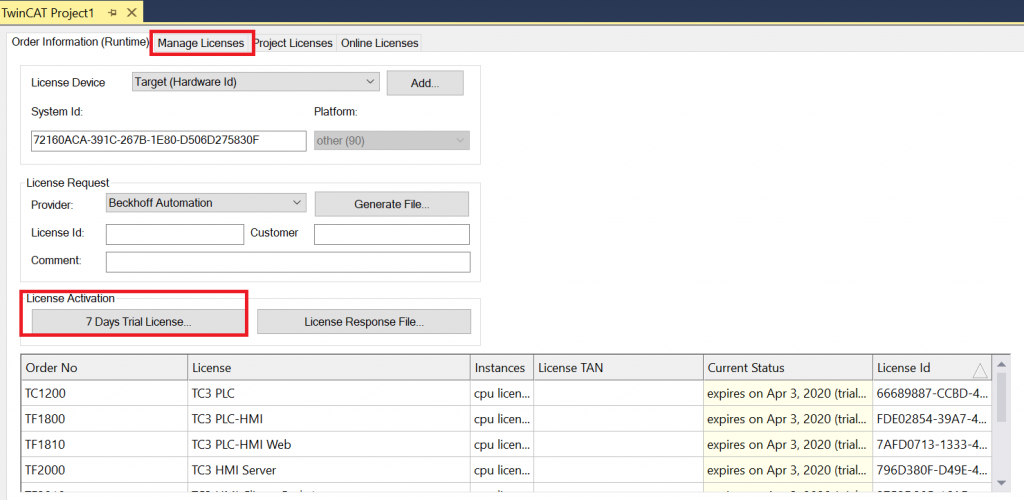
Figure 2: 7 days trial license
STEP 1:
=> Install the HMI Server to the remote computer (where we want to run the HMI).
=>Make the HMI Server auto startable by following steps
Windows 7
=> Click Start→All Programs
=> Right-click the Startup folder and click Open. (C:\Users\mylogin_name\AppData\Roaming\Microsoft\Windows\StartMenu\Progras\Startup)
=> Right-click Start and choose Open Windows Explorer.
=> Locate the program (TF2000-HMI-Server) we want to start when we start Windows, then drag it into the startup folder
=> Click the Close button in the upper-right corner of both Explorer windows to close them.
Windows 10
=> Type ‘run’ in the search box, it will pop a dialog where you can insert what to open or run
=> Type shell:startup, this will pop up or open a startup folder
=> Now you can drag and drop the TF2000-HMI-Server shortcut
Now every time when the server computer starts then the Beckhoff HMI/SCADA server starts. If the HMI server does not run in the remote server, we can’t push or upload our project there.
Another way to make the server auto restart is to use the server register as a service (C:\TwinCAT\Functions\TF2000-HMI-Server\register_service), execute this command as admin in the command line.
For a development environment we can use the following server found in the following folder:
C:\TwinCAT\Functions\TE2000-HMI-Engineering\Infrastructure\TcHmiServer\1.10.1336.404\Win32
This server is started when we lunch an HMI from visual studio. Following image shows the startup folder:
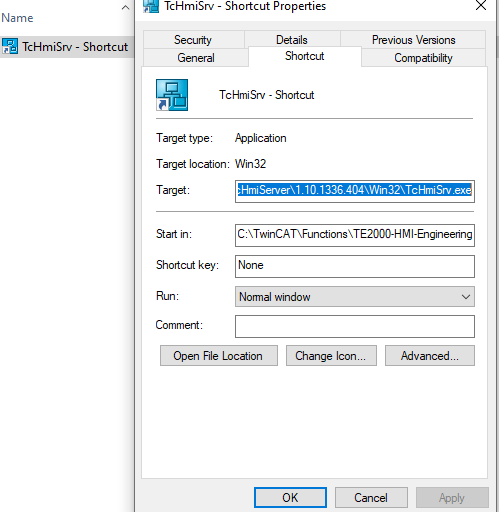
Figure 3: HMI server installation
Target: C:\TwinCAT\Functions\TE2000-HMI-Engineering\Infrastructure\TcHmiServer\1.10.1336.404\Win32\TcHmiSrv.exe
Startin: C:\TwinCAT\Functions\TE2000-HMI-Engineering\Infrastructure\TcHmiServer\1.10.1336.404\Win32
STEP 2:
When we are developing then we need to view the UI frequently for checking how it looks and feels. If we press on the live view as shown in the following image.
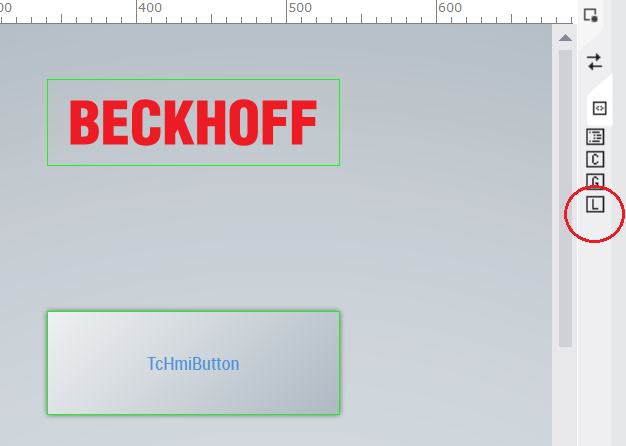
Figure 4: HMI live view
STEP 3:
When we are happy with step 2 then we can check our HMI by publishing it to the local server. Whenever we have installed the TwinCAT 3 Engineering then by default a local server is launched when we lunch the application. We can test almost all our functionalities by using the development HMI server as shown in the following image. We need to configure the debugger to Google chrome.
Application running, lunched with Visual Studio
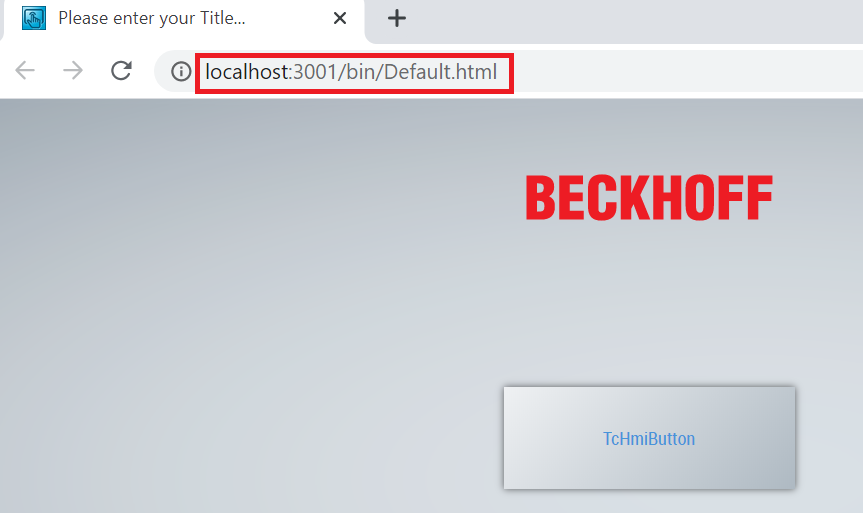
Figure 5: Running HMI in chrome
STEP 4:
It is the final step about publishing the contents to the server. If we want to publish our application to a local machine (IP: 127.0.0.1) or a remote machine 192.x.x.x/10.x.x.x, in either case, we must have a running server there. To run the server, put a shortcut of the server to the startup folder or run the batch file from the command line.
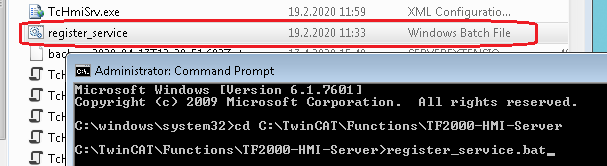
Figure 6: Installing HMI server as service
=> Now the HMI server will be up and running and we can publish the contents to the server
=> Select TWINCAT HMI Menu in Visual Studio | Publish to TwinCAT HMI Server, we see the following dialog. Press next.
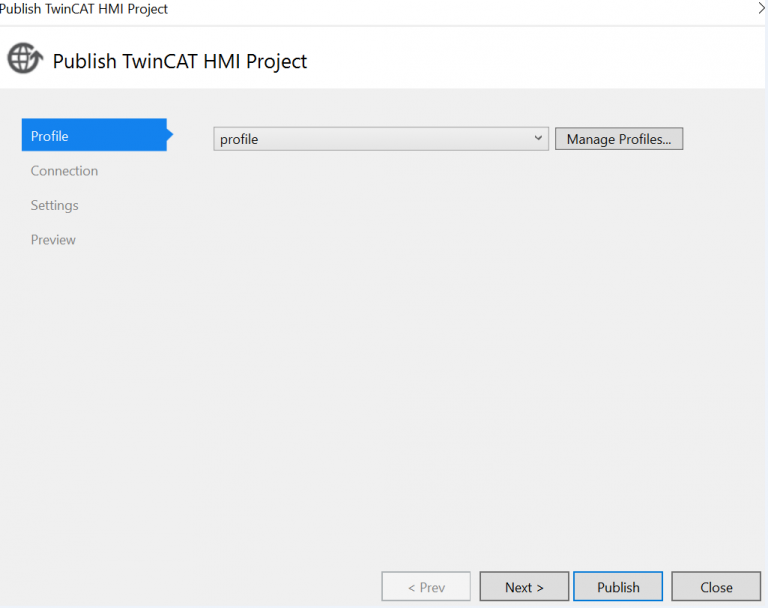
Figure 7: Publishing HMI to HMI server
STEP 5:
This step is very important. We need to put the Server IP address and the port. We need to make sure that the used port is free. We might need to change some TCP/IP related settings for the port as shown in the following image. If we are publishing for the first time then it will ask for the password. This password will be asked when the client wants to connect to the server. The connection can be tested by pressing on validate Connection. If the connection is OK then we can finish by pressing on publish button.
If we want to publish the HMI to a local machine, then we use the server address 127.0.0.1
If we want to publish to the remote machine (it must have an HMI server running) then we use the IP address (x.x.x.x) of the server
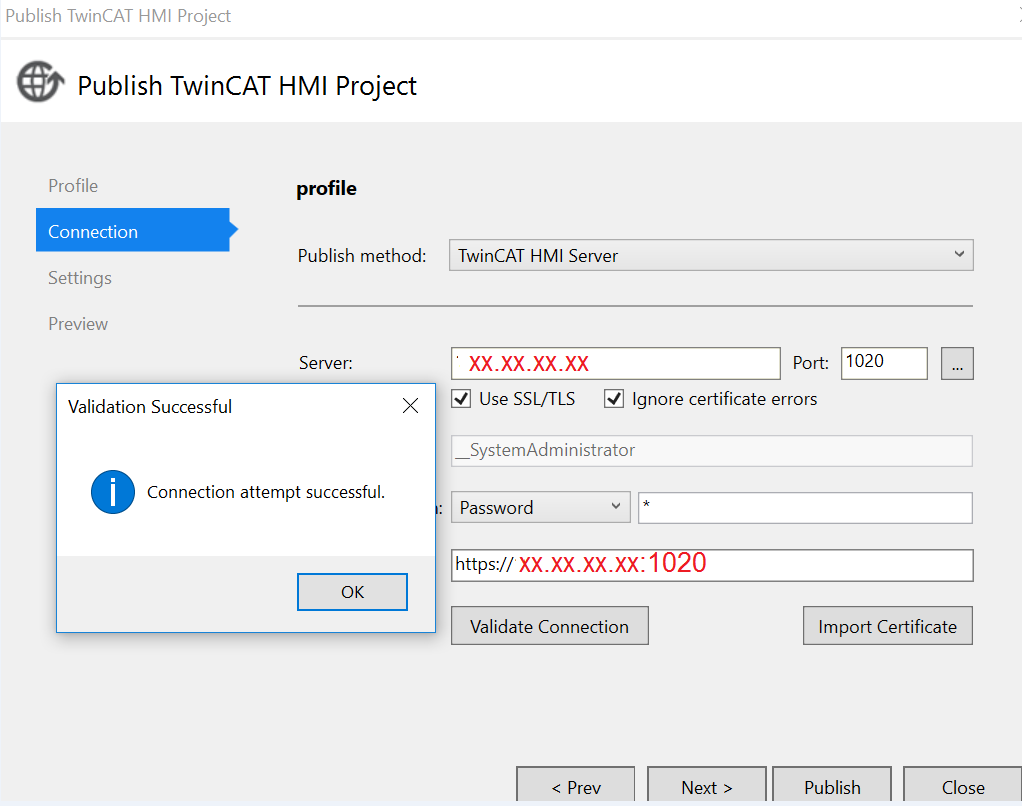
Figure 8: Checking connection to HMI server
Step 6:
Now we are ready to connect the HMI server to use our HMI. Point to the address https://xx.xx.xx.xx:1020 in Chrome. It will show a login page. We just insert the password and we are in.

Figure 9: Log in to HMI server
Finally we have the HMI running.
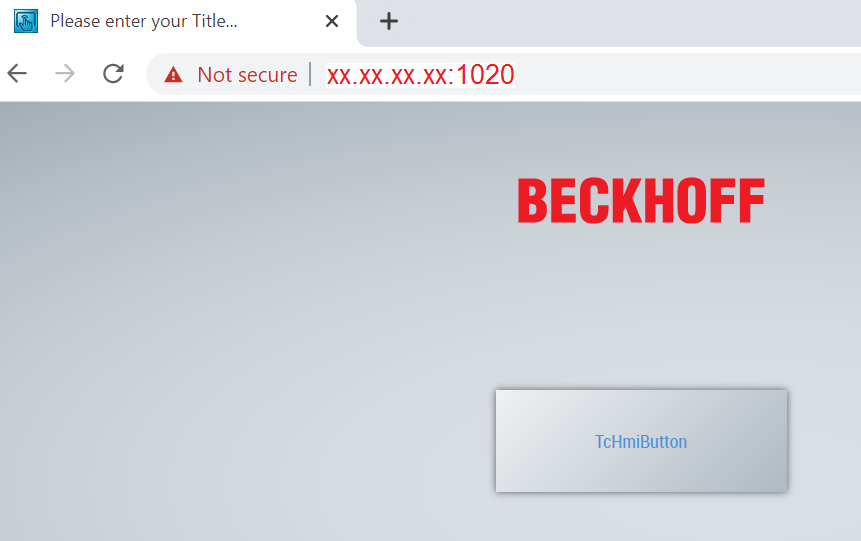
Figure 10: Log in to HMI server
Additional information:
We can log in to the localhost of the HMI server and access the config page of the HMI. To do this, we click on the server icon (bottom right corner of the server computer) and then we access the config page. We can do lots of useful configurations there. One of the configurations is how to avoid login names as shown in the following diagram. Authentication required Combobox there are 3 options, if we select none then it will not ask the password. If we select always authenticate then it will ask for the password.
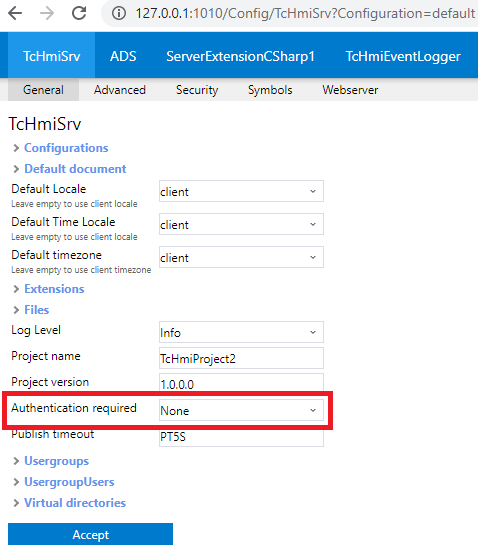
Figure 11: Authentication to HMI
If we are not using SSL then we remove the check from the check box. We can specify different port as shown in Figure 16.
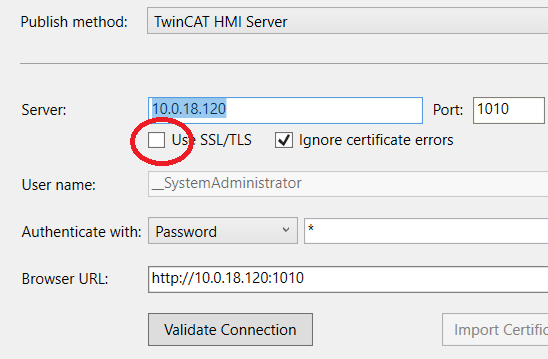
Figure 12: HMI port configuration
The configuration, which is transferred to the remote server, can be selected during the publish process. Two configurations are supplied by default:
Default Configuration: Local configuration that is loaded from the Engineering Server (valid in LiveView and when transferred to the Engineering Server).
Remote configuration: Configuration that is transferred to the remote server when publishing.
Tips 00 : Page has been published but variables are not read by the HMI Server
The HMI has been published to the server and all looks fine. But my HMI does not read the variables or does not make any decision based on the PLC data. Here we can have 2 problems and it’s solution.
=> Add the route to the server as described in the page https://www.hemelix.com/automation/structured-text/
=> Enable ADS in the HMI Server as shown in the following image.
=> Login as administrator account
Configure the AmsNetId in the server setting and accept the settings.
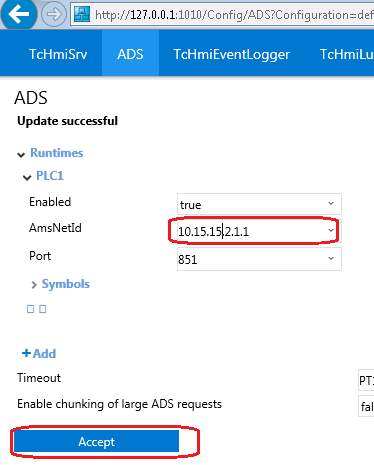
Figure 13: Setting AMS Net ID
As we see in the following screenshot that ADS version and Device name are missing. This will not work as I see the AMS Net Id is wrong.
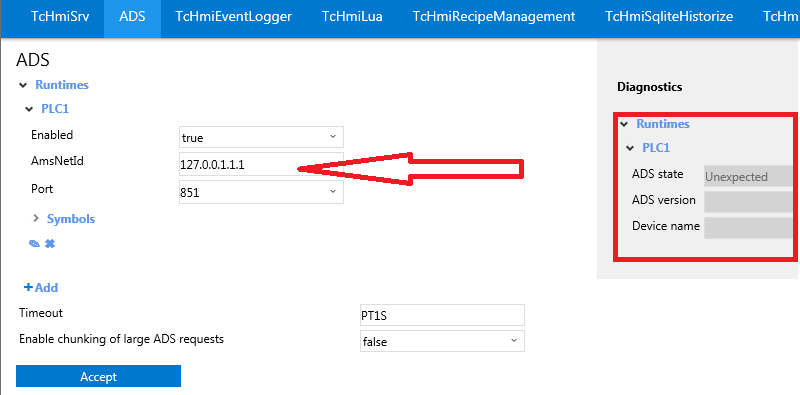
Figure 14: Setting AMS Net ID in the server side
Actual AMS Net Id should be used 192.168.12.56 and press accept. After that we see that ADS version and name has been updated. Learn more about AMS Net Id at https://www.hemelix.com/automation/structured-text-how-to-change-ams-net-id/
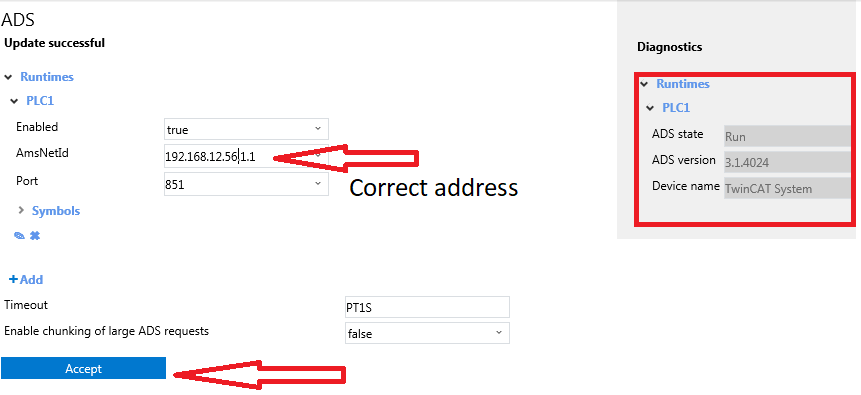
Figure 15: Correct view in the Server config mode
We can add an IP address directly to the Webserver settings page as shown in the following screenshot. The port number must be open via the windows firewall.
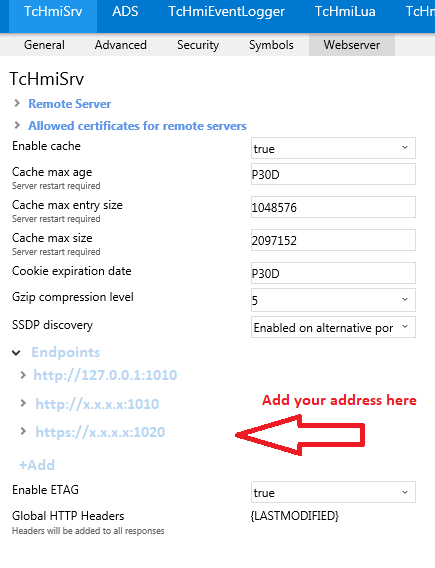
Figure 16: Additional address adding to the HMI server
After this our HMI should be able to work properly
Introducing Self Signed Certificate
Coming….
Publishing Extension
When we have an extension to publish, we need to have the correct .NET Core or runtime version. If we haven’t installed it on the server, it may be difficult to publish. One good way to read the log on the server and see what is missing.
Dot net version windows 64 bit can be downloaded from https://versionsof.net/core/8.0/8.0.13/
When we publish an extension, we can have trouble with the 64-bit/32-bit issue with own extension. If we have an extension of 64 bits and the HMI server has been installed as a 32-bit, then we can’t publish the extension.
If we have a 64-bit extension, then the HMI Server should be 64-bit
If we have 32 bit extension, the HMI Server should be 32 bit.
We can install the HMI Server a 32/64 bit version to match
We can change the extension version to match the HMI Server version as shown in the following image

Figure 17: Select the extension project | Build | Configuration Manager ( we can make 32/64 bit by this configuration)
Modify and Repair will give an option to modify as 32 or 64 bit as shown in the following image.

Figure 18: Modify or Repair will give an option to select 32/64 bit (default installation install 32 bit HMI Server)
When we publish an extension then we can get the following error; it is hard to know the reasons. I have noticed at least 2 reasons:
=> HMI Server case 32 bit (default installation, but it is recommended to have 64 bit HMI Server, because Visual Studio creates 64 bit DLL)
=> License case, we must have the right license, for example, I did not have the license for the HMI scope, so I could not publish. In this case, we need to check the HMI configuration in the HMI Server PC.
Try to publish without the extension (deactivate the extension and publish), after publishing, activate the extension again and publish

Figure 19: Output in Visual Studio when publishing an extension (the reason in this case license was missing)

Figure 20: HMI scope license was missing (result was showing as previous figure)
Tips
Make sure the HMI server on the target computer is running.
If you are using a 7-day license, verify that it is still valid.
Ensure that you can ping the server from your machine.
During publishing, Visual Studio may sometimes not show the publishing progress. In such cases, pressing Publish again (assuming it has not started) may cause the publishing to fail. Be patient and wait, then try again if needed.
When publishing an HMI project with an extension project, all dependent DLLs are automatically published to the HMI server; no extra steps are required.
To start the HMI Server automatically:
You can place a shortcut of HMIServer.exe in
C:\Users\USER_NAME\AppData\Roaming\Microsoft\Windows\Start Menu\Programs\Startup
However, this may restart the server whenever you log in.To avoid this, run the following batch file as Administrator:
C:\TwinCAT\Functions\TF2000-HMI-Server\register_service.bat
This registers the HMI Server as a Windows service that starts automatically with Windows.
Note that the HMI Server and HMI Engineering Server are different. When using the service registration batch file, be careful to select the correct version (32-bit or 64-bit). In my experience, the 32-bit version worked correctly.
Ensure that Windows Firewall is turned OFF. If you prefer to keep it ON, you must open the required ports manually. When the firewall is enabled and ports are blocked, an error dialog will appear when pressing the Check Connection button.
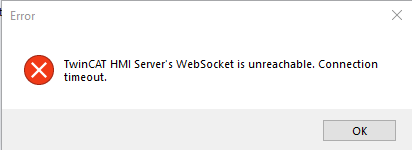
Figure 21: When fire wall is ON then we see this dialog when we press on check connection
- Access Advanced Security: Search for “Windows Defender Firewall with Advanced Security” in the Start Menu and open it.
- Create a New Rule: In the left pane, click on Inbound Rules, then click New Rule… in the right Actions pane.
- Rule Type: Select Port and click Next.
- Protocol & Port:
- Choose TCP .
- Select Specific local ports and enter the port number (e.g., 1020). Click Next.
- Action: Select Allow the connection and click Next.
- Profile: Check Domain, Private, and Public to apply the rule to all network types, then click Next.
- Name: Give the rule a descriptive name (e.g., “My HMI Server Port 1020”) and click Finish. More information can be found from the Beckhoff Infosys https://infosys.beckhoff.com/english.php?content=../content/1033/ipc_security_wince/11019143435.html&id=
- We can publish differnt application to different ports, for example, 1022, as shown in Figure 16
09: We must have all the necessary license especially if we want to publish an extension module

Figure 22: Necessary licenses for HMI project
We may see the following error code when we have issue with license:
Error User Extension "ServerExtensionCSharp1" is not licensed.
A licence for "TF2200 | TC3 HMI Extension SDK" is required on the remote system to execute user extensions. TcHmiProject1  C:\TwinCAT\Functions\TE2000-HMI-Engineering\MSBuild\Beckhoff.TwinCAT.HMI.targets 42
We need the above license if we want to run and publish to a remote server (for example to a CX device where we want to run HMI and our PLC program etc). We need to activate the license by using VS and the PLC program. Once the PLC program is running with the required license then we can publish the contents to the server as usual way.
10: When we publish content to a remote server especially with an extension, we may see INVALID_SYMBOL or similar error, somehow the TwinCAT server becomes messy, one solution helps if we just restart the HMI server in the remote machine.
11: If there are problems to publish the contents, we can delete the profile and make a new one. That may help to publish when there are confusing cases.
12: It looks like we can’t put 2 PLC addresses in the interface, if there are extra then the unused one can be removed.
13: We can see the following note when we try to publish, we can delete the profile, add route and check if we have duplicate AMS net ID.
Figure 23: Possible errors for publishing the project
14: We can see sometimes the following error at the end of publishing. This is due to that the PLC in config mode. Change mode to run mode and try.
Error Cleanup of extensions ‘MyServerExtensionName’ (MyServerExtensionName) failed. Error cleaning up target server extension configuration, Command Error: Code:265, Message: FILESYSTEM, Reason: Filesystem error
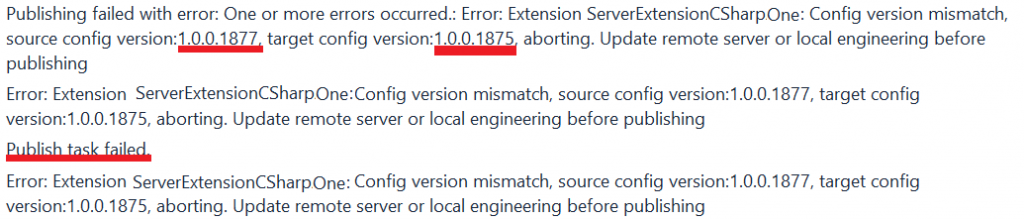
15: We can have errors sometimes that indicate that config file version mismatches, in this case, we can’t publish the extension. See the following screenshot, where our module name is ServerExtensionCSharpOne and the config file is ServerExtensionCSharp:Config. The solution is, we can change the version number in the config file and try again.
There is another way to solve this problem as well.
=> Go to HMI Server’s config page
=> Press on TcHmiSrv tab on the configuration page
=> Press on Extensions, then the extension in questions and delete (upper right corner cross)
=> Publish it again, boom!
16: Sometimes you are publishing HMI correctly but you see ADS can’t read data from the PLC. Your HMI can’t display data though everything works in the engineering environment. If you have added noncompatible PLC run time in your system it may cause this (in this case you have 1 compatible and other non-compatible run time version to the HMI). Need to find the reason ! you can post your findings in the Google groups.
17: Many times, I have seen after publishing the content, the page does not take us to the content page, instead it take to a page where it shows config page. Check if the extension module is activated!
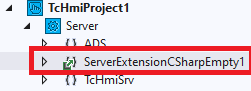
Figure 24: If the extension is not enabled then the HMI will not work.
18: Sometimes, after publishing the contents, the system does not bring the login page or the desktop view but shows the following page.
=> Check the AMS net ID if it matches (if you have changed or so it has been changed somehow)
=> Re-activate the PLC program (if you are running the wrong program in the PLC)
=> Try to publish again
=> Restart the HMI server
=> Check if the publisher has Read/Write Access, especially true when you are publishing users!
=> Check if the control Nuget packages matches with the SDK, update as necessary
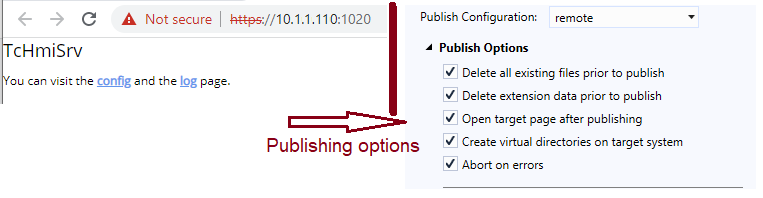
Figure 25: After publishing the contents, it shows the login page, HMI server restart helps (somewhere there is bug)
19: After publishing the contents, it may shows it can’t create virtual directory, one way it is possible to make it working by selecting all options and restarting the HMI server.
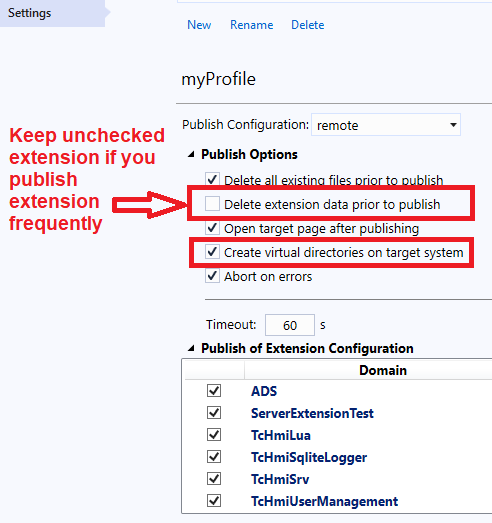
Figure 26: Virtual directory creation failed, select the options as shows in this image
20: If we have extension for example, C# extension then that must be enabled. If it is not enabled then we see the following error.

Figure 27: Error message when extension is not enabled
21: If you have a transition between PLC program (one program to another program in the PLC) then we have a situation like the right side (wrong state). The solution to this is that we need to activate the new program again in the PLC
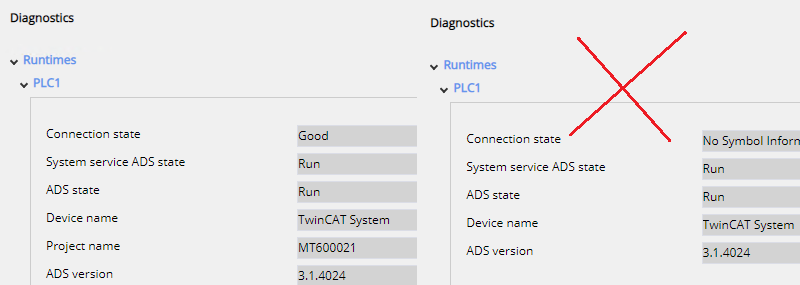
Figure 28: If the we see server status in server like right side, we need to activate the program again.
22: Insufficient access, many times it is possible that we have created users in the wrong way and when we publish then we get an access error. One solution to this problem is that we can try to delete the contents of the following folder
C:\ProgramData\Beckhoff\TF2000 TwinCAT 3 HMI Server\service\TcHmiProject
It will allow us to reset the password and we can continue publishing it.
23: Mismatch in time of the HMI Server, If you have a mismatch in time then you may not be able to publish, please make sure that time is synced.
24: This page isn’t working, content has been deleted or not published at all as shown in the following image.

Figure 29: This is shown when the content has been deleted
25: Actively refused to publish,
=> Restart Visual Studio (Visual Studio bug?).
=> This happens if we have changed the remote HMI server, or the HMI Server is not running in the target machine.

Figure 30: Actively refused case, restart the Visual Studio
26: When publishing it shows license expired, restart the HMI server where the HMI is running
27: We can have two scenarios when publishing the data to HMI Server
A. HMI Server and PLC can be same machine (PLC program and HMI server running in the same machine)
If this is the case then ADS runtime information and server address should be the same
B. HMI Server and PLC can be different machines (PLC program and HMI server running on different machines), if this is the case, then the Server address should be the HMI server address but ADS information should be the AMS net ID of the PLC
28: Enable/Disable cache when data is shown partially
Sometimes, after making changes to the project, the browser’s caching system may cause outdated or partially updated data to appear. In such cases, it’s a good idea to test the HMI with a different browser or use the browser’s incognito/private mode. It is also useful to check the behaviour directly from the HMI server machine’s browser.
A. Server Cache Settings
Go to the server settings page, for example:https://192.168.1.2:1020/Config/TcHmiSrv
EnableCache: Set to true or false to enable or disable caching.
MaxAge: Set to PT1S — this defines a maximum cache age of 1 second.

Figure 31: Cache enable and disable in HMI Server side
29 All looks fine, but data base is not working and it was working previously
A. Open the Windows Service and restartTwinCAT3HMIServer as shown in the following image
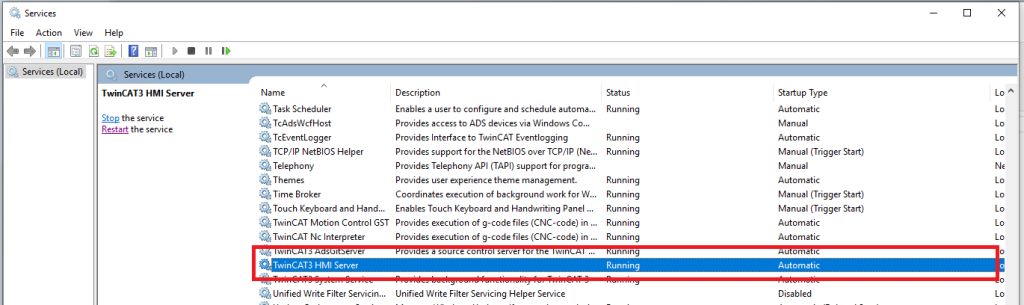
Figure 32: HMIServer Restarting
30: Nothing works then..
A. Remove the contents from C:\ProgramData\Beckhoff\TF2000 TwinCAT 3 HMI Server (HMI server PC). If you can’t delete the content, restart the HMI server and try deleting the content again.
Press the Validate Connection button, and it will give an option to reset the password. If it does not ask it there is some problem.
Try to publish again, it will ask to set the password. Finally, you may need to restart the HMI server. It should work.
B. If this does not work, then follow the next steps
C. Remove and uninstall the HMI Server
D. Restart the HMI Server computer
E. Install the HMI Server and (if you have an extension in 64-bit, then try to install the 64-bit version)
F. Publish again
References:
=> https://infosys.beckhoff.com/english.php?content=../content/1033/te2000_tc3_hmi_engineering/2669771659.html&id=7756575377675747422 (ADS and other settings for development)
=> https://infosys.beckhoff.com/english.php?content=../content/1033/tf2000_tc3_hmi_server/3743370379.html&id= (HMI Server installation)
Download the sample from the link given above.
Next, let’s try to understand how the animation works at https://www.hemelix.com/scada-hmi/twincat-hmi/animation-in-twincat-hmi/
Ask questions related to Hemelix sample code and design at Google group https://groups.google.com/g/hemelix