TwinCAT HMI EcDiagnosticsControl
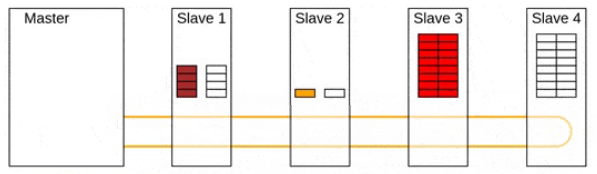
EcDiagnosticsControl is an HMI control by which we can visualize the EtherCAT slave statuses. In practise, it means we can display almost the complete statuses of our EtherCAT system wihout log in to the PLC with Visual Studio. This could be an online tool for operator if the system mulfunctions.
We shall show with practical hardware and software set up. You can find a YouTube video at the end of this tutorial. The following figure shows the control with actual hardware information.
Download the sample (it is mostly TC hardware dependent)

Figure 01: Desktop view with configured diagnostics control
HardWare Setup
=> Proximity sensor, When a metal is shown in front of the sensor it can detect its presence. It has 3 cables.
-Black, If metal is in front of the sensor, it will put the black line high (24V in general)
-Brown, power supply to the sensor (it usually is connected to the card where it has 24V available)
-Blue, it is connected to the -ve line
Normally we use these 3 lines; sometimes, we can have additional lines (for example a white line but we don’t use this in this case). When it detects any metal then the light of the sensor is active. Without an I/O card, we can measure the output voltage from the black line if brown and blue are connected to the +ve and -ve sides of the 24-volt supply.

Figure 02: EL1808 card and proximity sensor cable
EL1808 is an I/O card where the right side pin always has a 24V supply. On the left side, we connect a black cable that goes ON and OFF depending on whether it has detected the metal or not. We connect the blue cable to a -ve pole of the supply which completes the electrical circuits.
We should have a PLC SW which supports EcDiagnostics
We connect the PLC to an EK1100 coupler with an EL1808 card (we can have different combinations as well). But the main point we should have an I/O card.

Figure 03: EK 1100, EL1808 and the sensor connection (HW Setup)
Step by step
=> Create a basic TwinCAT PLC program and HMI in the same solution (since it is a simple application)
=> Copy and paste the following code to the PLC program
PROGRAM MAIN
VAR
myInputCoper AT%I*: BOOL;
END_VAR
=> Build and compile
=> Check the real-time settins and license issues
=> Put the system in config mode
=> Scan the from the device level
=> We should find the EL1808 card and we should link myInputCoper variable to the last channel
=> We can test so that if we show some metal in front of the sensor, the connected channel LED and the variable will go ON.
=> We need to note the NetID of the master, press on the EtherCAT device and find the NetID as shown in the following figure
=> We find 192.168.0.118.3.1 as NetID of the master device

Figure 04: How to find Master EtherCAT master NetID (192.168.0.118.3.1)
On the HMI side,
=> Bring an ellipse on the Desktop view, if the sensor is off we change the color to red and if the sensor is on we change it to green as shown in the following figure.

Figure 05: Configure the circle, sensor ON fill color is green
=> Map myInputCoper from the server variable list
=> Right click on the references (in HMI project) and go to Nuget package manager, install the following components
-Beckhoff.TwinCAT.HMI.EcDiagnostics and Beckhoff.TwinCAT.HMI.EcDiagnosticsControl (make sure to use same version as our HMI Engineering version)
Note: If we have installed already the control then the other is not needed
=> Drag and drop EcDiagnosticsControl from tool box to Desktop view
=> Activate the TcHmiEcDiagnostics and configure according to the following picture
=> Most important TargetNetId -> AMS Net Id of the PLC (we are using local so address is 127.0.0.1.1.1)
=> MasterNetID can be found from Visual Studio EtherCAT device list (under EtherCAT tab, which is 192.168.0.118.3.1)
=> Accept it and we are done, now show the metal in from of the sensor and see that it is interacting with HMI as it should.

Figure 06: Configure the extension, we set TargetNetId (PLC address) and Master NetId (192.168.0.118.3.1)

Figure 07: Configure the control, with the IO Scanned device name and the control property (fx is not highlighted)

Figure 08: Binding Device when using Diagnostics (fx is not highlighted; if highlighted, it will not work)
Adding Multiple EtherCAT Master
Multiple EtherCAT masters can be added one by one by pressing the Add button. We set enabled to true, TargetNetId is the AMS net ID of the PLC, if it is running on the local PC, it can be set to local. The master netID is generated by TwinCAT software, which can be copied and pasted. Finally, we accept it. We can display multiple devices on the same page by setting the visibility property of the controls.
1=> Enable, if we want to set Diagnostics enable (true) or disable (false)
2=> TargetNetId, PLC AMS net ID where the program is running
3=> MasterNetId, generated by TwinCAT software (found from the EtherCAT tab in the master)
4=> Add additional device (fill with name, Net Id, etc)
5=> Edit the name of the device if we need
6=> Device2, name generated by TwinCAT software, this can be renamed by step 5 or the rename option
7=> Device3, another device found by I/O scan
As we see in cases 6 and 7, we have the same names. If we don’t have the same name, then HMI will throw an exception.

Figure 09: Adding multiple EtherCAT masters (left side HMI configuration and right side PLC devices found by scan)
YouTube Video
TIPS
01:
If it has been installed Beckhoff.TwinCAT.HMI.EcDiagnosticsControl then Beckhoff.TwinCAT.HMI.EcDiagnostics is not needed
02:
For Diagnostics, TC1200 license should be enough
References
Download the sample from the link given above.
Next, let’s try to display data as a tree by JavaScript at https://www.hemelix.com/scada-hmi/twincat-hmi/display-tree-like-nodes-to-twincat/
Ask questions related to Hemelix sample code and design at Google group https://groups.google.com/g/hemelix