
HMI User Management
The management of users on any software system is critical to the security of the system and the organization. Proper procedures should be in place within the organization to identify the proper permissions each new user should receive. Each person or user may not have equal rights, for example, an expert-level user who knows how the system works as compared to an entry-level worker does not know. So there might be potential risks of misusing the system. This section just describes different features with samples for the TwinCAT environment.
Login page step by step
=> Add couple of text blocks to the HMI
=> Configure Text property of 2nd text block with the following code
TcHmi.Server.getCurrentUser()
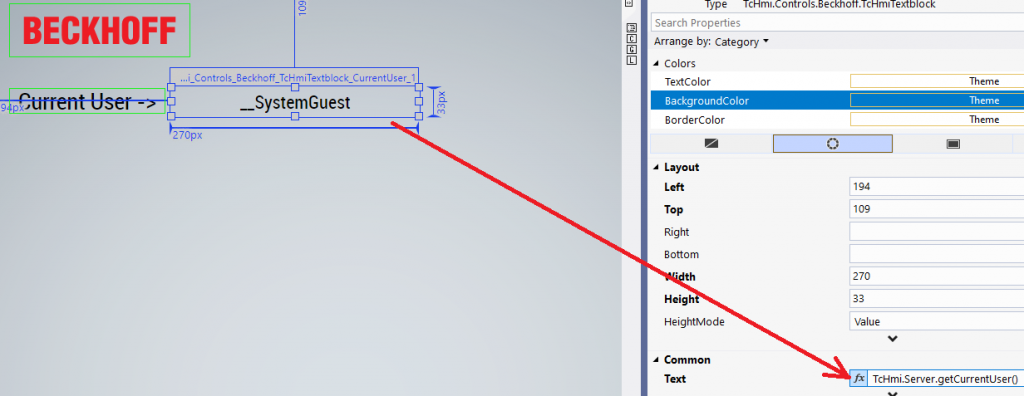
Figure 01: Displaying the current HMI user (session specific)
=> Publish and see the simple HMI
=> Check if it ask password to access (If it asks password, you can use the same password when you publish the content)
=> Who is the current user __SystemGuest or __SystemAdministrator
=> Login to the HMI Server, where we are publishing our application (without real HMI server, we can’t complete the test)
=> Check http://127.0.0.1:1010/Config/TcHmiSrv in the server computer for controlling the authentication required
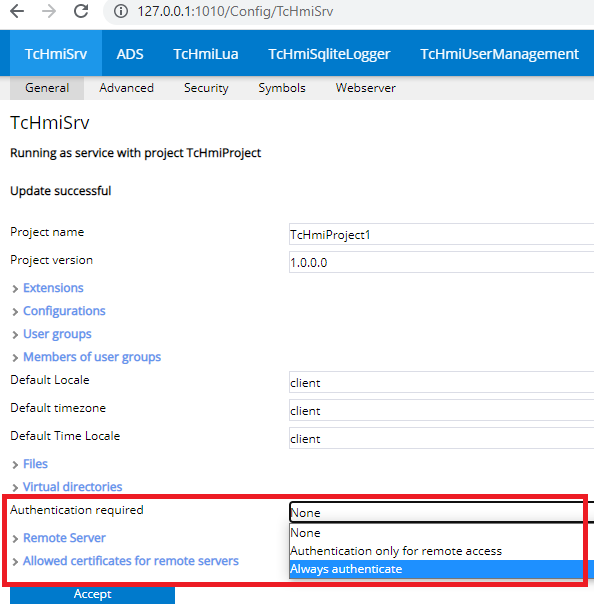
Figure 02: Controlling the authentication required process in HMI server
=> Authentication required
=> None, password is not required (login user is __SystemGuest)
=> Always authenticate, it will ask password
=> You may need to restart the HMI server application to take change in effect (if you had old app published)
Default User
=> We may need to set a user as default, For example, a viewer, whenever the system starts this user will be auto-login
=> We need to understand what is default user and what he can do
=> What kind of users we can have
=> In which group, each user belongs
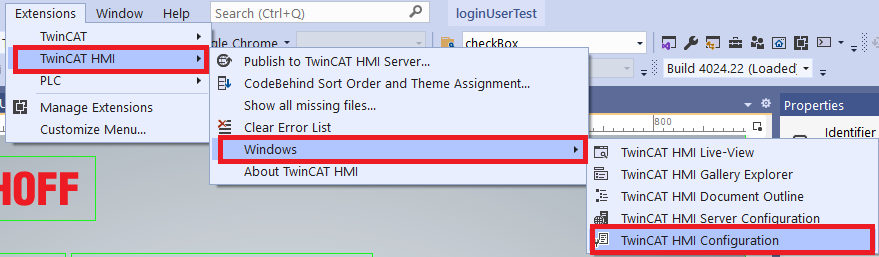
Figure 03: Menus for creating users and groups
=> We create a user by clicking on <create new user> name it as viewer, password viewer
=> We select the Auto-Login feature checked, when ever the system starts this user will be auto logged in
=> We can use Auto-Logout period very long time (for example 30 days)
=> We can create as many Users as needed in the HMI configuration which will be available when we tray to login

Figure 04: Default user ‘Viewer’ created with Auto logout 30 days
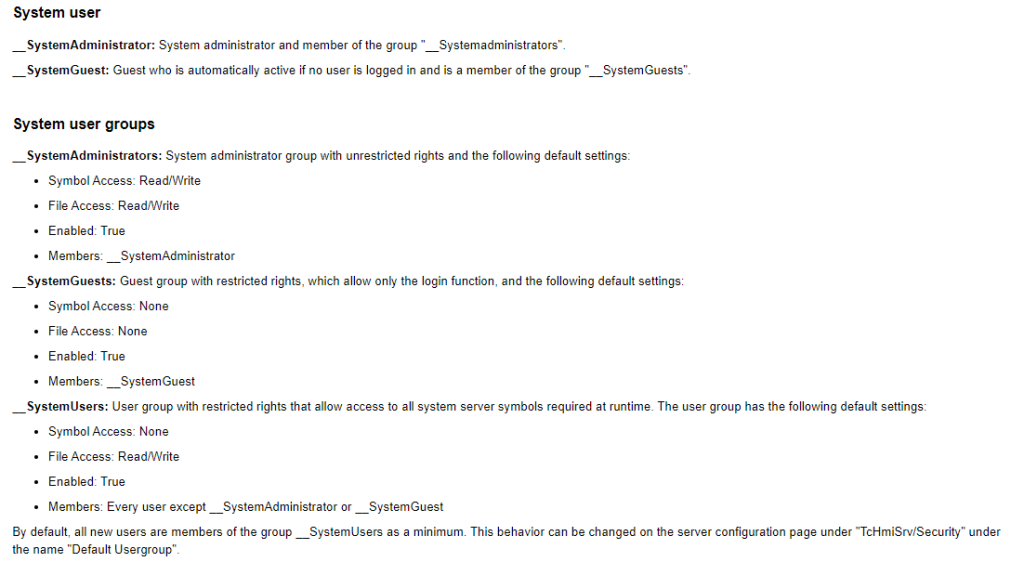
System users and system user groups
The following users and user groups exist as standard in the system and cannot be deleted:
Custom login page
By default, the template creates user such as __SystemGuest (if we don’t have Auto-Login user)
=> Add a custom login page as described in the Beckhoff documentation as shown in the following image.
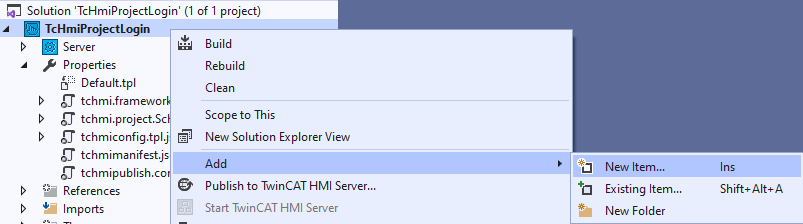
Figure 05: Add a new item to the project in visual studio
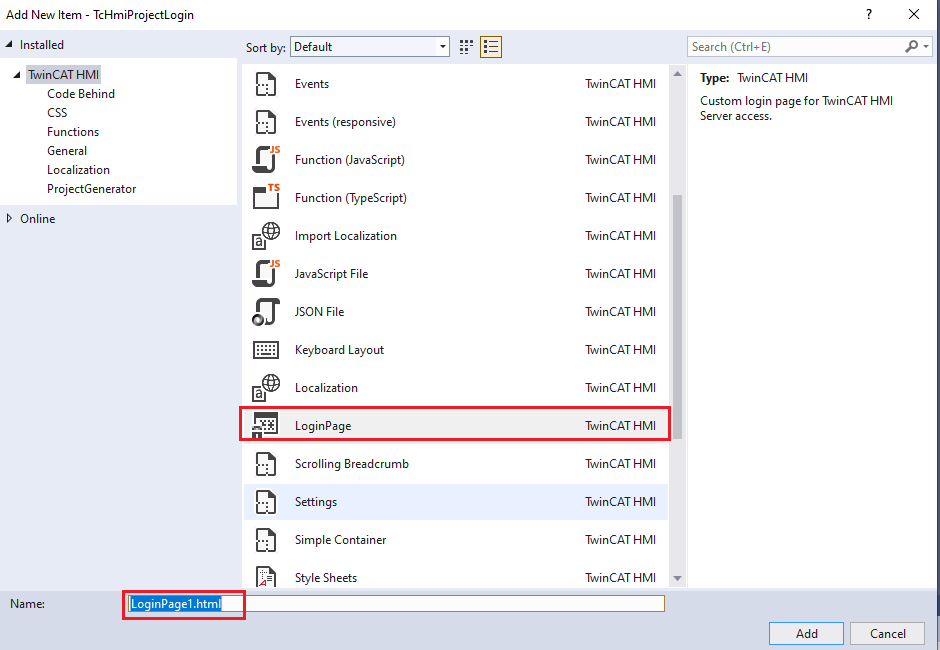
Figure 06: Select the loginPage1.html
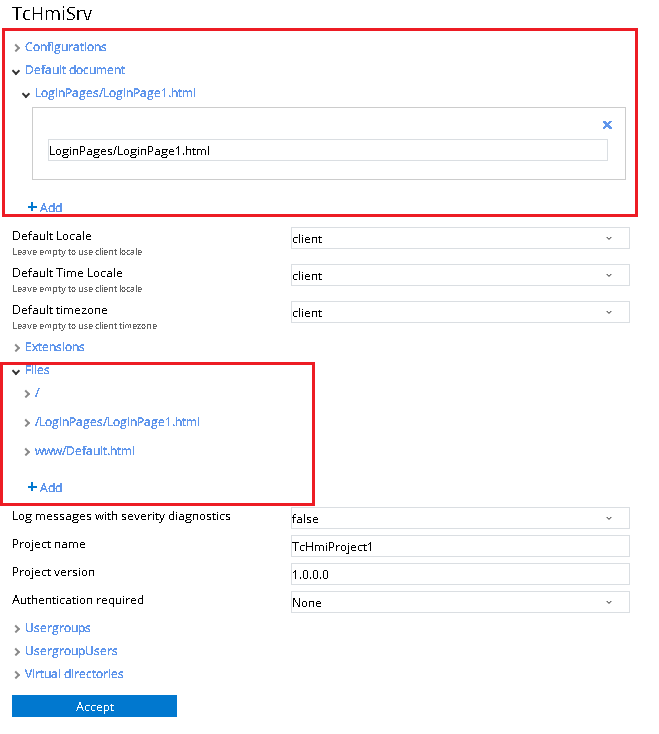
Figure 07: Check in the server side if the selection is OK
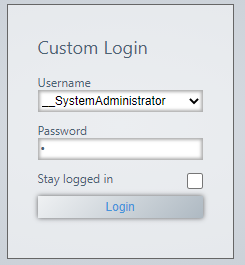
Figure 08: Login to the HMI (same password used when we publish the content)
Authentication can be kept OFF (username and password will not be asked) by using the configuration of the HMI Server, Authentication required can be set to Always authenticate (always ask the password), or None (password is not asked at all). The configuration page is shown in the following screenshot.
Authentication required -> None, it will not ask the password and the login user will be _SystemGuest
Login page will bring the login page and gives options to user for login dialog -> the user will be current user
Logout -> log out the current user and the current user again _SystemGuest
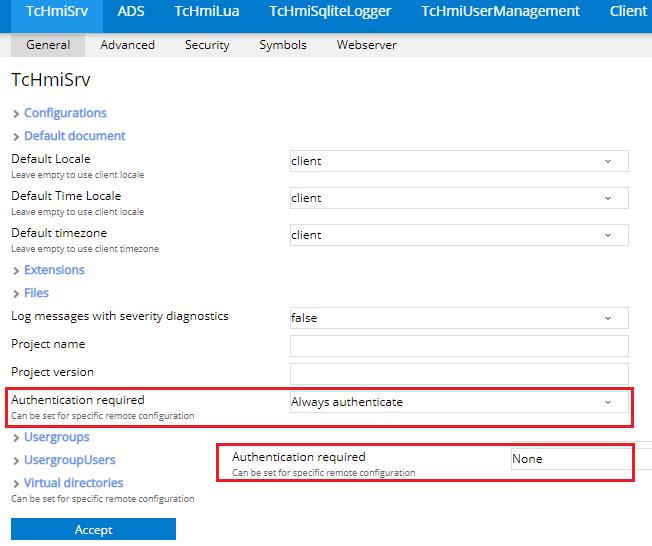
Figure 09: Always authenticate option asks password and None does not ask it as Figure 02
Now we can add a Login button and Logout button to our Desktop view
=> We call GoToLoginPage method when user click on Login button
=> We call the following JavaScript code when Logout button is pressed
 TcHmi.Server.logoutEx({ timeout: 2000 }, function(data) {
    console.log('User logout not successful.');
    });
Test Application
In the test application we will do the following:
=>We shall list all groups in the system
=>We show in a list how many users are included in the group
=>We shall list all users in the system, individual property can be seen as well
=>New Users can be added, updated, and deleted in the system
=>Custome Login by using user name and password
=>Button active or inactive based on the user’s right
We need to publish the application to see all the functionality (Live view in Visual Studio is not enough)
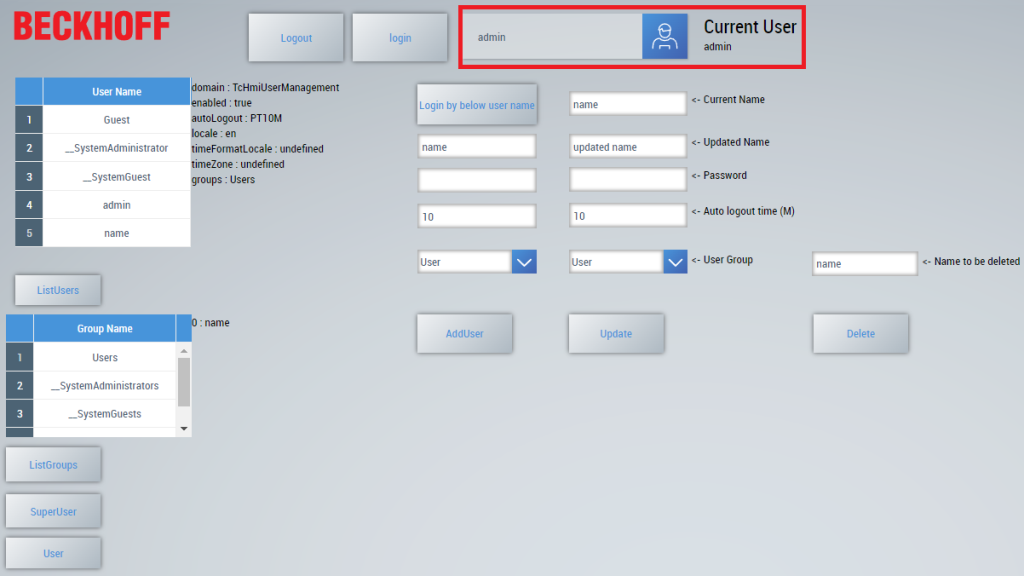
Figure 10: Main Desktop view of the test application
ListGroups:
List all groups available in the system, following code are necessary for getting a user group list. Please note that we are using async function which are implemented in the CodeBehindJs1.js file
 console.log('Calling listGroupsAll');
async function listGroupsAll() {
  try {
    var textBlockControl = TcHmi.Controls.get('TcHmiDatagrid_GroupLists');
    const result = await listGroups();
     var allName = [];
    for (const [key, value] of Object.entries(result)) {
      var item = {
        GroupName: key
          };
        allName.push(item);
    }
    textBlockControl.setSrcData(allName);
  }
  catch(error) {
    console.log(`error occured in listGroupsAll = ${error}`);
  }
}
listGroupsAll();
If we press on a group item, it will display the users in the group, following code are used when onSelectedItemChanged event. Please note that we are using async function which are implemented in the CodeBehindJs1.js file.
 async function SelectItemForGroup() {
  try {
    var gridControl = TcHmi.Controls.get('TcHmiDatagrid_GroupLists');
    var gridData = gridControl.getSrcData();
    var selectedValue = gridControl.getSelectedRowValue();
    var properties = await listUsersInGroup(selectedValue.GroupName);
    var infoTextBlock = TcHmi.Controls.get('TcHmiTextblock_GroupDetails');
    var text = '';
    for (const [key, value] of Object.entries(properties)) {
        var v = key + ' : ' + value + '\n';
        text = text + v;
    }
    infoTextBlock.setText(text);
  }
  catch(error) {
    console.log(`error occured in SelectItemForGroup = ${error}`);
  }
}
SelectItemForGroup();
ListUsers:
When we press on the ListUsers button it will display all the users in the system in a list view. Please note that we are using async function which are implemented in the CodeBehindJs1.js file.
console.log('Calling listUsers');
async function listUserAll() {
  try {
    var textBlockControl = TcHmi.Controls.get('TcHmiDatagrid_UserLists');
    const result = await listUsers();
    var allName = [];
    for (const [key, value] of Object.entries(result)) {
      var item = {
        UserName: key
      };
        allName.push(item);
    }
    textBlockControl.setSrcData(allName);
  }
  catch(error) {
    console.log(`error occured in listUserAll = ${error}`);
  }
}
listUserAll();
When we click on individual user then we fetch the property of the user such as locale, autologout time etc. Please note that we are using async function which are implemented in the CodeBehindJs1.js file.
async function SelectItem() {
  try {
    var gridControl = TcHmi.Controls.get('TcHmiDatagrid_UserLists');
    var gridData = gridControl.getSrcData();
    var selectedValue = gridControl.getSelectedRowValue();
    gridControl.setSelectedRowIndex(gridControl.getSelectedRowIndex());
    var properties = await listUserProperty(selectedValue.UserName);
    var infoTextBlock = TcHmi.Controls.get('TcHmiTextblock_UserDetails');
    var text = '';
    for (const [key, value] of Object.entries(properties)) {
        var v = key + ' : ' + value + '\n';
        text = text + v;
    }
    infoTextBlock.setText(text);
  }
  catch(error) {
    console.log(`error occured in SelectItem = ${error}`);
  }
}
SelectItem();
Add User
We can add user by pressing on the AddUser button. Basically it reads the list of users from the system and if the target name is not there then it will add to the system. The framework will store the information to the database, so after the reboot the user name will be there.
Following code are used to inser the user name to the system.
 console.log('Calling AddOneUser');
async function AddOneUser() {
  try {
    var nameControl = TcHmi.Controls.get('TcHmiTextbox_Name');
    var passwdControl = TcHmi.Controls.get('TcHmiPasswordInput_Passwd');
    var timeOutControl = TcHmi.Controls.get('TcHmiTextbox_TimeOut');
    var groupControl = TcHmi.Controls.get('TcHmiTextbox_Group');
    var name = nameControl.getText();
    var password = passwdControl.getText();
    var timeOut = timeOutControl.getText();
    var grp = groupControl.getSelectedIndex();
    var emptyString = true;
    if (!name || name.length === 0) {
       console.log('name empty');
    }
    const allUsers = await listUsers();
    var nameDuplicate = true;
    for (const [key, value] of Object.entries(allUsers)) {
        if(key.localeCompare(name) == 0) {
            nameDuplicate = true;
            break;
        }
        nameDuplicate = false;
    }
    if(nameDuplicate == false){
    const result = await AddUserEx(name, password, timeOut, grp);
    console.log(`Add User result  = ${result}`);
    } else {
        console.log(`Name already found  = ${name}`);
    }
  }
  catch(error) {
    console.log(`error occured in AddOneUser = ${error}`);
  }
}
AddOneUser();
Update User
User name cane be replaced with the new name. Following code are used to rename a user.
 console.log('Calling UpdateOneUser');
async function UpdateOneUser() {
  try {
    var nameControl = TcHmi.Controls.get('TcHmiTextbox_NameUpdate');
    var nameUpdatedControl = TcHmi.Controls.get('TcHmiTextbox_NameUpdateName');
    var passwdControl = TcHmi.Controls.get('TcHmiPasswordInput_PasswdUpdate');
    var timeOutControl = TcHmi.Controls.get('TcHmiTextbox_TimeOutUpdate');
    var groupControl = TcHmi.Controls.get('TcHmiTextbox_GroupUpdate');

    var name = nameControl.getText();
    var nameUpdate = nameUpdatedControl.getText();
    var password = passwdControl.getText();
    var timeOut = timeOutControl.getText();
    var grp = groupControl.getSelectedIndex();

    const allUsers = await listUsers();
    var nameDuplicate = true;
    for (const [key, value] of Object.entries(allUsers)) {
        if(key.localeCompare(name) == 0) {
            nameDuplicate = true;
            break;
        }
        nameDuplicate = false;
    }

    if(nameDuplicate == true){
    const result = await UpdateUser(name, nameUpdate,password, timeOut, grp);
    console.log(`Update User result  = ${result}`);
    } else {
        console.log(`Name not found  = ${name}`);
    }
  }
  catch(error) {
    console.log(`error occured in UpdateOneUser = ${error}`);
  }
}
UpdateOneUser();
Delete User
A user can be deleted in the similar way. When we press on the delete button we pick the name of the user and pass to the RemoveUser method. See the method in code behind file.
console.log('Calling DeleteOneUser');
async function DeleteOneUser() {
  try {
    var nameControl = TcHmi.Controls.get('TcHmiTextbox_NameDelete');
    var name = nameControl.getText();
    const allUsers = await listUsers();
    var found = false;
    for (const [key, value] of Object.entries(allUsers)) {
        if(key.localeCompare(name) == 0) {
            found = true;
            break;
        }
        found = false;
    }
    if(found == true) {
        const result = await RemoveUser(name);
        console.log(`DeleteOneUser User result  = ${result}`);
    } else {
            console.log(`Name not found  = ${name}`);
    }
  }
  catch(error) {
    console.log(`error occured in DeleteOneUser = ${error}`);
  }
}
DeleteOneUser();
HMI access right
Access control can allow security in such a way that different users can access different control. This can be configured in Visual Studio without code. One drawback of this approach is that it must be done in Visual Studio, it can’t be changed later.
=> Create a different User and set the membership of the User. In the following figure, It sets the User as a member of __SystemUsers group with other properties such as Auto logout time, password, etc.
=>If you select a control, properties, and then the lock icon, you can set who can observe the control and who can operate it.
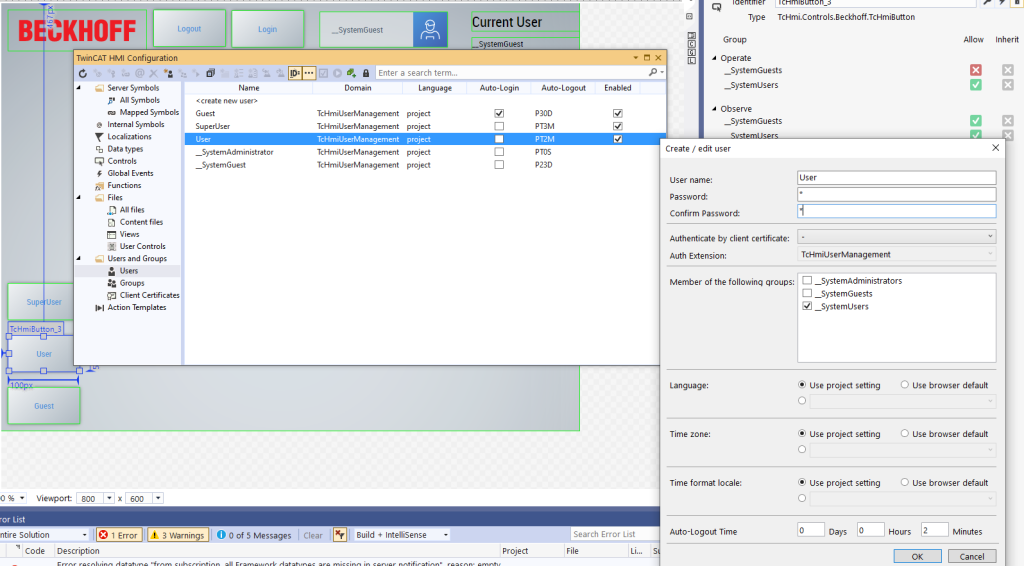
Figure 11: Login user creation and control access set in Visual Studio
YouTube Video
Tips
1: Login page only works with the remote HMI server (actual server), to test all related feature you must publish the content and test it with the HMI server. If you try with live view then it will not work because the framework has not been loaded fully. Also if you use browser (for example chrome) in your local machine, it will not work. You must publish to real HMI server.
2: Many times our changes are not taken into use (for some reason), RESTART HMI SERVER COMPUTER!
3: Insufficient access, many times it is possible that we have created users in the wrong way and when we publish then we get an access error. One solution to this problem is that we can try to delete the contents of the following folder
C:\ProgramData\Beckhoff\TF2000 TwinCAT 3 HMI Server\service\TcHmiProject
It will allow us to reset the password and we can continue publishing it. The case is shown in the following image

4: A working sample of users
=> Guest as __SystemUsers group
=> __SystemUsers group with Symbol Access Read/Write, File Access Read/Write
=> __SystemAdministrators as admin (default)
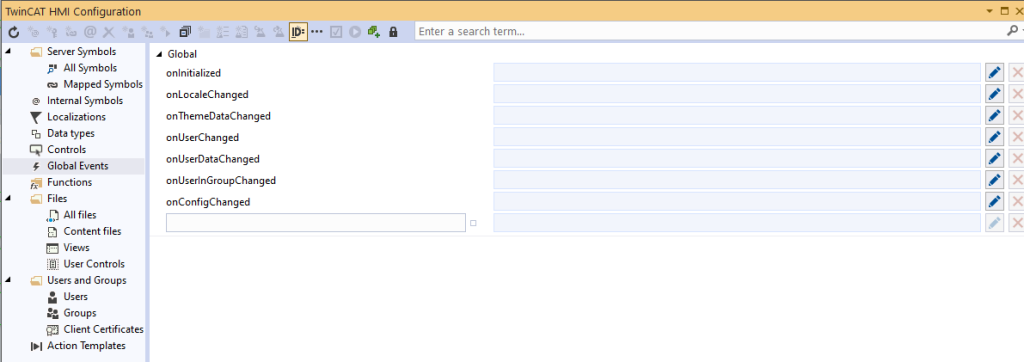
5: Global Event
=> By global event we can be notified when something changed. We can catch the event and do what is needed to do.
6: Permission to read user info
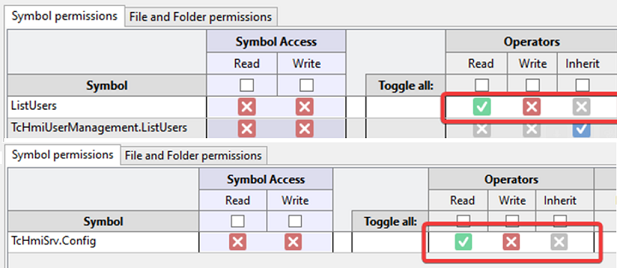
=> We have some user-related functions that need permission to read. Some even need to read the config. Here is an example of how to do that. To find the settings page for permission, select TwinCAT HMI configuration page (where we map all the symbols, then we can see a lock. If we press the lock, we can get the following settings page.
If we need to grant permission to read by any group (for example, when the HMI starts and no user is logged in), we can assign that permission to the default group. In that case, the functionality will be available immediately when the HMI starts. If we need to grant permission for a C# extension, we can enter the extension key and assign it to the default user group (viewer group).
7: Automatic logout time for Users
=> When we have defined an automatic logout time for each user, if we update the SDK for HMI engineering to another version, then if we change the logout time for user, it can go messy. Our changes may not taken into use. In this case, one option could be deleting the user and creating in different name. Probably those names are somehow integrated into the development environment.
8: More Info related user
=> Lots of information can be adjusted or adapted if we go to Usermanagement section in the server settings. We need to login as Administrator if we want to do some changes as shown in the following figure.

Reference
Download the Sample
Download the sample from the link given above.
Next, let’s try to understand how to manage Alarms and Events at https://www.hemelix.com/scada-hmi/twincat-hmi/alarms-and-events/
Ask questions related to Hemelix sample code and design at Google group https://groups.google.com/g/hemelix