
HMI Localization
Our software is mainly HMI which means it can run in any country, so we need to support different languages. There is very good built-in language support by the TwinCAT HMI framework.
There are a few ways to add language support in TwinCAT HMI.
Download the complete working source code Localization_Hemelix.zip
=> If the project is relatively small then we can add those strings manually to the project one by one.
=>If the project is too big then we should build the localized string in a CSV file or in an Excel file. We can import those strings directly to the HMI project.
We shall cover both ways.
Whenever we create an HMI project in Visual Studio, by default 2 languages are supplied, German and English language. We shall add two more languages to our sample application, French and Hindi.
We shall show a way how we can import language string which can be located in a database by C# Extension
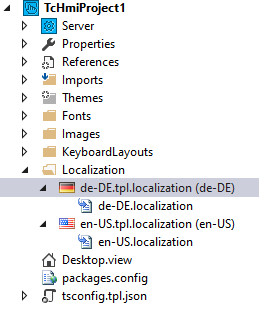
Figure 01: Localization options created by the Visual Studio (German and English are supplied by wizards)
We shall build an application with a couple of buttons (one will be Start and the other will be Stop), a combo box for selecting language, and a text block that will display a textual description of the selected language.
The initial GUI looks like the following. So if you want to follow me, start a project in Visual Studio and create a user interface like the following screenshot.
So there are 4 strings (Start, Stop, Select, and a string to describe that a language has been selected) that will be translated into four different languages, English, German, French, and Hindi.
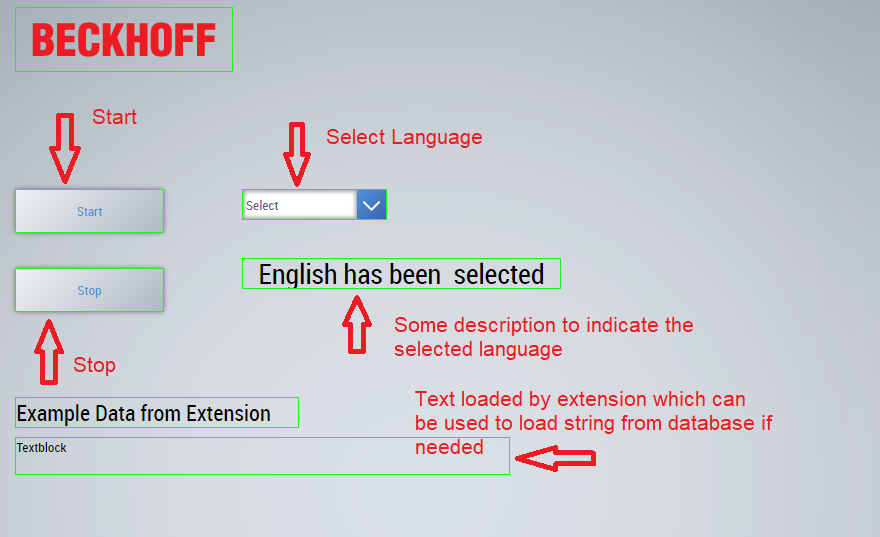
Figure 02: Final sample (we have translated text for button, combobox and textBlock)
JavaScript API that can be used to check the language-related settings. We can create a JavaScript function or embedded JavaScript function. Let’s try to use some embedded code.
=> Select the Desktop.view then F4 (View | Property Window), this will bring the property windows. In the property window, select the event icon (bolt icon)

Figure 03: JavaScript code for displaying language information
=> Select the Desktop.view then F4 (View | Property Window), this will bring the property windows. In the property window, select the event icon (bolt icon).
TcHmi.Locale.load('de-DE', function (data) {
    if (!data.error) {
        console.log('Loading de-DE successfully.');
    } else {
        console.log('Loading de-DE failed.');
    }
});
    var currentLocale = TcHmi.Locale.get();
    console.log(`currentLocale = ${currentLocale}`);
    var array = TcHmi.Locale.getRegisteredLocales();
    var i;
    for(i = 0; i < array.length; i++)
    {
        console.log(`${i} = ${array[i]}`);
    }
The result of the above code is from the browser console window. We loaded the German language and then checked how many languages are there in a loop.
currentLocale = de-DE
0 = de-DE
1 = en-US
Adding language text string manually.
=>First of all we find the translation of the four texts in our four languages. I shall show those in the following table. Now we shall add one by one to the language table.
=>Since by default, the wizard supplies German and English, we need to add the other two languages manually. I made those translations by Google so it may be wrong.
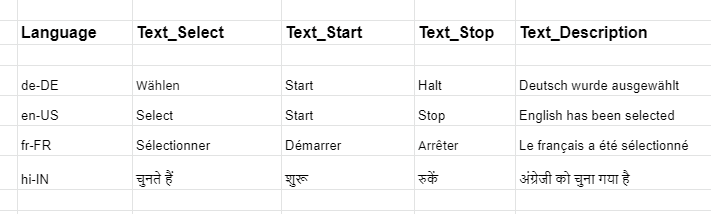
Figure 04: Used translated text in target languages
=>For adding additional language support, go to the project, right-click on localization | Add | New Item, and “Add New Item” wizards appear.
=>Select Localization | Add, a wizard appears and select French: fr and then create, note that Language1.tpl.localization(fr) has been created.
=>You can rename the Name of the file from Language1.localization to fr-FR.localization
=>Repeat the process for the Hindi (Hindi: hi and file name hi-IN.localization) language.
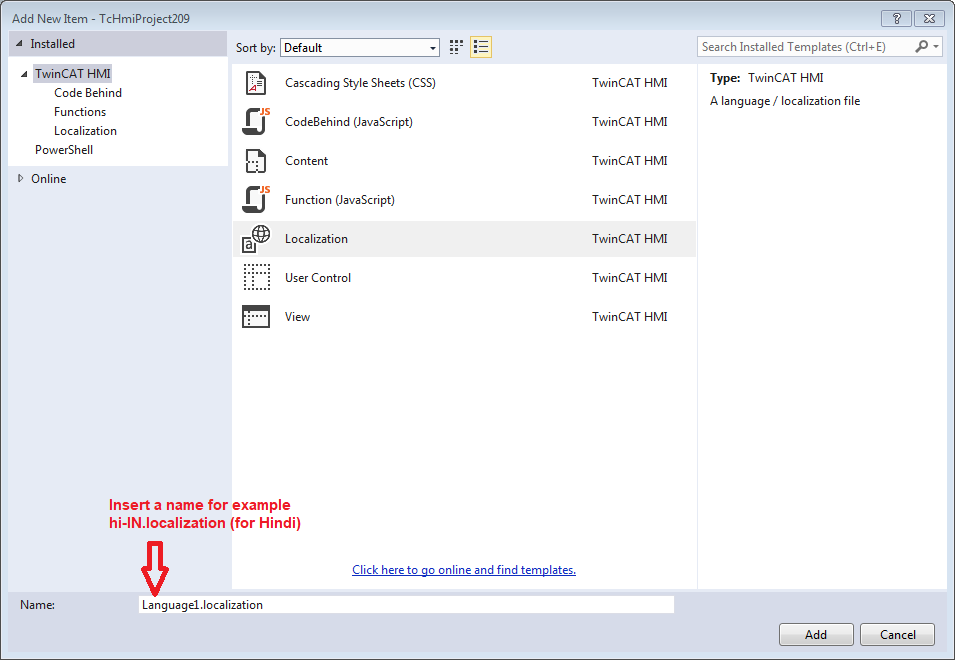
Figure 05: Adding new language support in the project
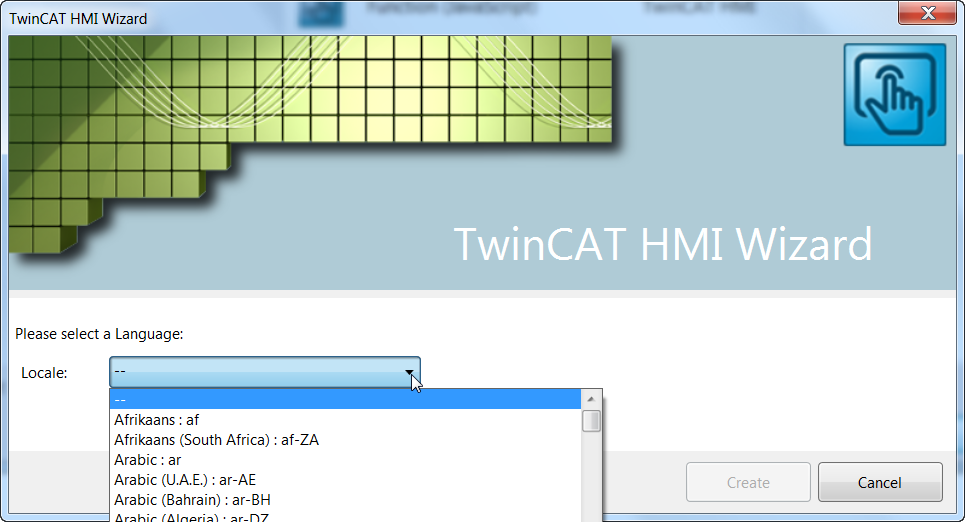
Figure 06: Language selection (These images are taken from Beckhoff site.)
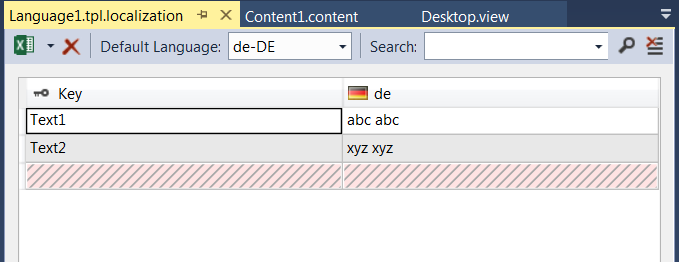
Figure 07: Inserting language text in editor
Now remove Text1, Text2, etc, and insert the header and text from our string table. Repeat these for our four language
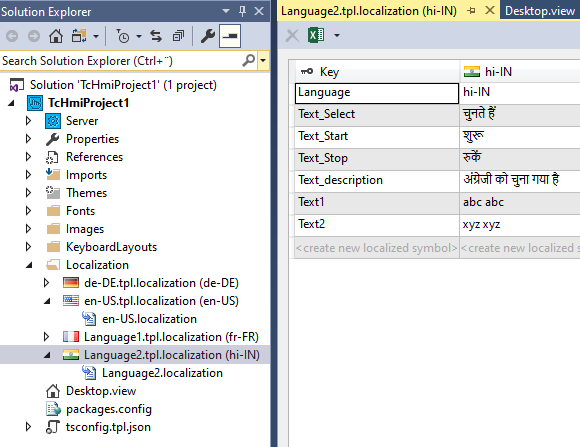
Figure 08: Indian language and the translation of the text
Now if we compile and load the Desktop and check the console in the browser we can see the following text, we have four languages there.
currentLocale = de-DE
0 = de-DE
1 = en-US
2 = fr-FR
3 = hi-IN
Now we configure those visible texts.
=> Rename all the necessary control’s ID to match real one, for example, Start button id to TcHmi_Controls_Beckhoff_TcHmiButton_Start, Stop button’s id to TcHmi_Controls_Beckhoff_TcHmiButton_Stop, etc.
=> Select Start button | Properties (F4) and bind the Text field Text_Start
=>Repeat the process for all other fields.
=>Change the SrcData field of the Combobox to
["de-DE", "en-US", "fr-FR","hi-IN"]
=>Now run the HMI and noticed that de-DE (German) text has been selected for all our target fields (as it was loaded during the Desktop attached event)
=>During the run time if we select any language that will be loaded as expected, following image is taken when German language was selected.
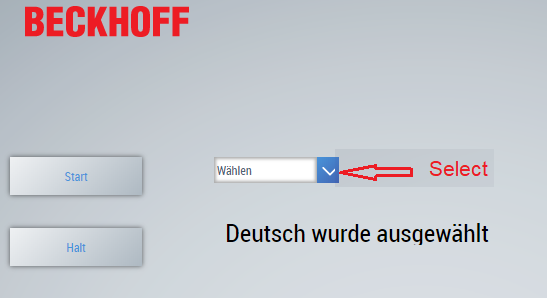
Figure 09: German language has been selected in our sample application
Now if we implement the event of Combobox selection then we are done, let’s implement the Combobox selection event. We shall check what the user has selected and based on that we load the language. The configuration is shown in the following image.
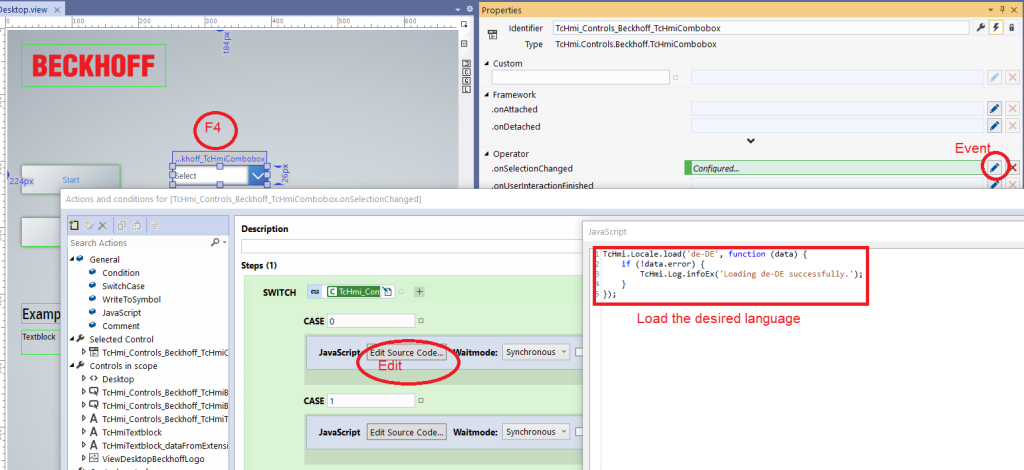
Figure 10: Language selection combobox handling
If we select the Hindi language from the Combobox we see that the buttons’ text and the description have been changed accordingly.
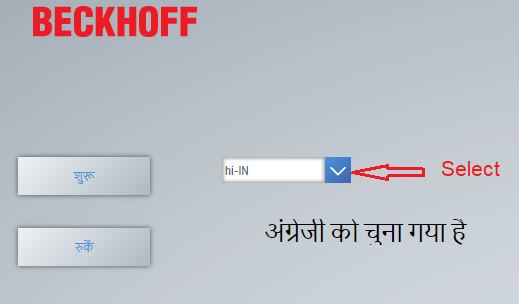
Figure 11: Hindi has been selected from the combo box
If we select the French language from the Combobox we see that the buttons’ text and the description have been changed accordingly.
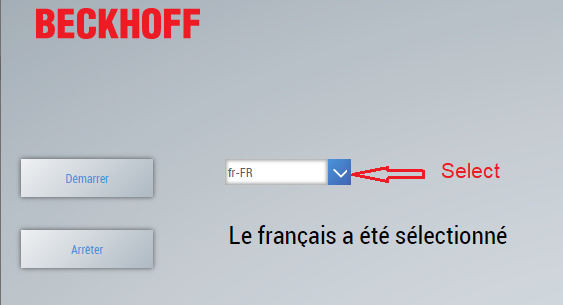
Figure 12: French has been selected from the combo box
Adding language string from CSV or Excel file
We can export the string from Excel or CSV files. We can format all the strings in an Excel/CSV and load it to the project. After that, we have to follow the same process as we have done in manual string handling. The following image shows the content of the Hindi language. For other languages, we have a similar structure.
=>When we have the language file ready then we can load it from the upper left corner (from a CSV/Excel file)
=>We can export the text to a file in the opposite process.
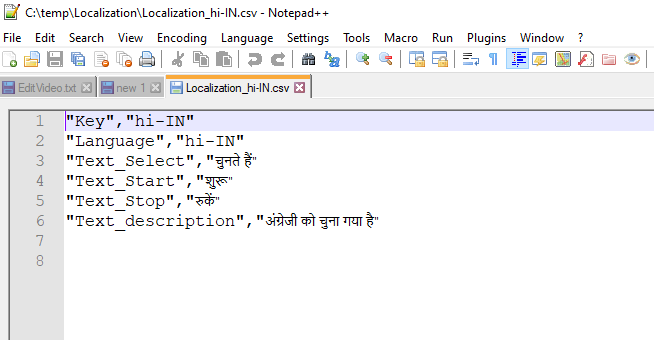
Figure 13: CSV file for Hindi language (each language will have own CSV file)
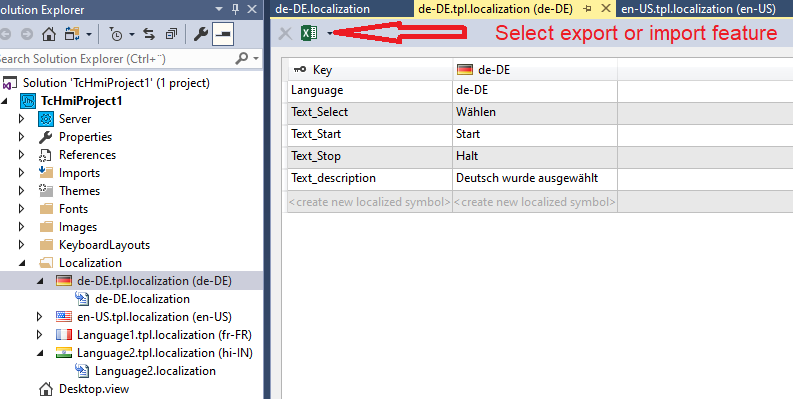
Figure 14: Inserting excel file in the project
=> When we select import it will ask if we want to merge the imported keys
=> Yes, Keep the existing keys and merge (it will just add at the end). We might need to delete extra stuff
=> No, remove the existing keys and just insert what we have in the CSV file (if there is empty line at the end of file it will insert a empty key value pair), see the following figure.

Figure 15: Confirmation for keeping existing key value pair
Adding language string from Database
We can have language strings stored in SQL. How do we read the string from Database and insert it into our project.
=> Read string data by a string from the Database by CSharp extension or by other means.
=> Build a CSV file and insert it into the project or
=> Modify the JSON file in the HMI project and insert it into the project
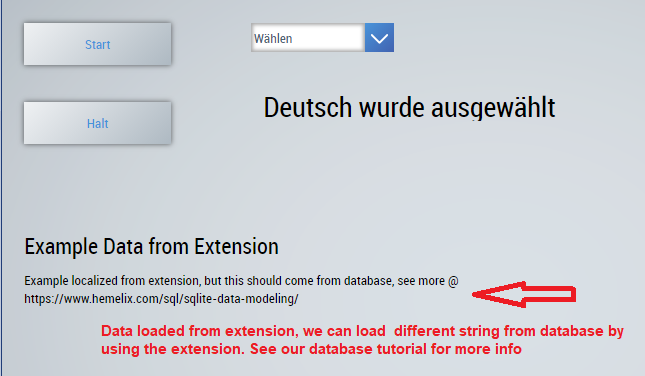
Figure 16: Process how to load string from database
If you use the sample (the extension project), make sure that the extension is activated. If the extension is not activated then the string will not be loaded from the extension, more info related to the extension at https://www.hemelix.com/scada-hmi/twincat-hmi/twincat-hmi-server-extension/
=> Add reference to the extension project.
=> Activate the extension.
Video Tutorial
Download the sample from the link given above.
Next, let’s try to understand what is user management at https://www.hemelix.com/scada-hmi/twincat-hmi/hmi-user-management/
Ask questions related to Hemelix sample code and design at Google group https://groups.google.com/g/hemelix