
Display the device name for a short time in HMI
We have developed or learned how to display image, control, or user control on the HMI. Many times we may have lots of devices drawn on the HMI and there is not so much space to to show the device name statically on the HMI. But we would like to clarify which device is what and what is their names dynamically.
Most likely, we would like to show the name when we bring the mouse over the device. In this article, we shall solve this problem. In this sample, we have 3 items on our HMI and if we bring our mouse on top of any device, it will show the name of it as shown in figure 01. In the following image, we have brought a mouse on the motor and it shows the name ‘motor’ for 500 milliseconds.
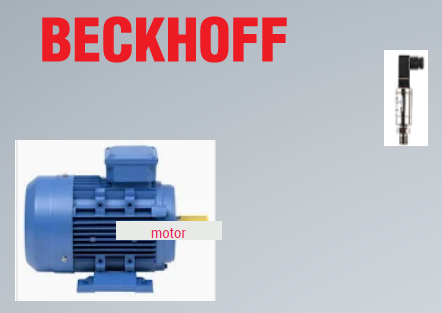
Figure 01: displaying device name when the mouse is brought over to the device
Steps:
Step 01:
Create a sample HMI project using Visual Studio, drag and drop 3 image controls (you can also use other controls), and configure those image controls with suitable images.
Step 02:
Give the image ID or the control ID something like this, motor_1, pressuresensor_1, etc. We shall identify the name by JavaScript code inside the file DisplayName.js. We can use other naming conventions but we need to update the JavaScript as needed.
Step 03:
We shall use a user control and insert a text block there. We can change the text background color and text color as needed. The user control can be found in the attached zip file. This user control will be displayed when we bring the mouse on top of another control.
Step 04:
We shall insert a JavaScript file which we can name as DisplayName.js (as done in this sample). The sample code is shown in the following snippet. Remember we need to insert the function via Visual Studio. If we just include the file in the Visual Studio project, it will not work. The best way, we insert an empty JS function then by copy-paste we fill it.
function DisplayDeviceName(DeviceID) {
    // DeviceID is control id
    var targetControlCircleAlarm = TcHmi.Controls.get(DeviceID);
    var width = targetControlCircleAlarm.getWidth();
    var height = targetControlCircleAlarm.getHeight();
    var left = targetControlCircleAlarm.getLeft();
    var top = targetControlCircleAlarm.getTop();
    var Content = 'UserControl/DeviceName.usercontrol';
    var deviceType = DeviceID.split("_");
    DeviceID = deviceType[0];
    var popupParametersPopupControl = [];
    popupParametersPopupControl['data-tchmi-height'] = 19;
    popupParametersPopupControl['data-tchmi-width'] = 181;
    popupParametersPopupControl['data-tchmi-zindex'] = "1000";
    popupParametersPopupControl['data-tchmi-name'] = DeviceID;
    popupParametersPopupControl['data-tchmi-left'] =  left + width / 2;
    popupParametersPopupControl['data-tchmi-top'] = top + height / 2;
    var PopupUuid = String("Popup_" + generateUuidv4());
    var popup;
    popupParametersPopupControl['data-tchmi-target-user-control'] = Content;
    popup = TcHmi.ControlFactory.createEx(
        'tchmi-user-control-host',
        PopupUuid,
        popupParametersPopupControl
    );
    var desktop = TcHmi.Controls.get('Desktop');
    if (desktop && popup) {
        desktop.addChild(popup);
    }
    var t;
    var timer_is_on = 0;
    function timedCount() {
            myStopFunction();
            stopCount();
    }
    function startCount() {
        if (!timer_is_on) {
            timer_is_on = 1;
            t = setTimeout(timedCount, 500);//text will be shown in 500 ms, in the zip file it has 5000 ms
        }
    }
    function stopCount() {
        clearTimeout(t);
        timer_is_on = 0;
    }
    startCount();
    function myStopFunction() {
        TcHmi.Controls.get(popup.__id).destroy();
    }
    function generateUuidv4 () {
        return 'xxxxxxxx-xxxx-4xxx-yxxx-xxxxxxxxxxxx'.replace(/[xy]/g, function (c) {
            var r = Math.random() * 16 | 0, v = c == 'x' ? r : (r & 0x3 | 0x8);
            return v.toString(16);
        })
    }
    return;
}
Step 05:
Select the control where we want to display the name, and configure as shown in the following image.
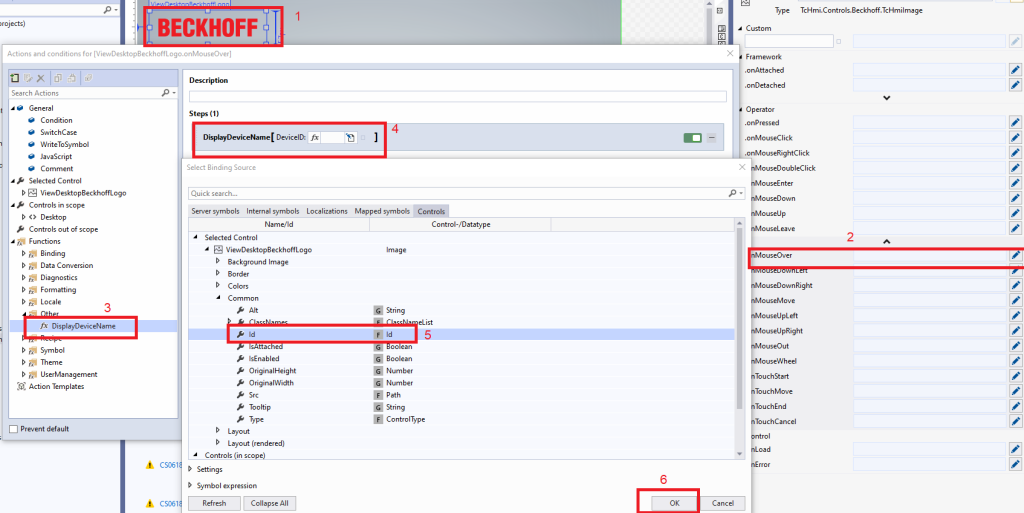
1 => Select the control which should show the name
2 => Find the mouse-over event from the event control
3 => Find the function name
4 => Select the id of the control (remember to change the ID as PressureSensor_1), this will call the JS with this as a parameter
5 => Select the ID
6 => Press OK
Step 06:
Build, Test and Share it in your network, done!
Download
Tips
01: We call startCount function in the JavaScript file, we could have simplified this (it came from other sample)
02: We use generateUuidv4 to get an uuid that is used to identify the user controls
See also
Next
Download the sample from the link given above.
See next how to show Google map on the HMI at https://www.hemelix.com/scada-hmi/twincat-hmi/display-google-maps-on-twincat-hmi/
Ask questions related to Hemelix sample code and design at Google group https://groups.google.com/g/hemelix