
Animation in TwinCAT HMI Framework
A keyframe (or keyframe) in animation and filmmaking is a drawing or shot that defines the starting and ending points of any smooth transition. TwinCAT HMI allows us to create and configure animations that can be played using CSS or JavaScript. The Animation API is designed for use within controls.
It is very easy to use the animation framework in TwinCAT HMI.
Download the sample: TcHmiAnimationExample_Hemelix.zip
In our fictitious home automation system, we have the yard door that we shall animate. We shall explain how do we achieve the animation.
Animation is made of numerous frames; when those frames are shown at a certain speed; we perceive the individual frames as moving images. Keyframes are the important frames that contain information on a start/endpoint of an action. A keyframe tells us about two things; first, it tells us what the action of our frame is at a certain point of time; second, it tells us what time that action occurs.
We need to do/use the following STEPS to achieve the animation for a control.
STEP 01:
=> Identify the control name (identifier), we have identified the yard door for our fictitious as “TcHmi_Controls_Beckhoff_TcHmiImage_5”
=> Create an animation object by using JavaScript
var animation = new TcHmi.Animation('TcHmi_Controls_Beckhoff_TcHmiImage_5', '');Note that the second parameter is empty which selects an HTML element within the control to be animated. An empty string selects the root element of the control.
STEP 02:
Now we need to add frames, there are few overloaded methods there. We need to select the right one depending on what types of animation we are expecting. The most important properties of addKeyframe methods are:
styles: A collection of CSS properties and their desired values as a dictionary.
progress point : A value between 0 and 1 inclusive, which determines the point in time of the animation. 0 is the start and 1 is the end of the animation.
animation.addKeyframe('transform', 'translate(0px, 0px)', 0)
 .addKeyframe('transform', 'translate(30px, 30px)', 1);
animation.duration(15000);
Here we are telling the framework that moves the image for 30 pixels in diagonal in 15 seconds.
STEP 03:
Another important point is what to do when it has done animated (in our example we are transforming the image to the desired location so it will stay there). We need to listen to the animation events. Following are the events that can be emitted by the framework
Name | Value | Description |
|---|---|---|
CONFIGURE |
| The initial status of an animation. This status means that the animation has never been played or reset after it has been played. |
INITIALIZED |
| An animation has this status when run() was called, but no effects actually work yet because the CSS has not yet been parsed or a delay is set. |
RUNNING |
| A currently running animation. |
PAUSED |
| The animation was paused. |
ENDED |
| The animation has finished or was skipped with skip(). |
STEP 04:
Another important p The final JavaScript code is shown in the following snippet. It can be called when an event has occurred. It can be, for example, a button event.
var animation = new TcHmi.Animation('TcHmi_Controls_Beckhoff_TcHmiImage_5', '')
animation.addKeyframe('transform', 'translate(0px, 0px)', 0)
    .addKeyframe('transform', 'translate(282px, 0px)', 1)
    .duration(5000);
animation.registerEventHandler('animationend', function (event) {
    console.log('Animation ended: ' + event.animationName);
    var someControl = TcHmi.Controls.get('TcHmi_Controls_Beckhoff_TcHmiImage_5');
    var t = [{
        "transformType": "Translate",
        "x": 282,
        "xUnit": "px",
        "y": 0,
        "yUnit": "px",
        "z": 0,
        "zUnit": "px",
    }
    ];
    someControl.setTransform(t);
    var formattedSymbol = '%s%PLC1.MAIN.yardGate.YardDoorOpenCommand%/s%';
    TcHmi.Symbol.writeEx(formattedSymbol, false, function (data) {
        if (data.error === TcHmi.Errors.NONE) {
            console.log("Writting YardDoorOpenCommand OK");
        } else {
            console.log("Writting YardDoorOpenCommand NOT OK");
        }
    });
});
animation.run();
Design of the sample:
STEP 01:
=>Create an HMI project by visual studio
=>insert the following control from the tool box
Text block: for the fictitious home automation text
Image control: for the upper symbol (same source is used for the actual gate of the yard and the icon )
Text blocks: for displaying the distance and showing the distance travelled
Actual gate: decorate the actual gate by pillar and the gate image
Open button: for opening the gate
Close button: for closing the gate (we could have used toggle button as well)
Now the HMI content is ready.
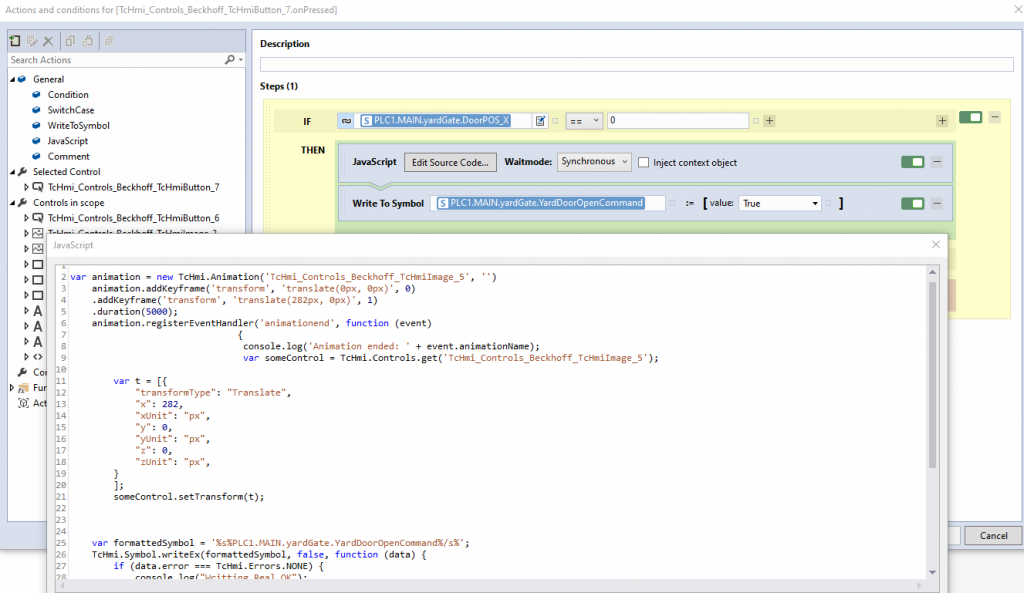
Configure the open button’s event as shown in the following image (the actual complete sample can be download from the site hemelix.com)
Open button | Properties (F4 or the wrench icon) | Show events (the bolt icon) | .onPressed Action
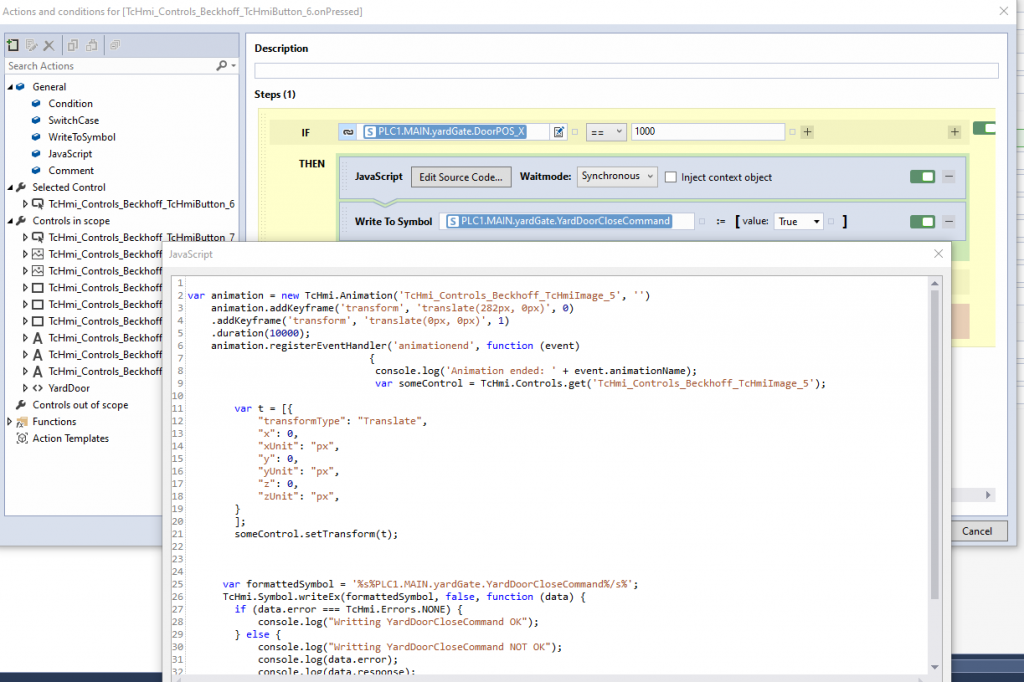
Configure the Close button’s event as shown in the following image (actual code can be checked by downloading the sample from hemelix.com)
Close button | Properties (F4 or the wrench icon) | Show events (the bolt icon) | .onPressed Action
We need a PLC program (for actual animation we don’t need but we simulates with PLC to show that the data is actually coming from the PLC or OPC UA Server).
-We need to link those interested PLC variables with the HMI control (please see the first example)
-We can download the sample PLC code which comes with this sample project, please download it if you want to run the full example.
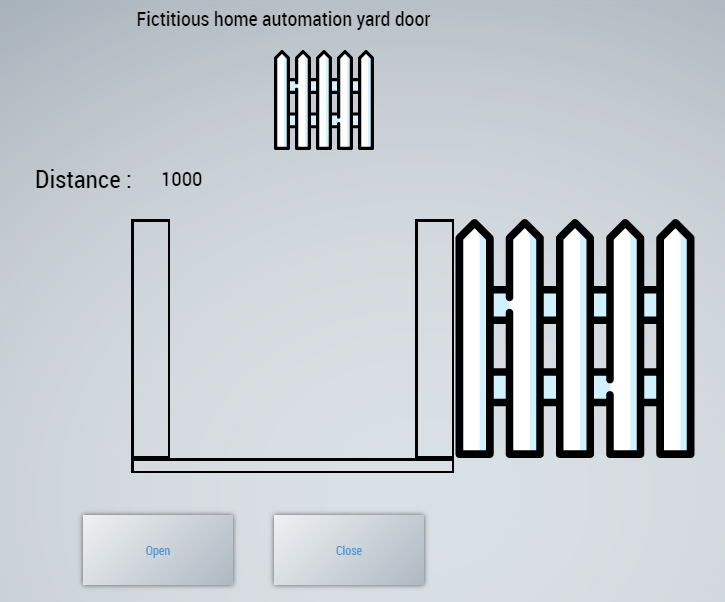
Following image shows the Yard door in open position.
Open button opens the door,
Close button close the door,
Distance : it shows the distance travelled from the home position
Download the sample: The link is given on the top of the page
Rotation by angle
var animation = new TcHmi.Animation('TcHmiImage', '')
var startMotor = '%s%PLC1.MAIN.startRotation%/s%';
TcHmi.Symbol.readEx2(startMotor, function(data) {
	if (data.error === TcHmi.Errors.NONE) {
	if (data.value == true) {
	var angleControl = TcHmi.Controls.get("TcHmi_Controls_Beckhoff_TcHmiTextbox_Angle");
			var timeSControl = TcHmi.Controls.get("TcHmi_Controls_Beckhoff_TcHmiTextbox_Time");
			if (angleControl != undefined && timeSControl != undefined) {
				var angle = parseFloat(angleControl.getText(), 10);
				var timeS = parseFloat(timeSControl.getText(), 10);
				var finalFrame = 'rotate('.concat(angle.toString()).concat('deg)');
a
				animationGlobal = new TcHmi.Animation('ViewDesktopBeckhoffLogo', '');
				animationGlobal.addKeyframe('transform', 'rotate(0deg)', 0)
					.addKeyframe('transform', finalFrame, 1)
					.duration(timeS * 1000);
				animationGlobal.run(); //animationGlobal has been declared in code behind file
			}
		} else {
			console.log('Reset');
			//Stop the animation and put back the beckhoff image to horizontal position
			//I don't have reference to the animation object if I don't declare in code behind file or in some otherway
			//At least if I deslare the animation in a code behind  file  then I have access to the object and I can reset it or pause it
			//Problem with pause the image does not go to the original shape
			//Problem with reset, the animation does not start again if I create the animation in code behind file. If I declare it in code behind file and
			//initialized in the embedded code then it is  fine.  But I am not sure related to memory leak or other performence issue.
			//With subscription, I have similar issues.
			//animationGlobal.pause();
			animationGlobal.reset();
		}
	}
});
Two controls can be used to get time and angle. One way to run continuously is to run it for a long time and cancel it when needed.
Rotating an Image around center by animation framework
I have tried to use the transformation function with a timer but it is not smooth. So animation framework help to display the rotation smoothly. We shall design the sample to display the DC motor speed in our fictitious home automation system.
A keyframe (or keyframe) in animation and filmmaking is a drawing or shot that defines the starting and ending points of any smooth transition. TwinCAT HMI allows us to create and configure animations that can be played using CSS or JavaScript. The Animation API is designed for use within controls.
Downlooad the sample from the following link
Animation_Rotation_BeckhoffImage.zip
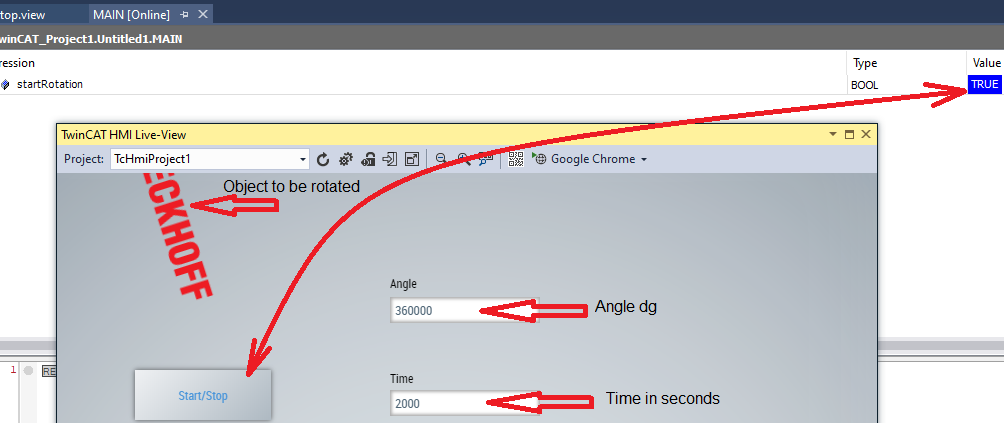
The main user interface and a tiny PLC program are in the background. The simple PLC program has a variable called start rotation. If this variable is TRUE then we rotate the Beckhoff image and stop the rotation (and set it to the original position). We need to set the variable to TRUE, since we don’t have any actual device, we set it by the button START/STOP. The same button will toggle the start rotation variable. Try to download the sample and test it in your environment.
Create the short PLC program and run it in Visual Studio. Make sure you can change the variable in the PLC program. The HMI will monitor the startRotation variable, if the variable is true then the image will start rotating. When the value is false then it will stop.
//PLC Program
PROGRAM MAIN
VAR
startRotation : BOOL := FALSE;
END_VAR
STEP 01 :
=> Configure Start/Stop button so when we press it will toggle the startRotation in PLC
=>Create a folder in the HMI project, name it JavaScript and insert a code behind file (if needed see https://www.hemelix.com/scada-hmi/twincat-hmi/twincat-javascript-function-and-code-behind/)
=> Declare a animation object there
module TcHmi {
    // If you want to unregister an event outside the event code you need to use the return value of the method register()
    var destroyOnInitialized = TcHmi.EventProvider.register('onInitialized', function (e, data) {
        // This event will be raised only once, so we can free resources.
        // It's best practice to use destroy function of the event object within the callback function to avoid conflicts.
        e.destroy();
        // ----------------------
        // Place your code here!
        // ----------------------
        var animationGlobal; //<<<< This the variable we are talking about
    });
}
STEP 02:
=> Select the Beckhoff image and bring the properties (select the range tool or F4 )
=> Press on the event button (lightning bolt)
=>Configure the Custom event to tell framework to do some action when the startRotation in the PLC changes as shown in the following image.
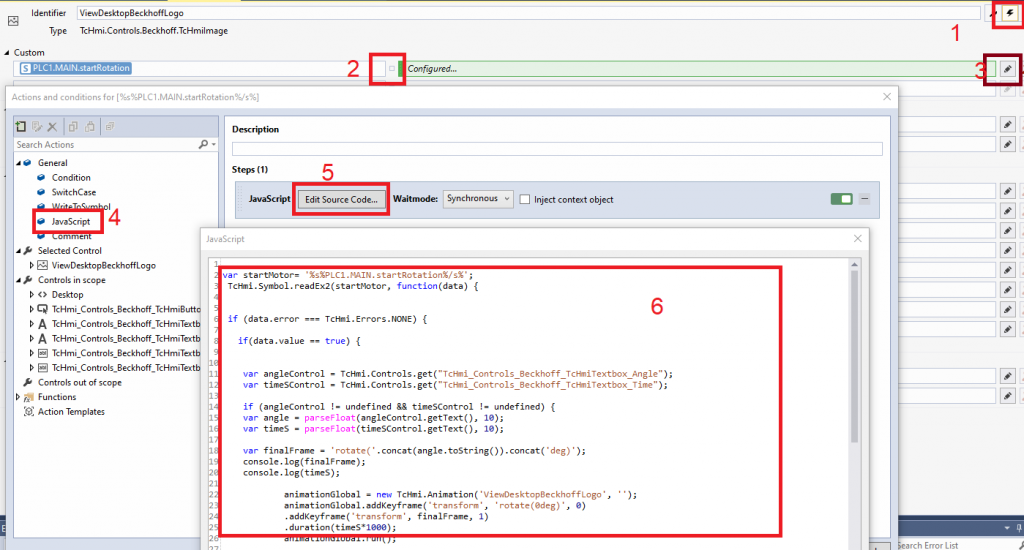
=> 1 => Bring the events view
=> 2 => Monitor the PLC variable as custom events
=> 3 => Configure the actions
=> 4 => Bring the JavaScript editor by drag and drop (JavaScript item from the left pane)
=> 5 => Bring the JavaScript editor window
=> 6 => Paste the actual JavaScript code!
We need to insert the java script code. See how we are reacting to the changes of variable. Once you have inserted the script you are ready to test it.
var startMotor = '%s%PLC1.MAIN.startRotation%/s%';
TcHmi.Symbol.readEx2(startMotor,
function(data) {
  if (data.error === TcHmi.Errors.NONE) {
    if (data.value == true) {
      var angleControl = TcHmi.Controls.get("TcHmi_Controls_Beckhoff_TcHmiTextbox_Angle");
      var timeSControl = TcHmi.Controls.get("TcHmi_Controls_Beckhoff_TcHmiTextbox_Time");
      if (angleControl != undefined && timeSControl != undefined) {
        var angle = parseFloat(angleControl.getText(), 10);
        var timeS = parseFloat(timeSControl.getText(), 10);
        var finalFrame = 'rotate('.concat(angle.toString()).concat('deg)');
        console.log(finalFrame);
        console.log(timeS);
        animationGlobal = new TcHmi.Animation('ViewDesktopBeckhoffLogo', '');
        animationGlobal.addKeyframe('transform', 'rotate(0deg)', 0).addKeyframe('transform', finalFrame, 1).duration(timeS * 1000);
        animationGlobal.run();
      }
    }
    else {
      console.log('Reset');
      //Stop the animation and put back the beckhoff image to horizontal position
      //I don't have reference to the animation object if I don't declare in code behind file or in some otherway
      //At least if I deslare the animation in a code behind  file  then I have access to the object and I can reset it or pause it
      //Problem with pause the image does not go to the original shape
      //Problem with reset, the animation does not start again if I create the animation in code behind file. If I declare it in code behind file and
      //initialized in the embedded code then it is  fine.  But I am not sure related to memory leak or other performence issue.
      //With subscription, I have similar issues.
      //animationGlobal.pause();
      animationGlobal.reset();
    }
  }
});
References:
Download the sample from the link given above.
Next, let’s try to understand how Nuget Package works at https://www.hemelix.com/scada-hmi/twincat-hmi/nuget-package-management/
Ask questions related to Hemelix sample code and design at Google group https://groups.google.com/g/hemelix