Alarms and Events
Alarm: Alarms represent warnings of process conditions that could cause problems, and require an operator response. Examples can be many, like suppose a Tank water level has increased beyond the desired value and that time SCADA system should give Alarm. Some other examples could be for example:
Download real and complete sample
=>Circuit breaker tripped
=>Battery low
=>Leak detected
The intention of an alarm is to signal that something has gone wrong, or that a particular stage of processing has been reached. For example, an alarm might indicate that a boiler has exceeded a safe temperature limit.
Event: Events represent normal system status messages, and do not require an operator response. An event is defined as a detectable occurrence, which may or may not be associated with an alarm. So event means something interesting happened to the system that may be an indication of an unwanted state or some info that we are interested in.
For example, in our yard gate example, whenever the user has opened the gate from our HMI that we can log as an event. This can be used for reporting. But say, nobody commanded to open the gate but the gate opened by itself due to a bug in the software that can be treated as an alarm, say our motor has burned and we commanded to open the gate and it did not open, this is an alarm. If an alarm occurs then the operator needs to do something.
The central event system is integrated into the TwinCAT HMI server. It is possible to manage events from the HMI server and its extensions. The TcHmiEventlogger extension can be connected with the TwinCAT 3 event logger from local or remote real-time systems.
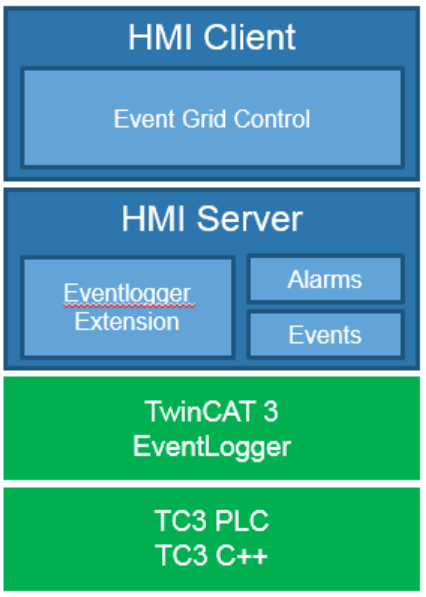
Figure 01: Architectural view of TwinCAT Alarm and Event system
According to TwinCAT architecture, events are generic terms. Events are divided into Messages and Alarms.
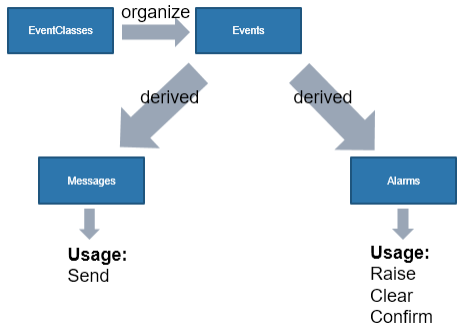
Figure 02: Message and Alarm in the Event system
The event system has been built as an extension. The extension can be loaded automatically when a project is created or can be installed via NuGet packages. When we install the NuGet package we might encounter a computability problem as the interface may not match.
The Event Grid Control is a control for the tabular display of alarms and messages. It automatically displays the alarms and messages of the target systems addressed in the event logger extension. Alarms can be confirmed directly in the control.
The Event Grid Control is located in the Toolbox under the category Beckhoff, from where you can insert it into an HMI page by drag-and-drop. We shall use the same sample here as references.
Commonly Used Function Blocks:
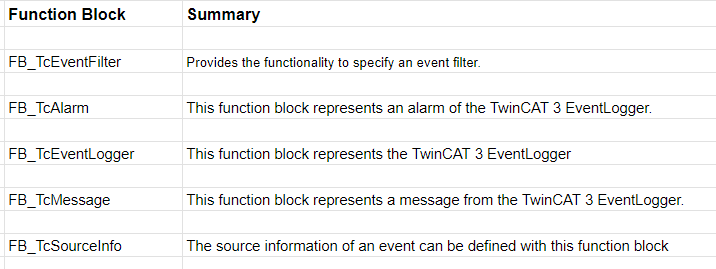
Figure 03: Major TwinCAT function blocks
Arguments:
The texts of the events can be individualized by programming with “arguments”. A marking with the notation {n} is used for this during the description of the events in the TMC editor, where n is an ascending number starting from 0. Up to 128 arguments with a maximum size of 1024 bytes can be used at one event.
In the TMC editor, for example, such a Display Text is used for an event.
How to install NuGet packages:
Visual Studio project | Manage NuGet Packages, then select the desired version as shown in the following images.
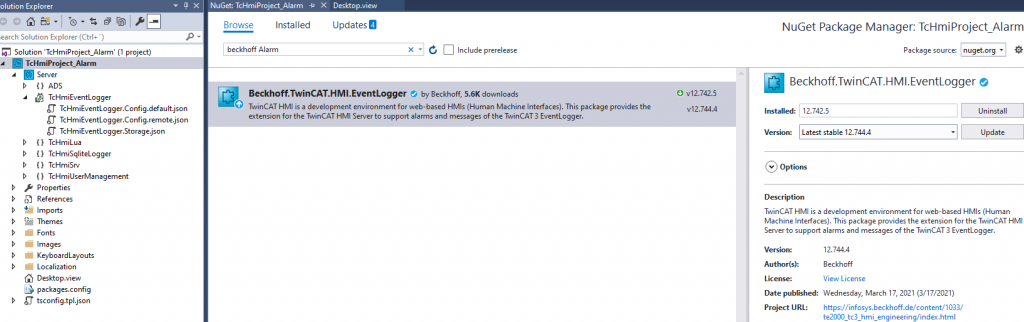
Figure 04: Installing Event logger Nuget package
TC_EVENTS constants:
TC_EVENTS is a global TwinCAT system variable list (GVL). Each constant in this list represents an event class that is available on a TwinCAT system. The instances of the event classes are structured data types. Their member variables are instances of individual events. The events can be used, for example, in a PLC project or in a PLC library for logging the most diverse messages. The TwinCAT system has several predefined event classes. Further event classes are brought along by the integrated PLC libraries (functions) or defined by the user in the PLC application. The Global Variable List of the event classes is automatically created and updated by the TwinCAT system. The number of available event classes can vary from system to system as a result.
How do we add own event types in PLC System:
=>Create a TWinCAT PLC project
=>Add the related Library
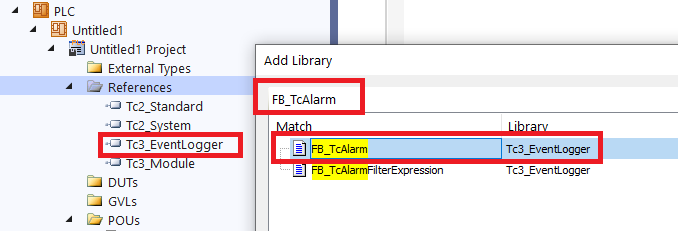
Figure 05: Adding library for the project
=> It is good to specify what would be alarm and what would be message which we are planning to log
=> Press on Type System | Add New Item | Give a file Name | Right Click | New
=> Create two Event Classes (YardGateMessage and YardGateAlarm) and add messages or alarms as needed
=>Or select SYSTEM | Type System (double click), it will insert a NewEventClass (TMC Editor), if it does not open then right click and select new from the context menu.
=>It will bring NewEventClass (rename this one as you like)
=>Give a suitable Name (for example, I gave TestClass for testing) and Description
=>In the left pane, under Events add, remove and reorder Events (that you are going to raise), as shown in the following figure.
=>We can rename the Event to actual event that we are going to raise.
=>Event (as shown in the following image can be renamed to suitable one, example Contactor_Broken, note space is not allowed)
=>Give an Id, Display Text (translatable) and Severity level.
=>Under Server there is TcHmiEventLogger extension | right Click | Configure Extension
=>TcHmiEventLogger | Target Systems | Address (Insert AMS Net ID)
Following table shows which events (Alarms and Messages) we are going to log, this is just a quick way to start and test the project, once we compile and run the program we can see that there are some event in the event logger page.
PROGRAM MAIN
VAR
	bIsInitalized : BOOL := FALSE;
	bAlarm : BOOL := FALSE;
	bClearAlarm : BOOL := FALSE;
	fbAlarm      :  FB_TcAlarm;
END_VAR
IF NOT bIsInitalized THEN
	bIsInitalized := TRUE;
	fbAlarm.CreateEx(TC_Events.TestClass.Event, TRUE, 0);
END_IF
IF bAlarm THEN
	bAlarm := FALSE;
	fbAlarm.Raise(0);
END_IF
IF bClearAlarm THEN
	bClearAlarm := FALSE;
	fbAlarm.Clear(0, TRUE);
END_IF
An event can be either a message or an alarm. Below are a few lines of code from our Yard Gate example.
The following snippet demonstrates how to pass the door opening time as an argument, which can then be formatted as localized text. In the SendMessageEx method, we have the first argument TC_Events.YardGateMessage.DoorOpenTime, if we want to see the details of the first parameter, we follow the following steps.
=> Double click on the Type System
=> Go to the Event Classes tab, and we find YardGateMessage and YardGateAlarm, Event Classes
=> Right-click on the classes (YardGateMessage or YardGateAlarm)
=> You can find all the events under YardGateMessage (or YardGateAlarm)
=> You find DoorOpenTime (if we selected YardGateMessage)
=> It has a property YardGateOpenTime_DisplayText, Severity, etc. (these can be changed if we like)
=> Under translations, we find YardGateOpenTime_DisplayText which is formatted like this “Door open time = {0}”
We can see “Door open time = 100” in the event message. The alarm message works in the same way.
    fbLogger        :FB_TcEventlogger;
    fbAlarm         :FB_TcAlarm;
    fbSource        :FB_TcSourceInfo;
    fbArgument      :FB_TcArguments;
    tEnd := TIME();
    tDelta := tEnd - tStart;
    fbArgument.Clear();
    fbArgument.AddInt(TIME_TO_INT(tDelta));
    fbLogger.SendMessageEx(TC_Events.YardGateMessage.DoorOpenTime,fbSource,0,fbArgument);
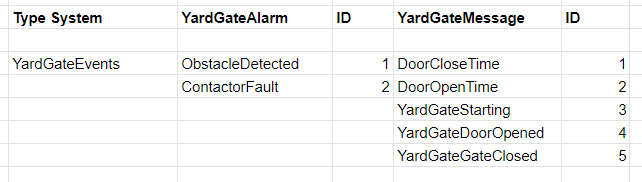
Figure 06: List of Events in our sample application (Alarm and Message)
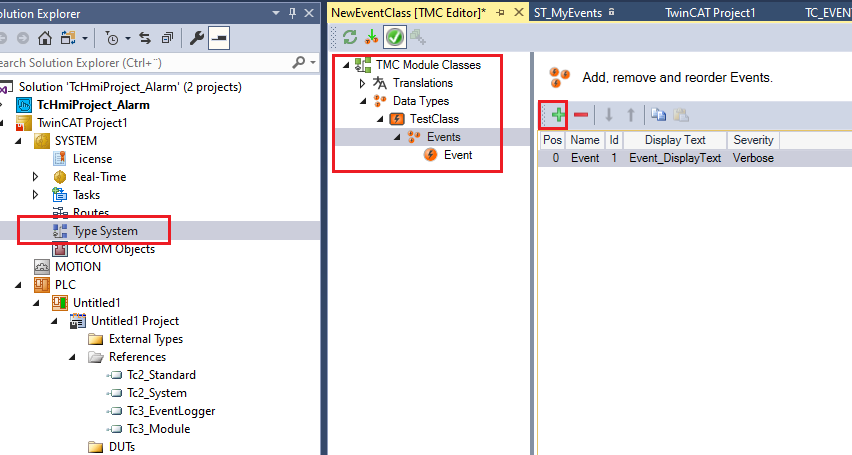
Figure 07: Event creation
Set the AMS net id for the ADS and TcHmiEventLogger if you are using real PLC. For simulator we don’t need to set it.
If we set Address to local address 127.0.0.1.1.1 then we need extra license. If we have set for ADS another license then we must set the same AMS address.
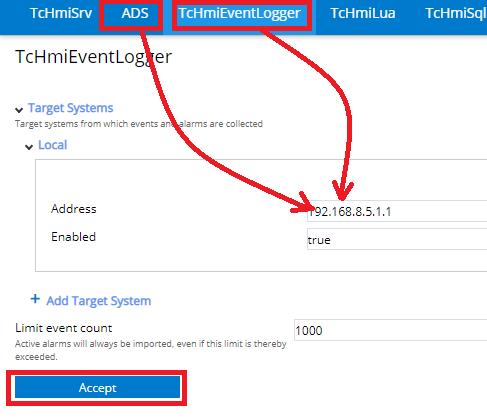
Figure 08: Setting Address for EventLogger
Step by Step, sample done by Hemelix
We can start a project from scratch or we can start from any existing sample (to save time)
=> We pick an existing sample (because this will be extended for other purposes)
=> Let’s download the sample from https://www.hemelix.com/plc/state-machine-in-structured-text/ (Down the sample project (HistoricalData_Hemelix.zip))
=> If we notice there is no event-related implementation there, we are going to add there.
=> Download EventLogger Nuget package
Now switch to the PLC program
=> Right Click on Type System | Add New Item | YardGateEvents
=> Double-click on YardGateEvents
=> Right click on the empty space | New | rename the NewEventClass as YardGateAlarm
=> Rename Event as ObstacleDetected and add another one ContactorFault according to our specification
=> ObstacleDetected_DisplayText is the key which is an identifier of a localizable text, Our two alarms have added
Now let’s add the messages
=> We have 5 messages according to our specifications (DoorCloseTime, DoorOpenTime, YardGateStarting, YardGateDoorOpened, YardGateClosed)
=> Press on the empty space | New | Name it as YardGateMessage | Add the above Events
=> DoorCloseTime_DisplayText can be formatted as Door close time = {0}, we shall display closing time so we need {}
=> We add the following code to FN_MAINYARDGATE function block
    tDelta, tStart, tEnd : TIME;  //For counting time, closing/opening time
    contactorAlarm : BOOL := FALSE; //We shall have a button in HMI for setting true or false just to simulate it
    fbLogger        :FB_TcEventlogger;
    fbAlarm         :FB_TcAlarm;
    fbSource        :FB_TcSourceInfo;
    fbArgument      :FB_TcArguments;
=> We add a new state YARD_ALARM
TYPE YARDGATESTATE :
(
    YARD_UNINIT := 0,
    YARD_INIT,
    YARD_CLOSED,
    YARD_OPENING,
    YARD_OPENED ,
    YARD_CLOSING,
    YARD_BLOCKED,
    YARD_ALARM //New
);
END_TYPE
When the contactorAlarm is TRUE the gate goes to YARD_ALARM state. We raise the alarm and clear the alarm in the following way.
YARD_ALARM :
IF NOT stateInit THEN
stateInit:= TRUE;
fbSource.Clear();
fbSource.sName := 'Contactor fault';
fbAlarm.CreateEx(TC_Events.YardGateAlarm.ContactorFault, TRUE, fbSource);
fbAlarm.Raise(0);
END_IF
IF NOT contactorAlarm  THEN
	state :=YARD_UNINIT;
	tStart := TIME();
	stateInit:= FALSE;
	fbAlarm.Clear(0, TRUE);
END_IF
We need to display the time taken when opening or closing the yard. It can take varying amount of time (for example there were obstacle in front of yard). We shall record the time and display it in the event logger in the following way.
DoorCloseTime_DisplayText Door close time = {0} // See the YardGateMessage, DoorCloseTime and translationfbArgument.Clear();
fbArgument.AddString('Yard Gate Closed');
fbLogger.SendMessageEx(TC_Events.YardGateMessage.YardGateStarting,fbSource,0,fbArgument);
tEnd := TIME();
tDelta := tEnd - tStart;
fbArgument.Clear();
fbArgument.AddInt(TIME_TO_INT(tDelta));
fbLogger.SendMessageEx(TC_Events.YardGateMessage.DoorCloseTime,fbSource,0,fbArgument);
For more see the YouTube Video, the same example has been explained step by step.

Figure 09: Event view of the sample application
Beckhoff Event Filter
A filter is an array that can contain Comparisons, LogicOperators and other filters. There must always be a logic operator between two comparisons, two filters or a comparison and a filter. In this way, a logical expression is formed, with nested filters performing the function of parentheses.
We pass array of JSON object. Each object is an condition. There should have a condition object between two objects. Here is a sample.
var myFilter = [
     {
         "path": 'domain',
         "comparator": '==',
         "value": 'TcHmiEventLogger'
     },
     {
         "logic": 'AND'
     },
     {
         "path": 'severity',
         "comparator": '>=',
         "value": 'TcHmi.Server.Events.Severity.Warning'
     }
 ]
gridControl.setFilter(myFilter);
If we get data from HMI for filtering then we can format the myFilter by using the data.
comparator are described in the following page: https://infosys.beckhoff.com/english.php?content=../content/1033/te2000_tc3_hmi_engineering/5239679371.html&id=2754862184166547989
Listener project
By listener project we can call back to the event system in the PLC. You need to know the interface implementation for that. Take a look in the infosys.
The modified project from infosys can be found here. We shall update the door alarm soon. You can download from the link below
https://www.hemelix.com/wp-content/uploads/2024/10/AlarmConfirmed.zip
Tips:
01: If we have some data logger stored in the DB file that can interfere with the visual studio project, you may not find the data in the solution and wonder from where it was coming, actually it can come from the DB file (good to remove from the DB file.)
02: The database file name is LoggedEvents.db and is located in C:\TwinCAT\3.1\Boot. If we remove the DB file and try to find the events, you may see the empty events. If we restart the HMI server we can see the events again.
03: The window is opened in the TwinCAT 3 Engineering (XAE) via View > Other Windows > TwinCAT Logged Events, all events can be deleted from there.
04: We have noticed that events are not available sometimes, somehow the HMI Server and the event system go out of sync. If we restart the HMI server then we can see the events again. For that purpose, we provide a button for restarting the server, the following JS code will do the job.
function RestartHMIServer() {
    return new Promise((resolve, reject) => {
        TcHmi.Server.readSymbol('Restart',  function (data) {
            if (data.error === TcHmi.Errors.NONE) {
                resolve(data.value);
            } else {
                console.log(`error occurred in RestartHMIServer error = $ {data.error}`);
                reject(data.error);
            }
        });
    });
}
05: If we don’t see the event we need to restart the HMI server
YouTube video
References
Download the sample from the link given above.
Next, let’s try to understand what is a recipe at https://www.hemelix.com/scada-hmi/twincat-hmi/scada-hmi-recipe-management/
Ask questions related to Hemelix sample code and design at Google group https://groups.google.com/g/hemelix