MQTT and TwinCAT
What is MQTT
A thing in the internet of things can be a person with a heart monitor implant, a farm animal with a biochip transponder, an automobile that has built-in sensors to alert the driver when tire pressure is low, or any other natural or man-made object that can be assigned an Internet Protocol address and is able to transfer data over a network.
MQTT (Message Queuing Telemetry Transport) is a messaging protocol, or set of rules, used for machine-to-machine communication. Smart sensors, wearables, and other Internet of Things (IoT) devices typically have to transmit and receive data over a resource-constrained network with limited bandwidth. These IoT devices use MQTT for data transmission, as it is easy to implement and can communicate IoT data efficiently. MQTT supports messaging between devices to the cloud and the cloud to the device.
Why MQTT
MQTT is a lightweight and flexible protocol that is designed to provide reliable transmission of data packets of all types. It’s a popular mechanism for IoT devices, especially those constrained by power and computing, and is also easy to integrate with software vendors. It also establishes a persistent connection with the specified endpoint server, which helps ensure that the message reaches its destination. While MQTT payloads are limited to 256MB, it is more than sufficient to support most IoT use cases outside of image or video streaming. The following are the major benefits. (mostly adapted from mqtt.org)
Lightweight and Efficient
MQTT clients are very small, require minimal resources so can be used on small microcontrollers. MQTT message headers are small to optimize network bandwidth.
Bi-directional Communications
MQTT allows for messaging between device to cloud and cloud to device. This makes for easy broadcasting messages to groups of things.
Reliable Message Delivery
Reliability of message delivery is important for many IoT use cases. This is why MQTT has 3 defined quality of service levels: 0 – at most once, 1- at least once, 2 – exactly once
Scale to Millions of Things
MQTT can scale to connect with millions of IoT devices.
Support for Unreliable Networks
Many IoT devices connect over unreliable cellular networks. MQTT’s support for persistent sessions reduces the time to reconnect the client with the broker.
Security Enabled
MQTT makes it easy to encrypt messages using TLS and authenticate clients using modern authentication protocols, such as OAuth.
MQTT components
MQTT implements the publish/subscribe model by defining clients and brokers as below.
MQTT client
An MQTT client is any device from a server to a microcontroller that runs an MQTT library. If the client is sending messages, it acts as a publisher, and if it is receiving messages, it acts as a receiver (or subscriber). Basically, any device that communicates using MQTT over a network can be called an MQTT client device.
MQTT broker
The MQTT broker is the backend system which coordinates messages between the different clients. Responsibilities of the broker include receiving and filtering messages, identifying clients subscribed to each message, and sending them the messages. It is also responsible for other tasks such as:
=> Authorizing and authenticating MQTT clients
=> Passing messages to other systems for further analysis
=> Handling missed messages and client sessions
MQTT connection
Clients and brokers begin communicating by using an MQTT connection. Clients initiate the connection by sending a CONNECT message to the MQTT broker. The broker confirms that a connection has been established by responding with a CONNACK message. Both the MQTT client and the broker require a TCP/IP stack to communicate. Clients never connect with each other, only with the broker.
How does MQTT works
=> An MQTT client establishes a connection with the MQTT broker.
=> Once connected, the client can either publish messages, subscribe to specific messages, or do both.
=> When the MQTT broker receives a message, it forwards it to subscribers who are interested.
MQTT topic
The term ‘topic’ refers to keywords the MQTT broker uses to filter messages for the MQTT clients. Topics are organized hierarchically, similar to a file or folder directory. For example, consider a smart home system operating in a multilevel house that has different smart devices on each floor. In that case, the MQTT broker may organize topics as:
yarddoor/motor/starttime
yarddoor/motor/stoptime
yarddoor/motor/maxspeed
MQTT publish
MQTT clients publish messages that contain the topic and data in byte format. The client determines the data format such as text data, binary data, XML, or JSON files. For example, a motor maximum speed can be published on a topic as yarddoor/motor/maxspeed
MQTT subscribe
MQTT clients send a SUBSCRIBE message to the MQTT broker, to receive messages on topics of interest. This message contains a unique identifier and a list of subscriptions. For example, Amazon web service subscribes to our motor data for processing, in this case, amazon web service is a subscriber. Let us say we want to show the motor data to our mobile phone, our mobile phone application is a subscriber. Subscribers get data from brokers and clients push data to brokers.
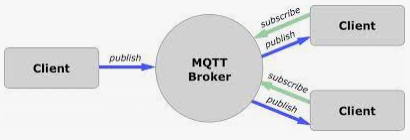
The following figure shows a typical publish and subscribe mechanism. The client or publisher could be our PLC which sends messages related to the motor to the broker and other devices subscribe to the message and use it.
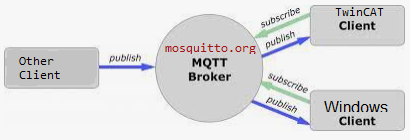
Figure 01: MQTT broker, publisher and subscriber
MQTT protocol makes it suitable for Internet of Things messaging such as with low-power sensors or mobile devices such as phones, embedded computers, or microcontrollers. In the very basic, a publisher (a publishing client in the system) can publish its own data to the broker. Some other interested consumers might tell the broker that we are interested in the same kinds of data, if those types of data are available then let me know. In that case, if nobody is interested in data still publisher can publish the data. On the other hand, some consumers (or subscriber client may be interested or has registered for data but there may not have any publisher, in that case, they just wait). In most cases, broker software runs in the cloud and both publisher and subscriber can access the broker and send receive a message.
Broker keeps trucks of all kinds of records like who is publishing, who is subscribing, should it remember the session if the client goes out of network, etc. In this article, we shall build a sample application using MS Windows and the Beckhoff PLC devices.
Differences between MQTT and REST API
=> MQTT communication data is binary data / HTTP REST API transferred data is textual data.
=> MQTT is a lightweight messaging protocol over TCP/HTTP REST API is a client-server communication mechanism over a TCP connection
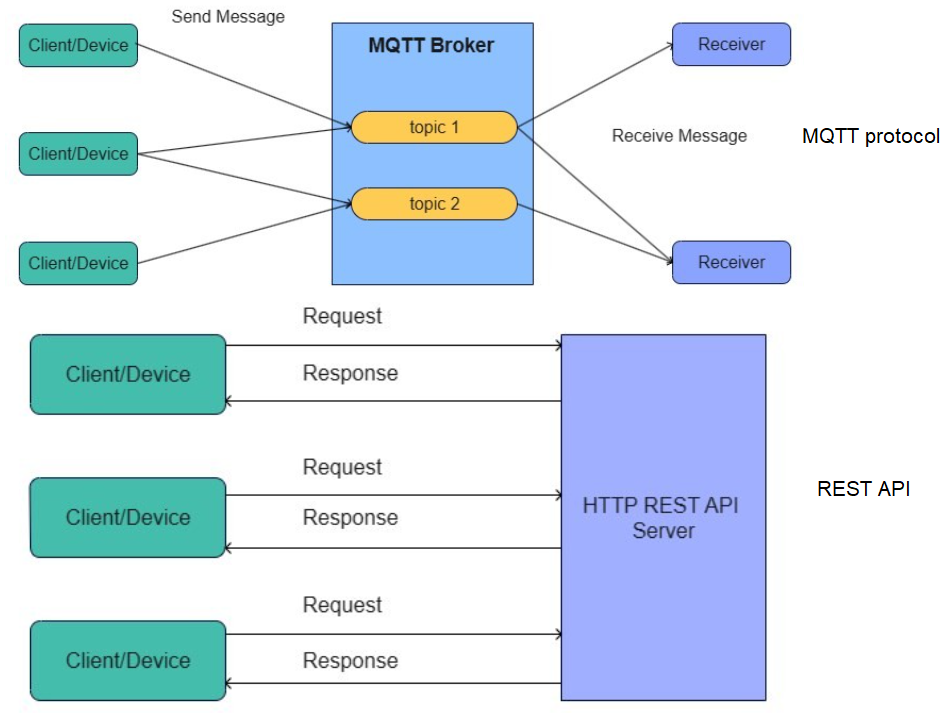
Figure 02: Differences between MQTT and REST API (image collected)
Free broker:
=> Eclipse Mosquitto is an open-source (EPL/EDL licensed) message broker that implements the MQTT protocol versions 5.0, 3.1.1, and 3.1. Mosquitto is lightweight and is suitable for use on all devices from low-power single-board computers to full servers. The Mosquitto project also provides a C library for implementing MQTT clients, and the very popular mosquitto_pub and mosquitto_sub command line MQTT clients. It also provides a free testing platform for development, more can be found at https://test.mosquitto.org/
The Mosquitto Project runs a test server at test.mosquitto.org where you can test your clients in a variety of ways: plain MQTT, MQTT over TLS, MQTT over TLS (with client certificate), MQTT over WebSockets, and MQTT over WebSockets with TLS.
=> You can download mosquitto-2.0.xx-install-windows-x64.exe (64-bit build, Windows Vista and up, built with Visual Studio Community 2019) from https://mosquitto.org/download/. You can install it to your local computer and you can access the broker with an IP 127.0.0.1. This software runs as a service on the local computer. The default port is 1883.
Test if the broker is running or not:
In separate terminal windows do the following:
Start the broker:
mosquitto
Start the command line subscriber:
mosquitto_sub -v -t test/topic
Publish test message with the command line publisher note the topic and message are written with and without “:
mosquitto_pub -t test/topic -m "helloWorld"
As well as seeing both the subscriber and publisher connection messages in the broker terminal the following should be printed in the subscriber terminal:
test/topic { helloWorld }It is worth pointing out that from v2.0.0 of Mosquitto it will only be listening for connections on the loopback interface by default. If you want to access the broker from machines other than the one it is installed on you will need to edit the config file (and pass it to the broker with the -c option e.g. mosquitto -c /path/to/mosquitto.conf) to enable listening on other interfaces.
We can check if the broker is running by looking at service as in the following image. Start Windows service and you can find the Mosquitto Broker
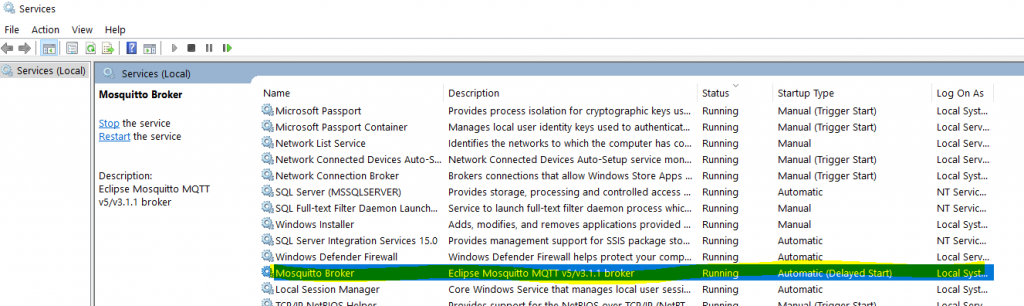
Figure 03: Running Mosquitto Broker as windows service
MQTT Windows Platform
MQTT client application development is super easy in the dot net platform. It is also very easy to test by using free eclipse foundation broker.
Before starting or trying the sample application you need to do pre work.
=>Download the Paho software from this site https://www.eclipse.org/paho/index.php?page=clients/dotnet/index.php
=>On the other hand you can download the sample from hemelix.com by the link on the right side of this page.
=>Open the solution in Visual Studio and build all.
=>We are using a Windows Form application an using the test.mosquitto.org to test our application.
=>We have added a reference to the library from M2Mqtt.Net project, the library can be found at:
{PROJECT_FOLDER}\\paho_mqtt_publisher_subscriber\bin\Debug\M2Mqtt.NetPROJECT_FOLDER is the root where you have installed the sample.
=>Also we need JSON parser which can be downloaded as Nuget packages. We are using Newtonsoft.Json for this.
The code snippet that connect and subscribe data from the broker.
private MqttClient client;
private string clientId;
private bool isRunning = false;
private object lockObject = new object();
private string BrokerAddress = "test.mosquitto.org";
private Thread workingThread;
public Form1()
{
    InitializeComponent();
    client = new MqttClient(BrokerAddress);
    // register a callback-function (we have to implement, see below) which is called by the library when a message was received
    client.MqttMsgPublishReceived += client_MqttMsgPublishReceived;
    // use a unique id as client id, each time we start the application
    clientId = Guid.NewGuid().ToString();
    client.Connect(clientId);
client_MqttMsgPublishReceived is call back function, this is called when data is received by the subscriber client. When data is received by this subscribing client, it is converted to the Sensor class (by JSON prser) and displayed on the UI.
 private void client_MqttMsgPublishReceived(object sender, uPLibrary.Networking.M2Mqtt.Messages.MqttMsgPublishEventArgs e)
{
	string ReceivedMessage = Encoding.UTF8.GetString(e.Message);
	MotorDataMeasurement motorMeasurementData = JsonConvert.DeserializeObject<MotorDataMeasurement>(ReceivedMessage);
MQTT C# sample example
Download the Windows sample:
Downloads Windows Publisher and subscriber, paho_mqtt_publisher_subscriber.zip
In the sample, we have a sensor that want to publish it’s value with some interval. This is fictitious case. We have a class for this sensor as shown in the following code snippet. It has an id, publishing time and the value at that time.
public class MotorDataMeasurement
{
	public int MotorID { get; set; }
	public String DatetimeStart { get; set; }
	public String DatetimeStop { get; set; }
	public double MaxSpeed { get; set; }
	public double RunTimeAtMaxSpeed { get; set; }
	public int NumberOfSpeedChanges { get; set; }
}
When we press on the publisher button then this application will start to publish data to the cloud and when we press the subscribe button it will start to subscribe from the cloud. When data is available then it will display it to the field.
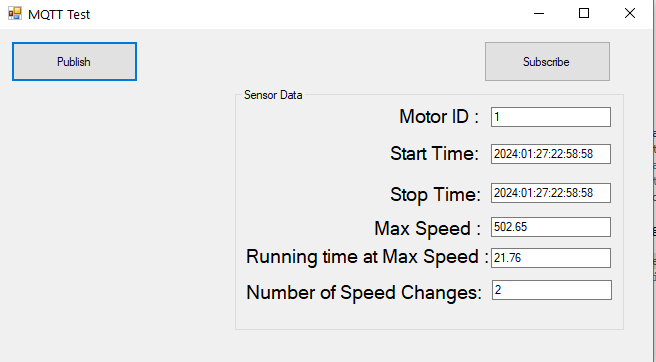
Figure 04: Windows Publisher and subscriber using C#
//Publish in each 2 seconds
Thread.Sleep(2000);
Random random = new Random();
MotorDataMeasurement motorMeasurementData = new MotorDataMeasurement();
motorMeasurementData.MotorID = rnd.Next(1, 10);
motorMeasurementData.DatetimeStart = DateTime.Now.ToString("yyyy:MM:dd:HH:mm:ss");
motorMeasurementData.DatetimeStop = DateTime.Now.ToString("yyyy:MM:dd:HH:mm:ss");
motorMeasurementData.MaxSpeed = Math.Round(500 + random.NextDouble() * 5, 2);
motorMeasurementData.RunTimeAtMaxSpeed = Math.Round(18 + random.NextDouble() * 5, 2);
motorMeasurementData.NumberOfSpeedChanges = rnd.Next(2, 5);
string json = JsonConvert.SerializeObject(motorMeasurementData);
client.Publish("yarddoor/motor", Encoding.UTF8.GetBytes(json), MqttMsgBase.QOS_LEVEL_AT_LEAST_ONCE, false);
How to Test the sample
=> We make sure that the broker is running in local machine at address (127.0.0.1 and port is 1883)
=> Press on the publish button in the windows application (publishing start, this is both publisher and subscriber)
=> Press on the subscribe button to subscribe the data (Now sensor data should be displayed in UI)
=> We can check also with the commercial MQTTX application (we make a connection by using Topic mytopic/test)
Use MQTTX Software
=> MQTTX is free publisher and subscriber which is very easy to use and can be downloaded from https://mqttx.app/
=> We need the connection info and topic info.
=> Following figure shows how to add connection info and how to add topic info
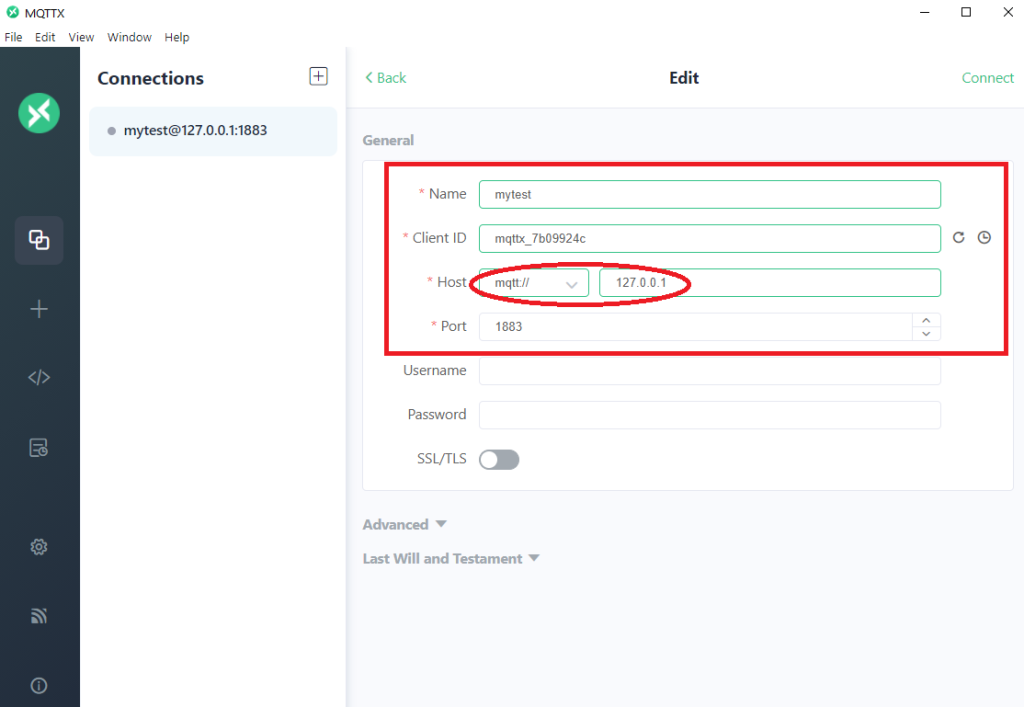
Figure 05: Configuring MQTTX as subscriber with Mosquitto broker (mqtt://127.0.0.1)
=> After adding the connection info, press on connect button
=> When the connected info is shown then press on + New Subscription and fill the topic and confirm it
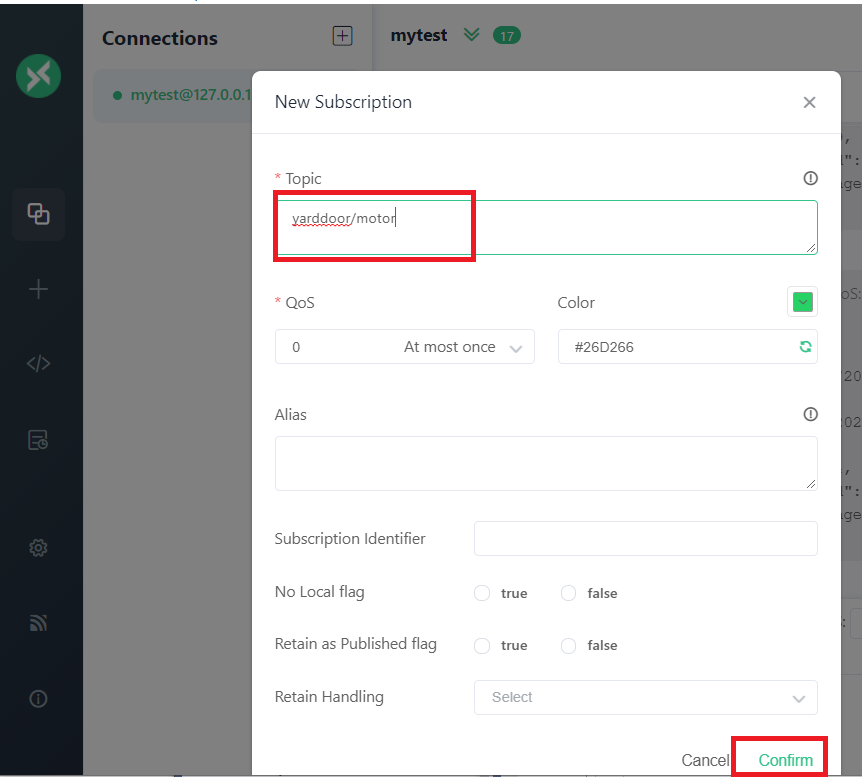
Figure 06: Inserting topics to the MQTTX software
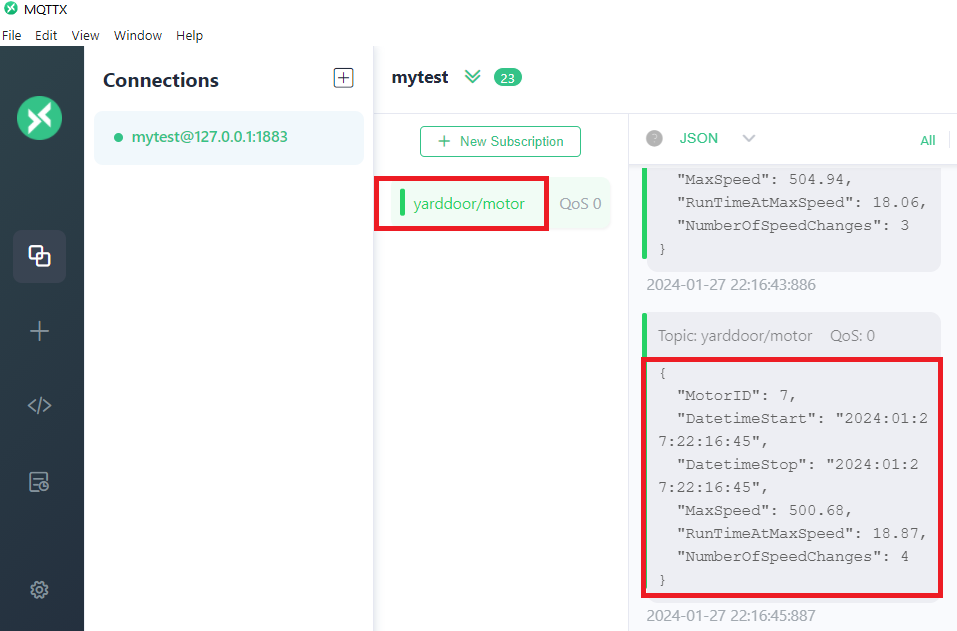
Figure 07: Received data is displayed in MQTTX
MQTT in Beckhoff PLC
Beckhoff has implemented the MQTT specification in the TF6701 IoT communication module. We can easily integrate their great work into our software without any pain. If you have read or tried our Windows C# client in the previous section you may have noticed that we are using test.mosquitto.org as a free broker for testing or the broker running in local machine (127.0.0.1).
We shall do the same for PLC structured text program. This PLC program will work as a publisher and subscriber and the data can be visible in TwinCAT HMI. Though we are using all in the same computer, these applications can be located on any computer anywhere in the world.
New architecture of the sample is shown in the following image. TwinCAT client (Beckhoff PLC) can publish message to the MQTT broker and Windows client (see the previous sample) can publish or subscribe the message. In addition we have added a HMI that can display the published/subscribed data to the UI as shown in the following image.
The following screenshot is showing the TwinCAT HMI, part of the PLC Program, and the Windows Client as well.
Download the sample from above link and load it in your visual studio project and see how it works in the real life.
How the sample works:
One of the main function block used in this sample is FB_IotMqttClient
The function block enables communication with an MQTT broker. A client function block is responsible for the connection to precisely one broker. The Execute() method of the function block must be called cyclically in order to ensure the background communication with this broker and facilitate receiving of messages. All connection parameters exist as input parameters and are evaluated when a connection is established.
=> Configure the client by filling the following field
    sClientId     : STRING(255);     // default is generated during initialization
    sHostName     : STRING(255) := '127.0.0.1'; // default is local host
    nHostPort     : UINT := 1883;    // default is 1883
    sTopicPrefix  : STRING(255);     // topic prefix for pub and sub of this client (handled internally)
    nKeepAlive    : UINT := 60;      // in seconds
sUserName : STRING(255); // optional parameter
sUserPassword : STRING(255); // optional parameter
fbJson.ResetDocument();
fbJsonDataType.AddJsonValueFromSymbol(fbJson, 'ST_Values', SIZEOF(stValues), ADR(stValues));
sJsonDocPublish := fbJson.GetDocument();
fbMqttClient.Publish(	sTopic:= sTopicPub, pPayload:= ADR(sJsonDocPublish), nPayloadSize:= LEN2(ADR(sJsonDocPublish)),  eQoS:= TcIotMqttQos.AtMostOnceDelivery, bRetain:= FALSE, bQueue:= FALSE );
=> If the document is too big we can use fbJson.CopyDocument(sTargetString, SIZEOF(sTargetString)); Where sTargetString can have any length.
The Publish method is the most important method for sending data to broker. All parameters are described below.
METHOD Publish : BOOL  //Publish returns TRUE if the call is successful
VAR_IN_OUT
    sTopic       : STRING; // topic string (UTF-8) with any length (attend that MQTT topics are case sensitive)
END_VAR
VAR_INPUT
    pPayload     : PVOID;
    nPayloadSize : UDINT;  //reduce the size to 1 so the 00 (null char) will not go to broker side
    eQoS         : TcIotMqttQos; // quality of service between the publishing client and the broker (0 to 2)
    bRetain      : BOOL; // if TRUE the broker stores the message in order to send it to new subscribers
    bQueue       : BOOL; // for future extension
END_VAR
Generate some random data as similar to the Windows platform. This time TwinCAT software generate the data.
	fbTimer(IN:=TRUE);
	IF fbTimer.Q THEN // publish new payload every second
		fbTimer(IN:=FALSE);
		fbGetSystemTime(timeLoDW=>fileTime.dwLowDateTime, timeHiDW=>fileTime.dwHighDateTime );
        putBufMessage := CONCAT('DT#', SYSTEMTIME_TO_STRING( FILETIME_TO_SYSTEMTIME( fileTime ) ));
		stValues.DatetimeStart := STRING_TO_DT( putBufMessage );
		stValues.MotorID := 1;
		stValues.DatetimeStop := STRING_TO_DT( putBufMessage ); // For time being same stop time
		stValues.MaxSpeed  := 500.89;
		stValues.NumberOfSpeedChanges   := 4;
		stValues.RunTimeAtMaxSpeed := 12.78;
		fbJson.ResetDocument();
		fbJsonDataType.AddJsonValueFromSymbol(fbJson, 'ST_Values', SIZEOF(stValues), ADR(stValues));
		sJsonDocPublish := fbJson.GetDocument();
		fbMqttClient.Publish(	sTopic:= sTopicSub, pPayload:= ADR(sJsonDocPublish), nPayloadSize:= LEN2(ADR(sJsonDocPublish)),  eQoS:= TcIotMqttQos.AtMostOnceDelivery, bRetain:= FALSE, bQueue:= FALSE );
		IF fbMqttClient.bError THEN
			hrErrorOccurred := fbMqttClient.hrErrorCode;
		END_IF
	END_IF
END_IF
The motor data has been declared as ST_Values as a structure in PLC program.
TYPE  ST_Values :
STRUCT
  	MotorID  : INT;
   	DatetimeStart : DATE_AND_TIME;
	DatetimeStop : DATE_AND_TIME;
	MaxSpeed  : REAL;
	RunTimeAtMaxSpeed  : REAL;
	NumberOfSpeedChanges  : INT;
END_STRUCT
END_TYPE
Testing PLC program
Again we can test the PLC program by using MQTTX as decribe in figure 5, 6 and 7
Download the ST version (TwinCAT)
Reporting:
References:
=> https://www.hemelix.com/automation/structured-text-mqtt-node-red-mssql/
=> https://mqttx.app/ (MQTTX mqtt test client)
=> https://www.hivemq.com/mqtt-essentials/
=> http://www.steves-internet-guide.com/mqtt-works/
=> https://infosys.beckhoff.com/english.php?content=../content/1033/tf6701_tc3_iot_communication_mqtt/3391835403.html&id=6531035858226877065
Download the sample from the link given above.
Next, let’s try to understand the PLC data type at https://www.hemelix.com/plc/twincat-opc-ua-server/
Ask questions related to Hemelix sample code and design at Google group https://groups.google.com/g/hemelix