In this article, we shall explain how to send email by using a Google SMTP server and using CSharp programming language. We shall follow another topic how to use JavaScript for sending email by using Elastic Mail. In both cases, we shall create a console application in C# and a simple HTML page (for sending mail by JavaScript). Later the same example, will be used to send mail from TwinCAT HMI.
SmtpClient class in .Net provides the necessary functions to send emails. It is one of the most popular methods for sending e-mails via .Net. It uses SMTP (Simple Mail Transfer Protocol). We can use a Google SMTP server for sending free mail.
Each day, we can send 500 emails.
Some background
Before doing anything we need to setup SMTP server for Gmail. In this excercise, we are using smtp.gmail.com. We can use our own mail server as well. If you don’t have own email server, Gmail is fine and rest are the same.
SMTP Port:
An SMTP port is a communication endpoint that handles the transfer of email data over SMTP (Simple Mail Transfer Protocol) as it moves through a network, from one server to another. Port 587 was established as a modern secure SMTP port for message delivery. It supports TLS natively and STARTTLS as well, allowing for the secure submission of mail over SMTP. Today, most modern email services, including email service providers and hosting providers, default to using SMTP port 587.
SMTP.GMAIL.COM setup:
We need to set up our Gmail as an application token.
Follow these steps as described at https://support.google.com/mail/answer/185833?hl=en#zippy=%2Cremove-app-passwords
To create an app password, you need 2-step Verification on your Google Account.
=> 1. Go to your Google Account, press on Manage your Google Account
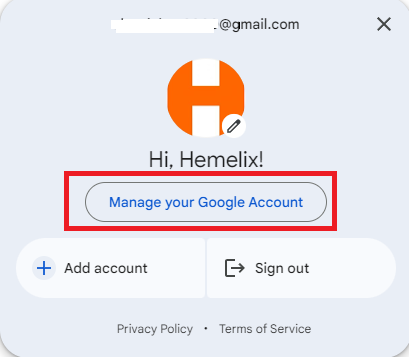
Figure 01: Manage Google Account
=> 2. Select Security.
=> 3. Under “How you sign in to Google,” select 2-Step Verification.
=> 4. At the bottom of the page, select App passwords.
=> 5. Enter a name that helps you remember where you’ll use the app password.
=> 6. Select Create.
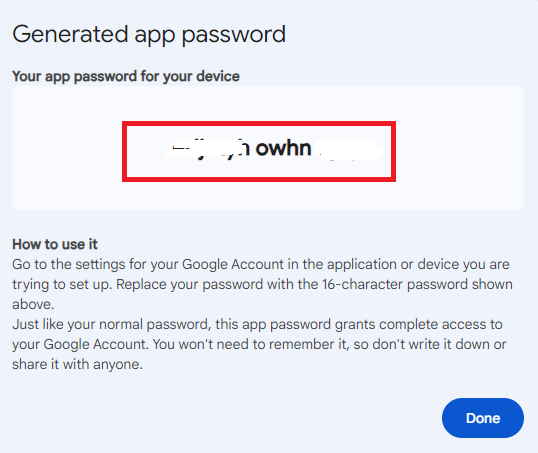
Figure 02: App key generation by using Gmail
=> 7. To enter the app password, follow the instructions on your screen. The app password is the 16-character code that is generated on your device.
=> 8. Copy the app password somewhere so we can use it in our application
=> 9. Select Done.
Sending mail by CSharp (console application)
Test with your Google account by creating a simple console application:
Now we have the 16 digit app keys. We shall use it for testing our app key if it can send email.
=> 1. Fire your Visual Studio and create a console application
=> 2. Select .NET Core (I am using 3.1)
=> 3. Copy paste the following code in Main function
=> 4. Remember to replace ‘aaaa bbbb cccc dddd’ with your actual one (as shown in previous image)
static void Main(string[] args)
{
    var smtpClient = new SmtpClient("smtp.gmail.com")
    {
        Port = 587,
        Credentials = new NetworkCredential("your_Gmail_id@gmail.com", "aaaa bbbb cccc dddd"), //fake app key
        EnableSsl = true,
    };
    smtpClient.Send("from_Gmail_id@gmail.com", "to_Gmail_id@gmail.com", "subject", "body");
}
=> 5. Include the following code on the top of file after using System
using System:Net;
using System.Net.Mail
=> 6. Compile and run the console program
=> 7. Now you should have a mail in your Google mailbox
Sending mail by JavaScript
JavaScript code cannot send emails by itself since server sockets are not supported. A server-side language that communicates with the SMTP server is needed for this. For the server script to send emails from the browser in response to queries, JavaScript is also used.
Step 1
Go to the ElasticeEmail (https://elasticemail.com/select-product)
Step 2
Create SMTP credentials
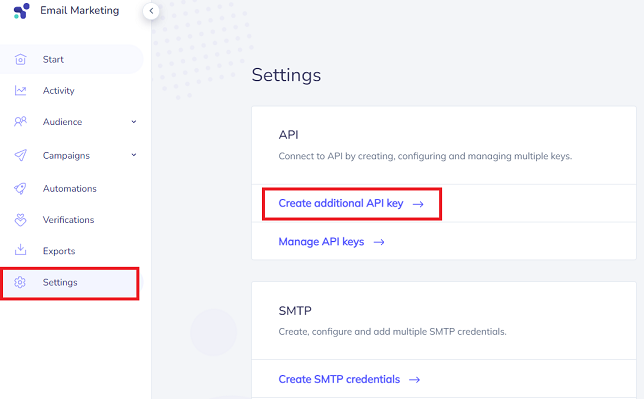
Figure 03: Opening Settings View at https://app.elasticemail.com/marketing/
Step 3
When we have pressed on Create button, it will provide a long password. Copy the password somewhere for future reference.
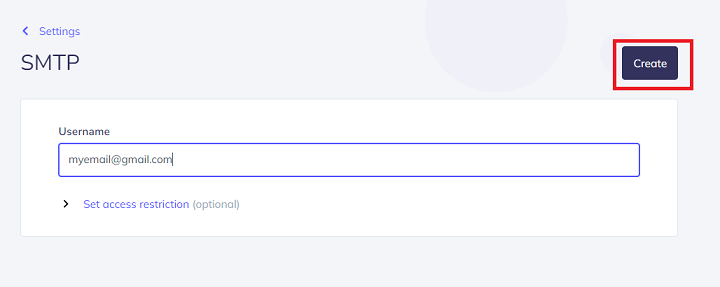
Figure 04: Creating credential for elastic email for sending email with JS
Step 4
Copy the following code and create a HTML file and save it.
<!DOCTYPE html>
<html>
<head>
    <title>Send Mail</title>
    <script src="https://smtpjs.com/v3/smtp.js">
    </script>
    <script type="text/javascript">
        function sendEmail() {
            Email.send({
                Host: "smtp.elasticemail.com",
                Username: "elasticemail.com user name",
                Password: "xxxxxxxxxxxx9A262E765CC8xxxxxxxxxxxx", //replace with real one
                To: 'receiver@yahoo.com',
                From: "sender@gmail.com",
                Port:'2525',
                Subject: "Sending Email using javascript",
                Body: "Well that was easy!!",
            })
                .then(function (message) {
                    alert("mail sent successfully")
                });
        }
    </script>
</head>
<body>
    <form method="post">
        <input type="button" value="Send Email"
            onclick="sendEmail()" />
    </form>
</body>
</html>
Step 5
Open the file in browser and click on Send Email
We should receive the email in receiver email
Integrating Email Sending by CSharp in TwinCAT HMI:
In the previous section, we sent an email by a console application using C# programming language. Now we are going to integrate that solution to TwinCAT HMI, so when some events occur then we can send an email from HMI to the operator.

Figure 05: Email sending User Interface by CSharp (also by JavaScript) in TwinCAT
Steps
Step 01:
=> Create an HMI by using Visual Studio, add few Textboxes and TextBlocks as shown in the previous screenshoot
=> Add a folder (name JavaScript) and add a code behind file with the following content on the top of the file as shown below (//Added code)
// Keep these lines for a best effort IntelliSense of Visual Studio 2017.
/// <reference path="./../../Packages/Beckhoff.TwinCAT.HMI.Framework.12.752.0/runtimes/native1.12-tchmi/TcHmi.d.ts" />
//Added code
function ReadPLCVariable(symbolParameter) {
    return new Promise((resolve, reject) => {
        var symbol = new TcHmi.Symbol(symbolParameter);
        symbol.readEx(function (data) {
            if (data.error === TcHmi.Errors.NONE) {
                resolve(data.value);
            } else {
                console.log(`Error in ReadPLCVariable, symbolParameter = ${symbolParameter}`);
                reject(data.error);
            }
        });
    });
}
function WritePLCVariable(symbolParameter, dataParameter) {
    return new Promise((resolve, reject) => {
        TcHmi.Symbol.writeEx(symbolParameter, dataParameter, function (data) {
            if (data.error === TcHmi.Errors.NONE) {
                resolve(data.error);
            } else {
                    console.log(`Error in WritePLCVariable, symbolParameter = ${symbolParameter}`);
                    reject(data.error);
            }
        });
    });
}
//Added code
Step 02:
=> Add the following JavaScript code to send the email information to CSharp extension module
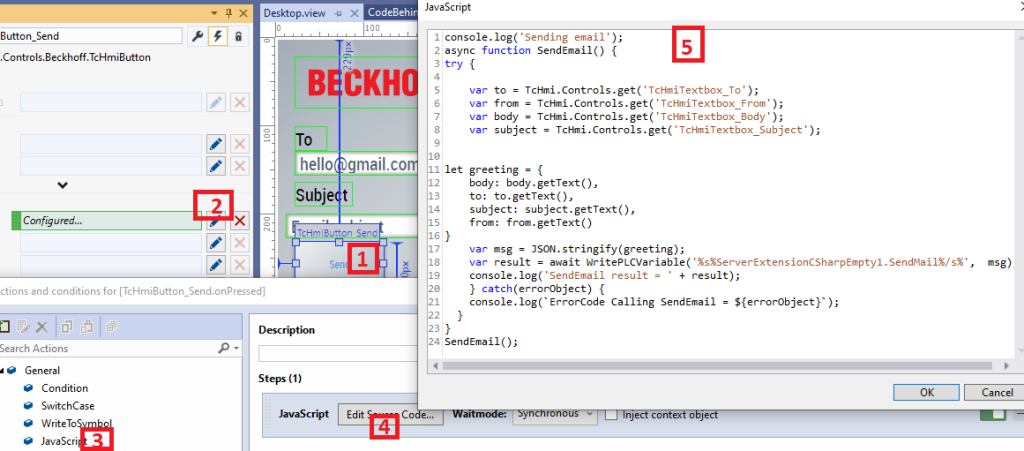
Figure 06: Email sending code to extension module
Step 03:
You can copy and paste the following code as shown in the previous screenshot. We are collecting all the fields to a JavaScript object greeting. The object is converted to a string before sending to the CSharp module.
console.log('Sending email');
async function SendEmail() {
try {
	var to = TcHmi.Controls.get('TcHmiTextbox_To');
	var from = TcHmi.Controls.get('TcHmiTextbox_From');
	var body = TcHmi.Controls.get('TcHmiTextbox_Body');
	var subject = TcHmi.Controls.get('TcHmiTextbox_Subject');
let greeting = {
    body: body.getText(),
    to: to.getText(),
    subject: subject.getText(),
    from: from.getText()
}
	var msg = JSON.stringify(greeting);
    var result = await WritePLCVariable('%s%ServerExtensionCSharpEmpty1.SendMail%/s%',  msg);
    console.log('SendEmail result = ' + result);
    } catch(errorObject) {
    console.log(`ErrorCode Calling SendEmail = ${errorObject}`);
  }
}
SendEmail();
Step 04:
Create a CSharp extension as described in the Extension module at https://www.hemelix.com/scada-hmi/twincat-hmi/twincat-hmi-server-extension/
We have two commands, ModuleInit (this has not been used here but in case, if we need to do some initialization, we can use it) and SendMail. The following code shows the C# code that actually sends mail to the SMTP mail server (please check the code by downloading the zip file).
case "SendMail":
if (command.IsSet == true && command.WriteValue != null)
{
try
{
EmailObject routes_list = JsonConvert.DeserializeObject<EmailObject>(command.WriteValue);
var smtpClient = new SmtpClient("smtp.gmail.com")
{
	Port = 587,
	Credentials = new NetworkCredential(routes_list.From, "aaaa bbbb cccc dddd"), //fake app key
	EnableSsl = true,
};
smtpClient.Send(routes_list.From, routes_list.To, routes_list.Subject, routes_list.Body);
command.WriteValue = 0;
command.ExtensionResult = ServerExtensionCSharpEmpty1ErrorValue.ServerExtensionCSharpEmpty1Success;
command.ResultString = "Not used command '" + command.Mapping + "' we can use it for init ";
}
catch (Exception) {
command.ExtensionResult = ServerExtensionCSharpEmpty1ErrorValue.ServerExtensionCSharpEmpty1Fail;
}
}
break;
Step 05:
Now run the HMI in live view, edit the address, and press the send button. We can check the email of the receiver if he has received it or not.
Note: the app key must taken from your Google account or we can use our own SMTP server.
Integrating Email Sending by JavaScript in TwinCAT HMI:
In the previous section, we used C# for sending mail, now we shall send emails by using JavaScript and Elastic email. Now we are going to integrate that solution to TwinCAT HMI, so when some events occur then we can send emails by using the same technique. We shall use the same user interface as shown in the CSharp case.
STEPS
=> Create an HMI as shown in the CSharp case
=> Drag and drop TcHmiHtmlHost control to the Desktop view
=> Create a folder named JavaScript in the Solution Explorer
=> Download smtp.js file from https://smtpjs.com/
=> Include smtp.js in the TcHmiHtmlHost as shown in the following code.
<div id="TcHmiHtmlHost" data-tchmi-type="TcHmi.Controls.System.TcHmiHtmlHost" data-tchmi-height="471" data-tchmi-height-unit="px" data-tchmi-left="20" data-tchmi-left-unit="px" data-tchmi-top="104" data-tchmi-top-unit="px" data-tchmi-width="749" data-tchmi-width-unit="px" data-tchmi-is-enabled="true">
    <script src="JavaScript/smtp.js"></script>
</div>
=> Configure the Send button according to the figure 06 and use the following code.
console.log('Sending email by JS');
var to = TcHmi.Controls.get('TcHmiTextbox_To');
 var from = TcHmi.Controls.get('TcHmiTextbox_From');
 var body = TcHmi.Controls.get('TcHmiTextbox_Body');
 var subject = TcHmi.Controls.get('TcHmiTextbox_Subject');
function sendEmail() {
            Email.send({
    Host : "smtp.elasticemail.com",
    Username : "elastic_mail_user_id",
    Password : "your_elastic_password",
    To : to.getText(),
    From : from.getText(),
    Subject : subject.getText(),
    Body : body.getText()
            })
                .then(function (message) {
                    //alert("mail sent successfully")
                    console.log('mail sent successfully');
                });
        }
sendEmail();
=> Now run the live view fill in the message and press the send button
The receiver should receive a message, it may go to the spam folder.
If you like this why not share it? Thank you for reading this article!
YouTube Video (coming soon...)
Downloads
Download the zip file and test it in your TwinCAT HMI environment
=> Send Mail by CSharp and Google Account (Download the zip file)
=> Send Mail by JavaScript and Elastic Mail (Download the zip file)